Solly Schoultz, from Cape Town, South Africa, asks a question on sharpening. Solly says he's having trouble keeping his tools sharp. He would like general sharpening information and advice about the various angles that need to be considered. Solly adds, “I am currently sharpening on an oilstone and polishing on 1200-grit water paper followed by honing on leather.”
1. What causes tools to dull quickly?
Solly, the method you are using the oilstone, 1200-grit water paper (Emery), and honing on leather - should be fine for all your sharpening needs. The trouble keeping your tools sharp could include several reasons.
One reason may be your angle is too acute (too narrow a point). That makes it too weak; it easily chips the keen cutting edge. If this is the problem, you can correct it by increasing the angle to make a stronger cutting edge.
Another reason could be the way you are using the tools, such as prying and breaking the cutting edge. Tools are designed to be very strong in the downward direction, but side torque from prying can easily chip the fine cutting edge. If you are prying with your tools, that could be the reason you are not able to keep them sharp.
Another reason could be that the wood has abrasive qualities, causing the tools to dull or chip. Some trees in certain growing conditions suck up sand with the sap. This dulls your tools quickly. Sanding the wood before carving can leave sand embedded in the wood, causing the tools to dull. Some hard or resinous woods, like Osage Orange, are abrasive and dull the tools quicker than other woods.
There may be other reasons your tools dull prematurely, such as a tool gets magnetized and metal shavings stick to the cutting edge and quickly dull it. Abrasive dust in your shop, like the dust from stone carving, will quickly dull your tools. Problems may result from the way you store and handle your tools. Be sure not to allow other tools or abrasives to come in contact with the cutting edge.
Another reason could be that you touch your tools without wiping your hand oil off before storing them. Hand oil can be very corrosive and can quickly etch that keen cutting edge away.
2. Are there standard angles or profiles for tools?
Most beginner carvers find sharpening confusing and difficult to learn because there are no industry standards. Sharpening angles and profiles are somewhat confusing, especially if the methods taught produce results that do not suit your style of carving. Most carvers' tools are unique depending on carvers' personal preferences, what material they are carving, and their carving technique. There are a few rules of thumb (like 19 degrees for chisels and 10 degrees for knives, sharp corners, flat bevel and perpendicular on the end), but these are not written in stone. When I'm teaching sharpening to a beginner carver, I use the following rule of thumb because it works best for carving soft wood.
You should experiment with angles and profiles to get the most from your tools. Study your preferred type of carving. If you are carving mostly softwoods, perhaps you require a lower angle than someone who carves primarily hardwoods. Secondary bevel, rounded bevel, or straight bevel relates more to how you carve and the level of control you need when raising the tool out of the wood. A rounded or secondary bevel moves the fulcrum of the lever very close to the cutting edge. This gives a finer depth control than a straight bevel where the fulcrum is back on the heel of the tool. However, a straight bevel gives a better reference surface when using the tools for planing the wood. If you carve more with a gouging technique, a secondary or rounded bevel might work better for you. If you carve more by planing the wood, a straight bevel might be best for you.
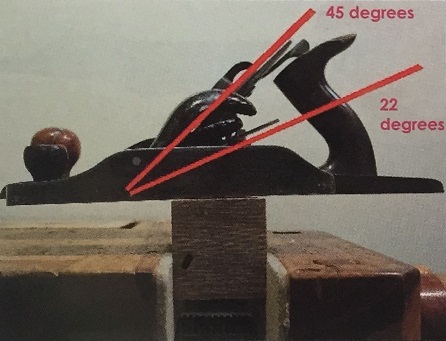
The photo above compares two planes. One is a stan- dard block plane with a blade angle of 45 degrees and the other is an end-grain plane with a blade angle of 22 degrees. We can compare the two angles.
The reason for the different angles is that they are designed for different types of cutting. The block plane is designed to plane with the grain. The end-grain plane is designed at a lower angle, to better slice the end grain.
The 45-degree block plane works well with the grain but it is too steep of an angle to plane end grain. The end-grain plane is better for slicing the end grain because it is a narrower wedge. This offers less resistance and less stress on the end-grain fibers; it easily slices rather than tears. However, the trade off for this lower angle is a weaker cutting edge that dulls quicker.
This large block plane is my favorite for general planing operations in my shop. Nothing compares to the sound and feel of a well-tuned plane dispensing curly chips and the glass smooth surface it leaves behind.
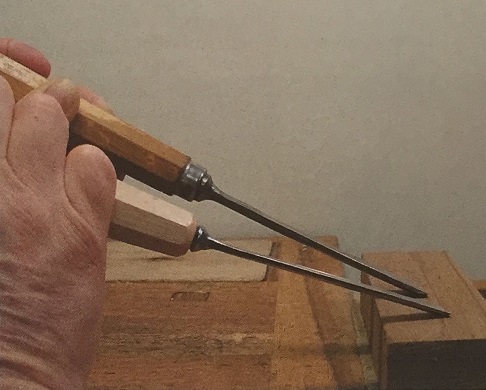
The above photo compares the angles of two gouges. The lower angle gouge in the front is a new gouge with the factory angle at about 22 degrees. My well-used gouge behind it is sharpened at the higher angle of 28 degrees. To determine what angle your tool is sharpened at, lower it so it is resting on its heel. Raise the tool gradually while moving it back and forth to test the exact angle where it begins cutting. The angle where it begins cutting is the angle at which it was sharpened.
I hit the tool hard when I carve hardwoods, so I need the higher angle to make the cutting edge stronger and more durable. Most new tools are rough ground or finish honed with an angle of 19 to 23 degrees, with sharp corners and straight bevels. This seems to be how the majority of carvers use their tools.
Note: Most tools do not come presharpened. Additionally, most V-tools come with a steep heel that needs to be ground.
Many carvers who carve mostly hardwood prefer to hold a sharpening angle from 24 to 29 degrees. This cutting edge is stronger so as to hold up better against the hard- wood. Many carvers (like me) add a secondary angle or rounded bevel. This allows for better scooping control because the secondary bevel acts as the fulcrum of the lever. This allows the cutting edge to rise with a slight lowering of the handle. I also prefer a slight rounding of the corners.
3. Custom profiles for specialized applications
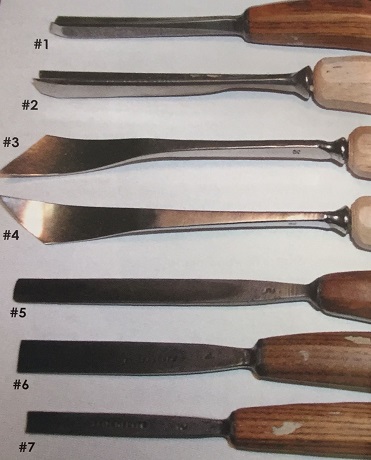
Most carvers agree the standard profile is perpendicular on the end. However, it is quite common to see other profiles like those shown in the photo on the next page.
Tool #1 is a 60-degree V-tool with the wings swept back. These swept-back wings are better for applications such as making stop-cuts into undercut areas.
Tool #2 has a more conventional flat perpendicular end.
Tools #3 and #4 are custom ground right and left hand skews. They are short bent, have a number 3 fishtail sweep, and are 24mm wide. I learned the benefits of these two tools in Ivan Whillock's class when carving the undersides of the chin down to the neck on a bust of my daughter.
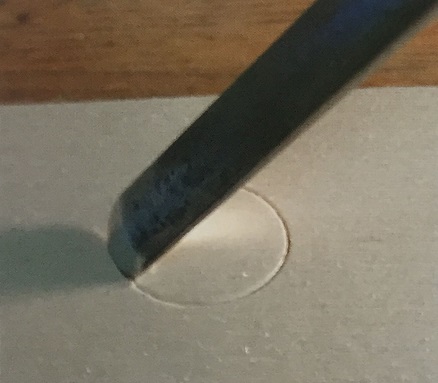
Tool #5 is a #5 sweep, and the end profile matches the #5 sweep. This custom profile works better when plunge-cutting a circular stop cut as shown below.
Tool #6 has a slight dome shape to match its #3 sweep for the same application.
Tool #7 is a #3 sweep with the more conventional perpendicular profile. The dome-shaped end on tool number 5 makes it easier to rock so you can walk it in a perfect circle as shown in the photo below. You use the previous cut as a guide and put about half of the tool into the previous cut.
4. Other specialized profiles
Carving tools are almost always sharpened from the outside; the inside edge is usually the cutting edge. However, there are times when special applications call for a slight bevel on the inside of the tool. One reason for this is if someone who prefers the lower angle of 19 degrees doesn't want to raise that angle but wants to strengthen the edge for hardwoods.
5. Using an oilstone
Oilstones are perhaps the most widely used tools for sharpening. One of the common mistakes made with these is using lubricating oil instead of honing oil.
The reason for using oil on the surface of the stone is to keep it from loading up with metal. When the stone loads up. 1 becomes shiny and will no longer remove metal. Lubricating oil is designed to put a coating over the surface to keep friction low. You must work through this coating in order to get your tools sharp. Honing oil is designed to keep the stone from loading up, but it does not leave a coating that interferes with metal removal, so it removes the metal more quickly with less work.
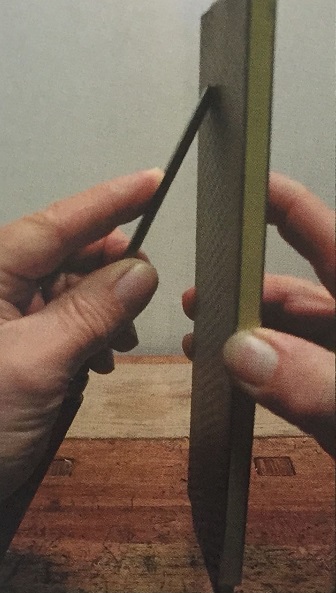
6. Tip for maintaining the angle
A technique for maintaining an accurate angle is to hold the tool upright so you can easily see the angle. Align the tool angle with the stone. Rest the handle of the tool on the bench and tip the tool so its angle is vertical. Lock your wrist to maintain that angle. Move the stone against the stationary tool in any direction, sharpening the tool. The advantage to this method is the ability to see the entire bevel making contact with the stone. I found this to be an excellent method for maintaining the same angle every time.
7. Three steps for sharpening
Step 1. Rough stock removal, such as remove nicks, change the bevel, and reshape the profile with a coarse stone or sandpaper (100 to 300 grit) or grinding wheels (80 to 120 grit). When grinding, it doesn't make any difference in which direction the material is removed. You may cut toward or away from the cutting edge or even sideways because you get the same resultant burr. Once you've raised a burr across the entire surface, it is as sharp as it will get.
Step 2. Use a medium/fine stone or sandpaper (400 to 1000 grit) to smooth the deep scratches from step 1. Any medium or fine stone will work. As in step 1, the direction of cut makes no difference.
Step 3. Buff or polish the microscopic cutting edge on a strop or buffing wheel using a buffing compound (about 1/2-micron grit). The buffing compound is essential for achieving that razor-sharp edge needed for carving. Buff both sides of the cutting edge, removing the burr and polishing the edge.
8. Strop material
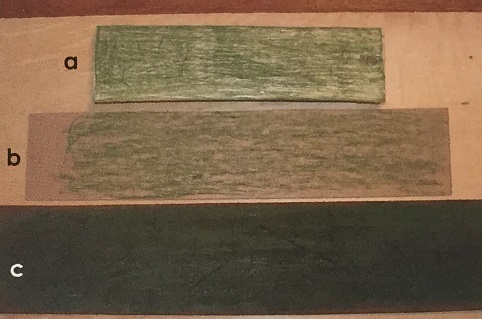
The most common material for a strop is leather, but the buffing compound can be applied to other materials, such as cardboard, paper, canvas, felt, or wood. The photo above shows a basswood strop (a), cardboard strop (b) (from the back of a tablet) and a leather strop (c) (the one I've been using for about 30 years).
Soft leather will strop the edge more quickly because it maintains 100% contact across the tool. It has the disadvantage of rolling over corners and rounding bevels because of its softness. Other soft strop materials like felt do the same rounding.
The harder strops, like wood and hard paper buffing wheels, will not roll the corners or round the tip of the knife. It will take longer to polish the edge because the two hard surfaces make less surface contact.
If you are having difficulty sharpening, I suggest you practice. The time you spend practicing sharpening will pay great dividends in time saved and the quality of your work. Try to keep the angle as low as possible to plane the wood with the least resistance but high enough to maintain the edge strength.
Experiment with profiles that might better fit your applications. I encourage you to consider reshaping a tool if you feel it will improve your quality. Experimenting with angles and profiles will give you a better understanding of your tools and make you a better carver.
9. About the author
 Our "Ask Joe" is Joe Dillett. For the past 35 years, he has owned a full-time carving business, The Carving Shop, in Somonauk, Illinois. Joe maintains a four to six year backlog of carving commissions. Sixty percent of his commission work is carving family histories into fireplace mantles. He also creates architectural carvings such as altars and statues for churches, doors, newel posts, and corbels and decorative panels for homes and businesses. In addition, he carves commercial patterns for castings and plastic molding.
Besides carving, Joe has been teaching carving for more than 25 years. He currently has six students in a four year non-accredited woodcarving apprenticeship program. He promotes self-employment in the arts I by lecturing at colleges and universities on how to establish businesses in the arts.
Joe serves as president of The Art Attack School of Fine Art, a volunteer position. He hosts the Annual Gathering of Woodcarvers (GOW) at The Carving Shop. The next GOW is September 19-24, 2005, so mark your calendar for a week of fun and woodcarving seminars. He's a member of the National Wood Carvers Association and serves as vice president for the Kishwaukee Woodcarvers Club.
