Woodcarvers love to create; we carve to give our ideas physical form. Along with this love to create comes a need to follow our own path. Unfortunately, the available tools often don't fit our needs, hands, or budget. While there are high-quality custom toolmakers out there, the tools can be expensive. Wouldn't it be great to have a quality tool that fits your hand and carving needs without breaking the bank?
Forging hand-carving tools can be done by anyone with a little practice and time. You don't even need a full blacksmith shop, although it does help. As you begin forging your own tools, you will want to read a bit on blacksmithing and how to temper different steels. There are many well-written books that go more in depth than I am able to in this article, as well as a growing body of information on the Internet, but the following will get you carving with your own tools in no time. It is a good idea to practice the steps on chilled modeling clay, as it moves like hot metal and you can re-form it into a rod to start over if you make a mistake.
Before we dive into the how-to, here are the basic forging techniques that you will be using as you forge your tools.
Basic Forging Techniques
Drawing and Tapering: Drawing is simply using a hammer and anvil to lengthen the metal by stretching it lengthwise. Tapering is drawing the metal into a point. To taper, hold the metal at an angle to the anvil and match that angle with your hammer. If you only taper two oppo-site sides (e.g., the front and back), you create a chisel; point all four sides to create a taper.
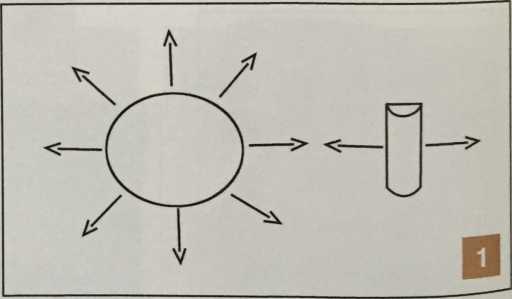
Fullering: To efficiently forge anything, you will need to isolate and move metal in one direction only; this is known as fullering. Because metal moves primarily in the direction perpendicular to the edge of what hits it, we can take advantage of this by using tools that have edges in only one direction.
A fuller has a rounded, blunt nose (of varying diameters) and can be as simple as a round rod to as complex as a handled fuller that is struck with a hammer. To clarify how metal moves, see Fig. 1 ; or simply drop a rock into a puddle and then hit it with a baseball bat and watch how the water splashes.
While you can purchase or make fullers, don’t forget that your hammer and anvil edges make very useful fullers and improve the efficiency of your drawing and tapering.
All the tools that I made for this article were made with only a hammer, an anvil, and a vise.
Upsetting: Upsetting is making the metal shorter and fatter by hitting the end of the metal back into itself (upsetting is the opposite of drawing). While upsetting, you will need to straighten any bends as soon as they occur—remember that you are pushing the metal back into itself. Heavier hammers and high heat are required when setting the shoulders on your chisel/gouge so that your hammer blows penetrate deep enough and you don’t create a rivet out of the end that you are hammering on.
Half-Faced Hammer Blow: A half-faced hammer blow is exactly as it sounds—you hit the metal so that the hammer face is half off the edge of the anvil; in essence, you’re using your anvil edge as a bottom fuller. With the rod overhanging the anvil, hit it with your hammer (which is also half off the anvil) so that you can create a taper on the inside of a bar rather than the tip (as shown in Fig. 2).
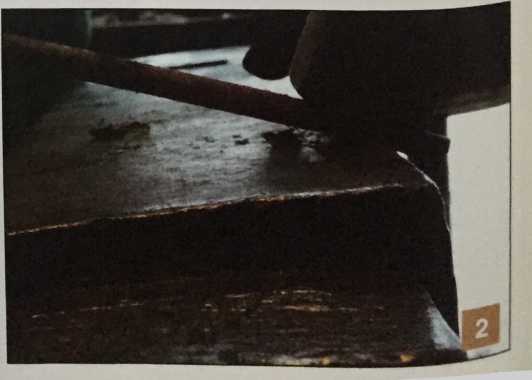
By using half-faced hammer blows on both the near side and the far side of the anvil, you can isolate a section of the rod to create the tang on the carving knife without cutting the blade from the rod, and then forge the tang while using tongs in the same manner as I did when forging a chisel.
What You Need
(Note: This is where a little research into blacksmithing will help you immensely—with your forge choice in particular.)
- Hammer: A cross-peen or ball-peen between 2-3 pounds.
- Anvil: The anvil must be mounted on a sturdy stand to prevent it from tipping or bouncing around. The hammer surface should be even with your knuckles to prevent back and shoulder strain. Your anvil can be as simple as a 75# piece of square steel or as fancy as a traditional London pattern anvil.
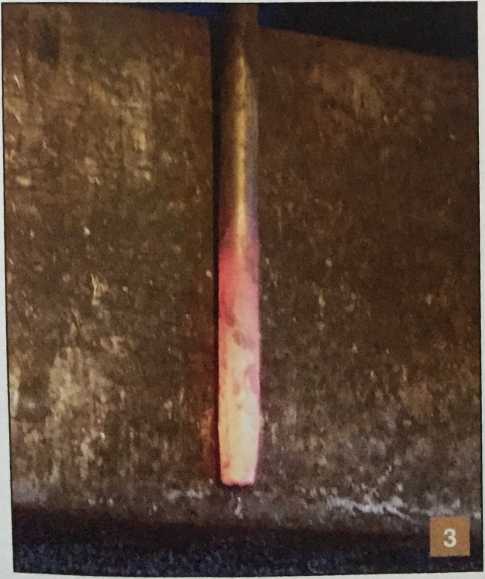
- Forge: A forge consists of a place to hold the fire and an air-supply; the type of fuel you need depends on the type of forge you use. For small hand tools (such as these) and if your space is limited, you can hollow out a large firebrick and use a torch that is fueled by stabilized methyl acetylene-propadiene (MAPP) gas. The fire needs to get the metal hot enough to be malleable. Fig. 3 shows the metal at a proper working temperature.
- Vise: A traditional post vise is best for upsetting because the post, rather than the jaw, takes the strain of hammering, but you can use a heavy machinist vise for upsetting lighter
tools like these. You will only need this for making shoulders on your chisels/gouges and holding your tool for filing once it is forged. If you don’t have a vise, don't worry because you can still make hand chisels/gouges without the shoulders and use clamps to hold the tools for filing.
- High-Carbon Steel (3/8" round or square): The tines from old hay rakes, chisels, punches, or springs work well if you don't want to buy new steel. If you do purchase new steel, 1095 and 0-1 is fairly common and forgiving for new blacksmiths. You can use smaller- or larger-diameter steel, depending on what size carving tools you wish to make.
- Files or Grinder: Use to clean up the blades for sharpening.
- Magnet: This is used for checking proper heat-treating.
- Tongs: You can make them yourself or a pair of long-handled pliers will work in a pinch.
- Fullers (These are optional, depending on your hammer control.): If you work by yourself, a simple set of fullers can be made by bending a rod around a pipe so that the arms are parallel and the ends are folded back on themselves to provide a stronger hammering surface.
- Hardwood: Use for handles of your choice.
Making Push Chisels and Gouges
Create the tang for the handle: Start by tapering the end of the rod into a long point. Do this on the side of the anvil farthest away from you to prevent damaging the anvil face with your hammer. Hold the piece of metal at a slight angle and match that angle with the hammer face (see Fig. 4). Rotate the rod 90 degrees between hammer blows so that the tang becomes a square shape to prevent twisting in the handle. To start the shoulders where the tang meets the blade, you can either increase the angle of your hammer and anvil or use a fuller tool to create the
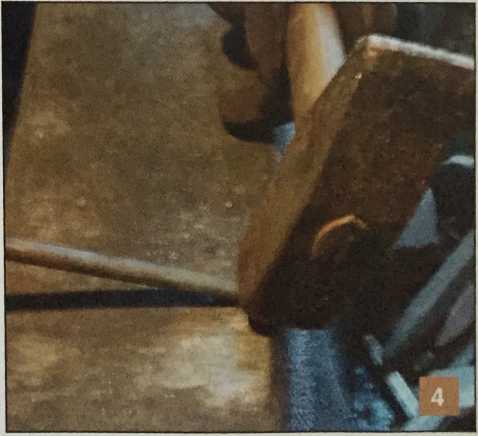
divots on all four sides of the rod. Fig. 5 shows the tang wilh the divots for the shoulders started by using a hammer and an anvil.
Setting the shoulders: The next step Is to square the transition from the tang and increase the width of the shoulders (also known as upsetting). This is important to prevent the chisel from wedging and splitting the handle with heavy use. Calculate the approximate length that you will need for the chisel and cut it off. The length of the metal that you need depends on how much metal is needed for the angle and the height of the sides. For these chisels, the length you gain from creating a neck equals the length you lose to the shoulders, so you can cut the rod at the same length as the finished product. Fig. 6 shows cutting the metal on a hardy in the anvil. You could also use a hand chisel, a hacksaw, or an abrasive chop saw. To keep the metal from bending while you upset it in your vise, make sure that it is a square cut or centered (as in Fig. 6). Place your hot metal perpendicular in the vise so that the shoulders catch on the top of the vise jaws (Fig. 7). It is important that the rod is perpendicular and the cut end is parallel to the jaws of the vise; otherwise, your rod will just fold over. Hammer straight down, straightening, rotating, and reheating as needed. This step can take some time because you will have to straighten the metal often—you will soon find out why it's called upsetting—but is only skipped at the risk of splitting your handle if you plan on using it with a mallet.


Create the neck and chisel end: On the close side of the anvil, reverse the hammer and metal angles that you used earlier (Fig. 8), or using a fuller tool, create divots slightly above the shoulders of the tang. Flatten the chisel (Fig. 9) and continue forming the neck by tapering it on the close
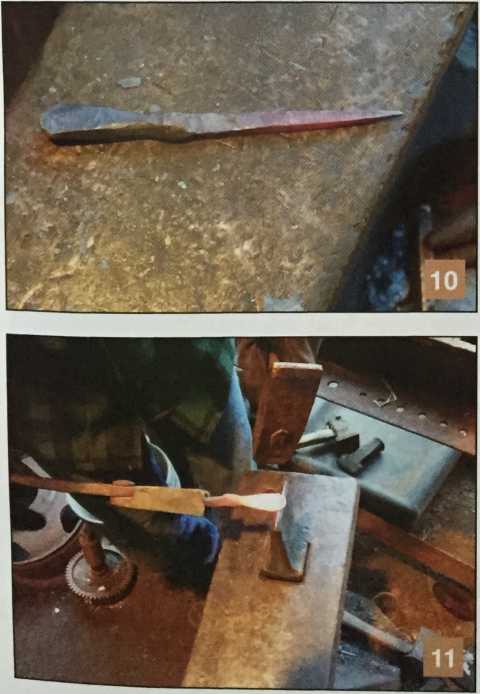
side of the anvil until it ends up looking like Fig. 10. Chamfer the corners of the chisel body by rotating the chisel from side to side. The edges need to be in line, perpendicular to the anvil face, to prevent twisting the chisel. Cut the end square (Fig. IT) and you have a chisel blank. If you want a chisel, not a gouge, skip to the heat-treating section.
Form the gouge: All the steps are the same for a chisel (flat) and a gouge (curved) except this one. Simply put a bend in the chisel using the cross-peen of your hammer, and a V- or U-shaped depression. In this step (see Fig. 12) I am using a London pattern anvil, but you can improvise— just look around your shop for a U- or V-shaped depression. Touch up the gouge and make sure that the curve is symmetrical by using the edge of the anvil or a block of steel in the vise with the edges rounded to the proper curvature (Fig. 13). Now skip to the heat-treating section.
Forging Carving Knives
Create the blade: Start by tapering the bar as you did for the chisel tang, only this time it will become the point of the knife. Determine the amount of blade that you want and start the transition to the tang over the far side of the anvil (Fig. 14). Flatten the blade as you fine-tune the profile—just don't thin it too much before you correct the curve of the blade or else it will simply fold on you. If that
happens, simply flatten the blade again and hot-file the profile.
Forge the tang: After fiddling around and trying to hold such a small blade in a pair of tongs to forge the tang. I've found it easier to forge the tang on the rod by alternating between the near and far sides of the anvil. It's tough for people to picture, but you work two adjacent sides of the rod on the far side of the anvil and the other two adjacent
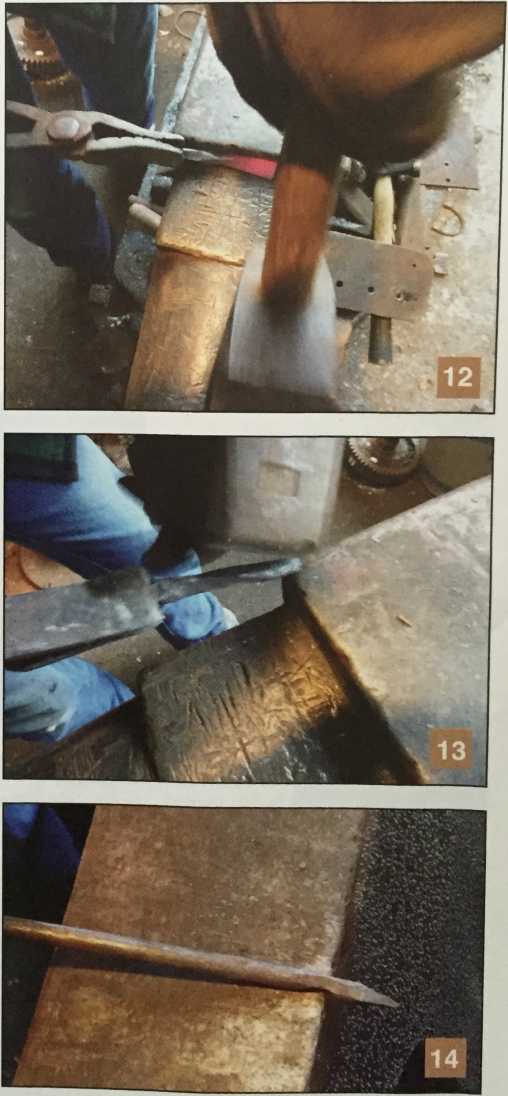
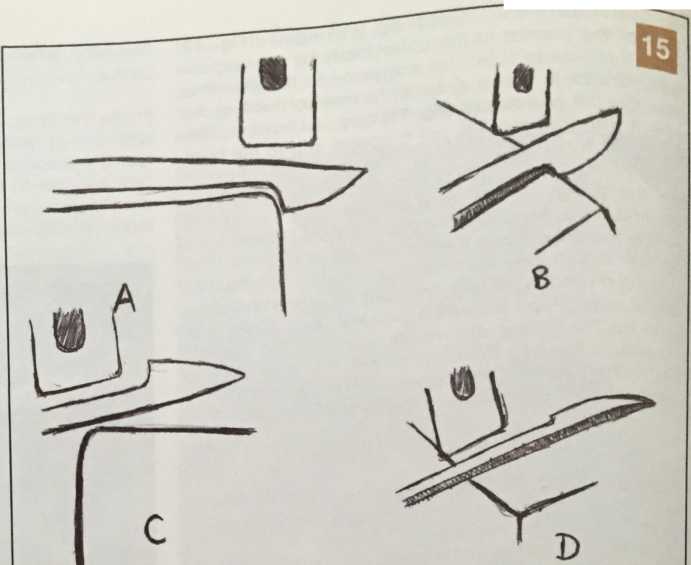
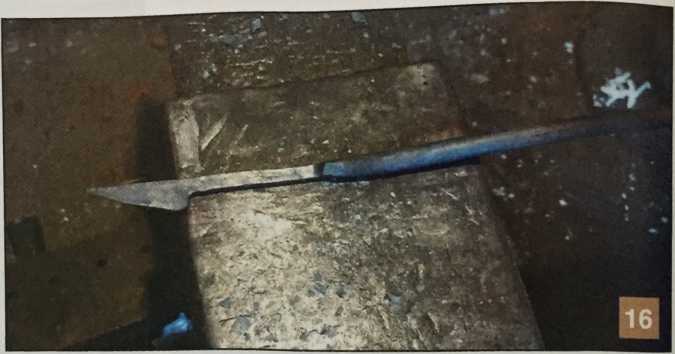
sides of the rod on the near side. So, on the far side of the anvil, the blade and a 90-degree adjacent side are hung over the edge to protect the blade. On the near side of the anvil, where you want the tang to end, the back of the blade and the last side are against the anvil (Fig. 15). You will need to start with steeper angles and lower them as the metal that you isolated for the tang becomes longer and thinner. Once you have the tang tapered into a point and it looks like a knife without a handle (Fig. u), cut it off the rod.
Heat-Treating
Once you have forged the blades and before hardening the steel, heat the tang until it burns and place it into an undersized hole drilled into your handle blank. When you do this properly, the wood will become greasy and the tang will slowly slip into the hole. It can take a couple of heats, but it is important that the tang does not get too hot (thus burning too much wood). Cool off the wood in water to stop the wood from smoldering. This will give it a tight, twist-free fit.
Rough-grind or file the edge and clean up the gouge: Metal is always easier to file before it hardens. Tip: Use an old rasp while the blank is still cherry-red hot. Hot-rasping can remove metal faster than a good grinder—use an old file, as the heat can ruin the temper on the file, making it too soft for other uses. File off all sharp edges and clean up the blade; eliminate any roughness that would affect how smoothly your tool cuts. Leave approximately 1/32' of the edge flat to prevent cracking during heat-treating.
Normalize the steel: By this point, you should have what looks like a dull chisel, gouge, or knife. During forging, all the hammering, heating, and cooling create stresses between the iron molecules. To remove any tension in the metal that could cause cracks during hardening, heat it uniformly until a magnet doesn't stick to it. Let it cool slowly by the fire. Once it is cool, using a cold chisel, cut barbs into the tang to help hold the blade in your handle.
Hardening: After the gouge/chisel has cooled, reheat it until a magnet doesn't stick. This time cool it quickly
and fully in a metal bucket full of vegetable oil or water. (Caution': Only use vegetable oil in a metal spill-proof container with a lid and have some dirt handy to smother any spills that may very likely start a fire.) Test the hardness by running a file over the edge. If it is properly hardened, the file should skate over it without catching. Restart the heat-treating if your file catches, using water as a quenchant if you used oil the first time.
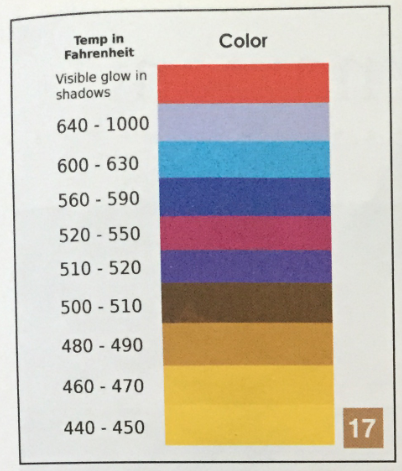
Tempering: Immediately after hardening, polish the blade of the chisel to shiny metal and watch the change in oxidation colors. I say immediately because hardening creates immense tension in the steel, making it brittle enough to break on its own if left too long. Reheat from the tang until the edge of the blade turns straw yellow and then quench in water.
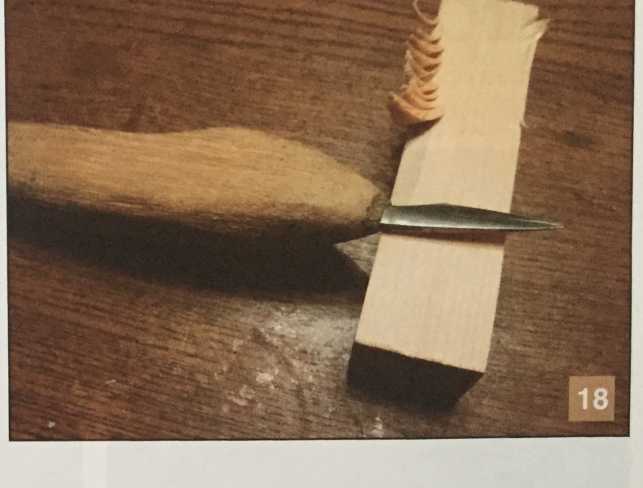
Finish sharpening and test: Unfortunately, until you get a feel for the metal that cooled, reheat it until a magnet you are working with, you may need to heat-treat and retest your chisel. Once doesn t stick. This time, cool it quickly you sharpen your chisel, test it on a piece of hardwood. If the edge chips, your temper was too hard and you need to heat it more; if it dulls quickly, your temper was too soft because it got too hot. (Refer to the temper color chart in Fig. 17.) Once you are happy with your temper, add a handle of your choice to the tang and begin carving (Fig. 18)
Temp In Fahrenheit
Color
Tips
- The great thing about steel is that we can work within a range of colors. For higher-carbon steel used for carving tools, the working temperature is between a bright orange and yellow in dim light. Any forging outside these colors weakens the steel.
- Use a hammer that you can properly control and safely lift—it’s more efficient to have good control and maximize your number of swings per heat.
- Round your hammer and anvil edges slightly for a smoother finish and to prevent weak spots (cold-shuts).
- When estimating the amount of metal that you will need for different parts, remember that the volume of metal doesn't change. For quick approximations: The length of a starting rod required for the taper is approximately one-third of the finished taper length. For chisel points without any narrowing, you need to start with one-half the length of the finished chisel.
Safety
- The most dangerous color of metal is black—it can look cool but be up to 1000°F.
- Wear safety goggles—sparks and flying metal are real dangers.
- Only wear nonflammable clothing and closed-toe boots.
- Leather gloves can be dangerous—only wear one on your tong hand that you can easily shake off. While burns can and do occur on bare hands, gloves tend to give a false sense of security and to shrink when hot, increasing the likelihood of a serious burn. Wearing a glove on your hammer hand requires a tighter grip, which increases your risk of developing tendonitis.
- Be prepared for fires. Always have a fire extinguisher (that is rated for oil), water, and dry dirt handy to smother any fires.
- Only blacksmith where there is adequate ventilation and carbon monoxide detectors.
