Donna founded the 'World Wide Wood Working Women' group for all women interested in improving their skills. They meet monthly at the Austin Woodcraft store to share their accomplishments and to learn more about wood working from local experts.
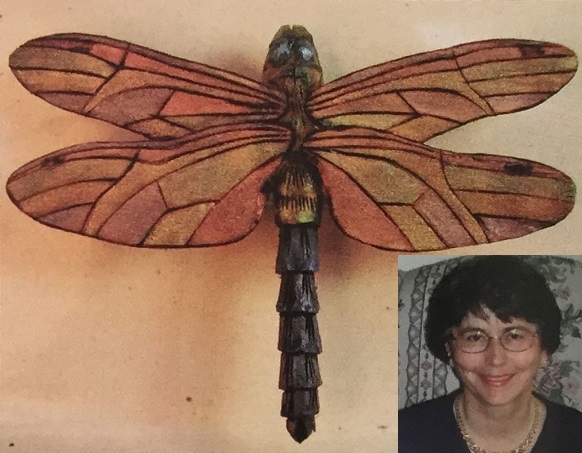
ABOUT DONNA LACHANCE MENKE
Donna has been involved with promoting woodcarving since she became a member of the 'Central Texas Woodcarvers Association' in 1995. She was secretary/newsletter editor of this club in 1996 and President in 1997. She is also a member of the 'Texas Woodcarvers Guild' and has taken classes at their bi-annual meetings since she started to carve. She has taught classes at these get-togethers since 1996. She has also taught carving classes for many other clubs in Texas.
Donna is hard at work writing a book about band saw boxes. Look for it in about two years!
Supplies
- Sharp bench knife
- #9 or # 11 1 /8" gouge
- #3 1" or 3/4" gouge
- Basswood: 1 /8" thick for the wings, 1 /4" thick for the body
- 3/4" pin back*
- Acrylic Paints: Black, Cobalt Blue, Green Gold/Sap Green, White, and Iridescent Gold, Red, Green, and Blue
- #5 round pointed synthetic brush
- Yellow glue
- Small clamp
- Wood burner with skew tip and writing tip
- 5-minute Epoxy
- Cyanoacrylic glue (thin super glue)
*Dragonfly could also be used as magnet or stuck to the wall with double-sided tape. My dentist has some of them stuck to his ceiling over the patient’s chair so his patients have something interesting to look at.

In the very first issue of Carving Magazine, the article on the swallowtail butterfly pin mentioned that my first insect carving attempt was the dragonfly pin. Since then, many carvers have asked me for instructions on this project. It will be a pleasure to oblige. Dragonflies are definitely my favorite item to carve, and my most rewarding class to teach. The process is long and not particularly easy; but in spite of many classes over many years, there has never been an instance where someone ‘failed’ the class.
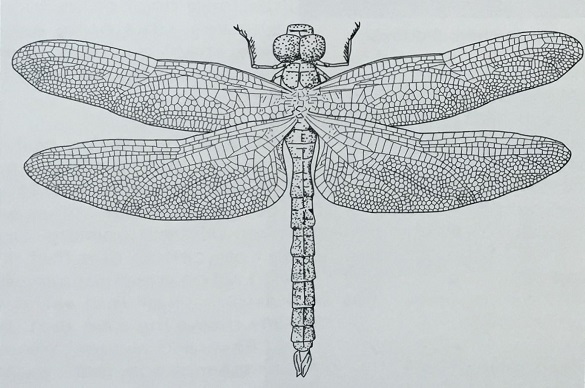
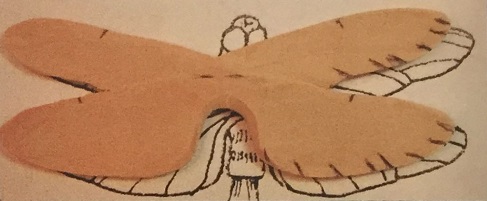
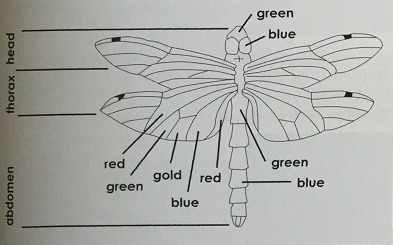
To develop a carved dragonfly design, it was only necessary to go to the file of my own scientific illustrations. I had a detailed study of a beautiful dragonfly from way back in the early 1970s that was exactly what was needed.
Although the complexity of the dragonfly is fascinat- ing, it was obvious that it would have to be radically [simplified for a small carving. We would not, for example, be able to put in all 1,200-wing divisions ; (yes, they were counted as they were drawn - there were no computers in those early days). So I looked for main divisions and used a bit of artistic license to come up with this design.
Hint: You may want to refer back to the Swallowtail Butterfly article in Carving Magazine issue # 1 for hints on cutting out multiple blanks at one time and some other details on wood burning, etc. that I didn’t go into here.
Blanks
For those of you who can cut your own blanks, we have the full sized patterns in the pullout section of the magazine. You could also make the patterns larger if you wanted to make a wall hanging, or smaller if you wanted to make earrings.
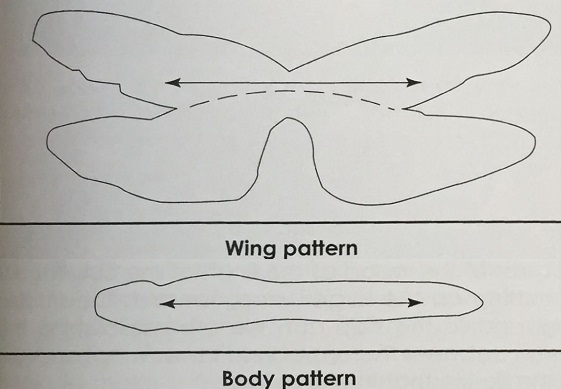
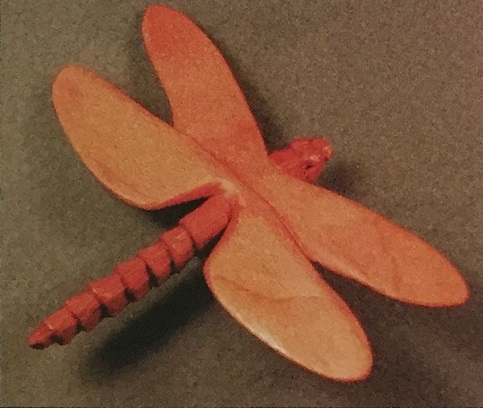
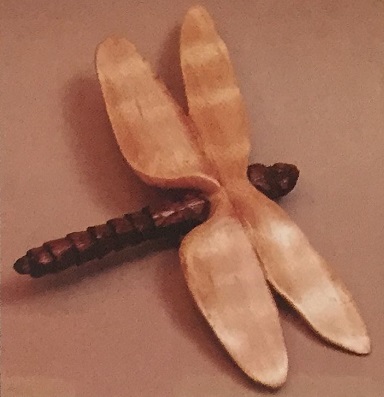
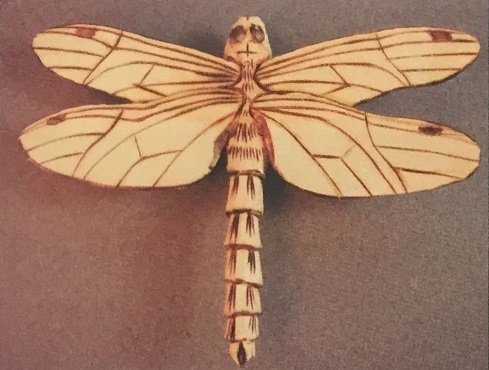
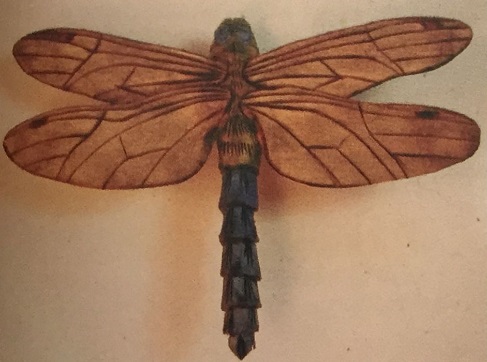
It is very important that the blanks be cut from straight-grained wood since many of the cuts will otherwise stray off course. We will be making this dragonfly with basswood, but I've included a couple of pictures of dragonfly pins carved out of 'hardwoods in case you are feeling adventurous.
The carving and assembly techniques are the same, but these pins get sanded very well and finished with oil and wax.
Carving
The first step in carving the dragonfly is to remove all marks left on the blanks from sawing them out. Light cuts with the knife will do this in no time at all. Be careful of the direction of the grain, especially along the front edge of the tips of the wings where it changes direction. Look at the finished blank to be sure that the wings are symmetrical; after all, if one is smaller than the other, the poor dragonfly would just fly around in circles!
Shaping the wings
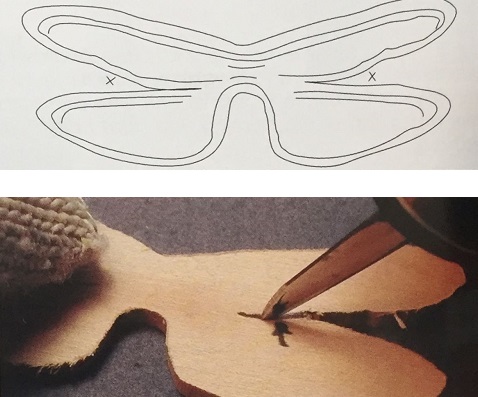
Lightly write with a pencil the word ‘top’ on the top surface of your wing piece so you don't get confused. Many times I have had to start over after forgetting which side was the top. Draw a line around the front edges of the top of each of the four wings on the side of the wood. Draw another line halfway through the thickness of the wood on each of the back edges of the wings on the sides. Then make stop cuts that start shallow near the center, but go to halfway through the thickness of the wing at the end to where the pencil line is.
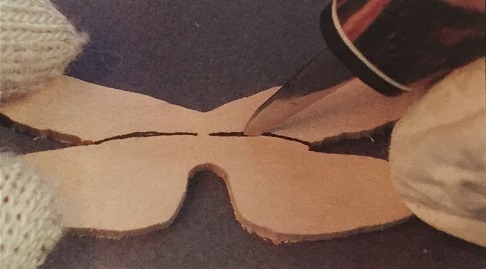
Don't go too deep - remember that the wood is just 1/8" thick, so your deepest cut should be just 1/16" into the wood. You can always cut it again if it is not deep enough.
Carving the Top
Using the widest #3 gouge you have, make slicing cuts from the front edge of the smaller wing to the stop cuts and pencil line.
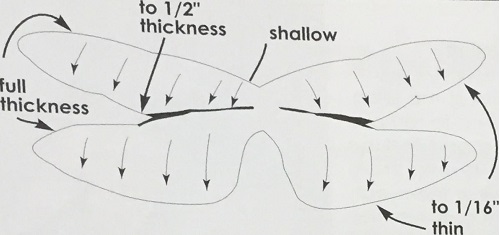
Leave the front edge at its full thickness and make the final cuts so that the finished wing ends up slightly cupped. I find that moving the gouge in a diagonal direction, neither with nor across the grain, works best for this difficult cut.

Keep the same #3 gouge to scoop out the larger wing. Do not make the back edges any thinner than to the pencil line.
Carving the Bottom
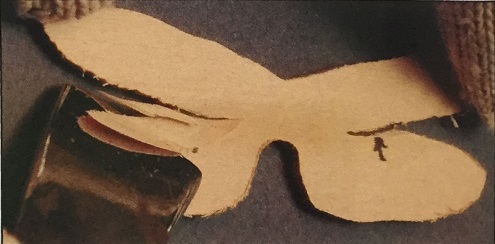
Make short, curved stop cuts on the bottom of the wing blank. Notice that if the smaller wing overlaps the larger wing on the front side, it will be reversed on the back side and the smaller wing will overlap the larger wing.
This is very important! I could warm my house on a cold day in January with wood that was wasted because the cuts on the bottom side were made in the wrong direction.
The slicing cuts on the bottom need to be shorter than those we did on the top, but they also start shallow on the body end and go to the center of the thickness of the wood at the finish of the cut. You will be cutting on the larger wing, towards the smaller wing, and to the stop cut. We are establishing the division between the upper and lower wings and giving the illusion that they overlap.
The last step is to use your very sharp bench knife to gently shape the edges all around the bottom side of the wings. Take a look at the ‘top’ you wrote on one side of the blank before you start, and then shape the bottom side. It is easy to get the wrong side shaped - and then you have to start over. I hate it when that happens. Leave a little of the wood around the edges for strength. If you made them paper thin, they may break. Carve to the pencil line only, and then thin the edges further when you sand the wings.
As a final check, look at the wings from the top. If you can see anything but the fine edge of the top surface you need to remove more of the bottom side's wood around the edges.
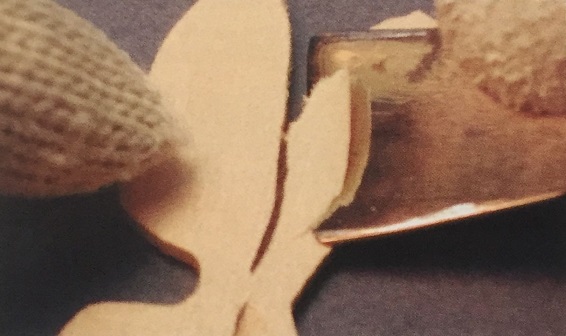
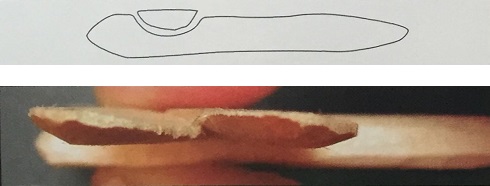
Then look at the wings from the side.
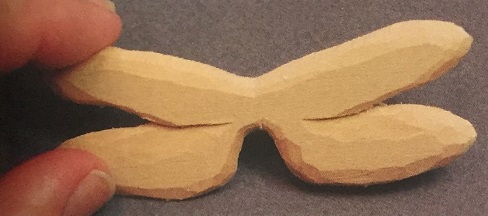
You should be able to put a knife blade between the I upper and lower wings and have it nearly parallel to the wings. Sand lightly with 220-grit paper just to remove the ‘fuzzies’ and refine the edges. Check again to make sure that everything looks symmetrical. When you have completed this step you have successfully generated the illusion of four wings from one piece of wood. Congratulations!
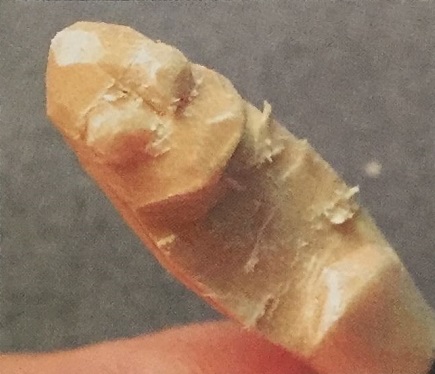
Shaping the Body
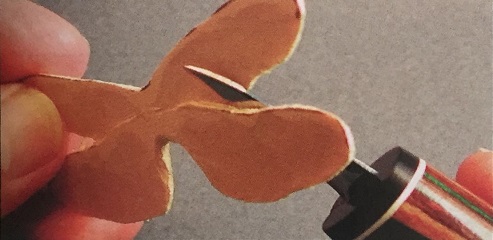
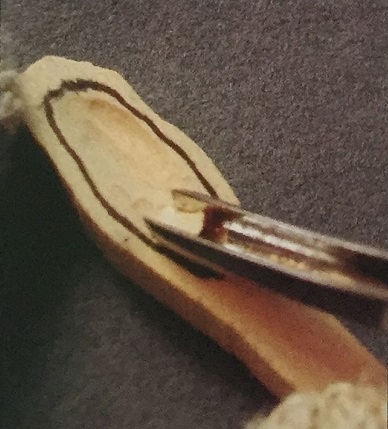
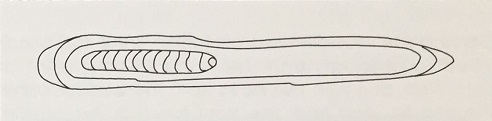
We are going to start the body by carving the groove for the pin back on fthe bottom side. It is easier to make these cuts while the blank is still square and sits flat on the workbench. Using the #9 or #11 1/8", or the closest gouge you have, make a groove that is just a little longer than the 3/4" pin back. Make it about 1/16" deep and be very careful to keep it on the bottom side only. Do not cut into the sides of the body, and keep at least 1/32" away from the sides.
Now, draw a centerline along the length of the top side and then round the entire body from this line to the bottom surface. Do not round the bottom - leave
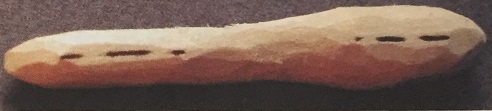
it flat. Be careful to avoid cutting into the pin groove. Further round the head and tail areas as shown in the photo. Gently carve a subtle 'waist' at the mid- point on the body.

It is very handy to have the full sized plans of the assembled dragonfly to help align and mark for the next steps. If you position the body on the plan for wood burning and then place the wings on top of the body, as they are on the illustration, it is easy to
wood burning and then place the wings on top of the body, as they are on the illustration, it is easy to position and mark the area where the wings need to go. Mark the area around the wings on the top of
the body with a pencil, and then extend those marks to halfway down the sides. Connect the ends of these lines.
Carving the ‘saddle’ is a bit tricky, since the wings need to fit snugly into the body without a lot of slop. Work at it with thin slices from the back towards the middle, and from the front towards the middle. You will have to pare away a bit at the corners to allow for the curves of the wings. Practice will improve your skill at this task, but if you make enough of them you can get good enough so that the wings ‘click’ into place.
I’ve made more than 50 dragonflies and I still only ‘click’ about half the time. You will be finished with the ‘saddle’ when the top of the wing is even with the top of the body when they are assembled.
Detailing the Body
In detailing the body we are working within mighty tiny tolerances. The eyes, for example, end up being just 3/32" in diameter. A slip of the knife and we have a blind dragonfly. You could choose to just paint the eyes and other body details, or wood burn and then paint, but if you are brave, and steady of hand, I'll
show you how to carve them as real looking as can be. Place the body on top of the full-sized illustration and then move it just a little to the side. That way it is easy to transfer the markings to the blank and then continue them around the top and sides.
This is also a good time to mark the wings in the same way.
Hint: Although I don’t usually use a magnifier, this is one of those times when a little help with more light and magnification is a good idea.
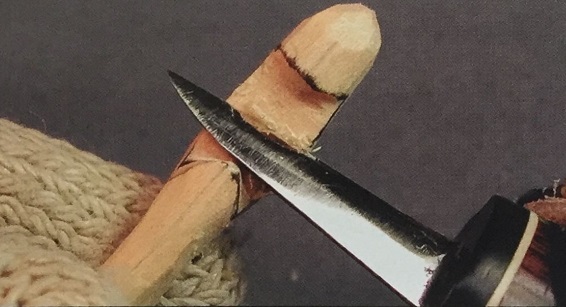
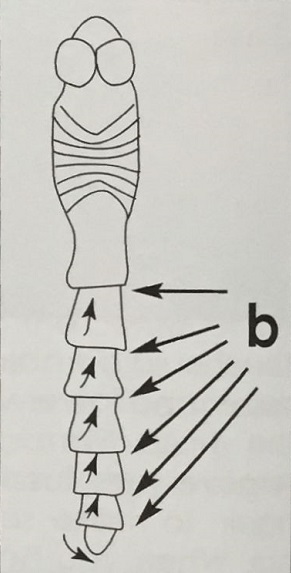
The first step is to make shallow (about 1 mm - told you we would have close tolerances!) stop cuts around the top and sides of the body as indicated by the ‘b’ markings.
These cuts can be made quickly by starting a shallow cut on one side of the body and then twist- ing the body with the other hand while your thumb holds the wood against the knife. Only do it this way if you have all the safety gear like I have in the photo below.
If you don't have the proper safety equipment then you can hold the body on the workbench and twist it as you press down with your knife.
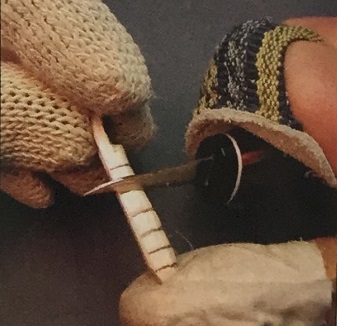
Hint: Notice the tape wrapped around the thumb guard. I wrap the new thumb guard in regular bandage tape to protect the leather from the knife blade. That way, when the tape gets sliced through, I just replace it and keep on carving. If I didn’t do this I’d have to own the thumb guard factory.
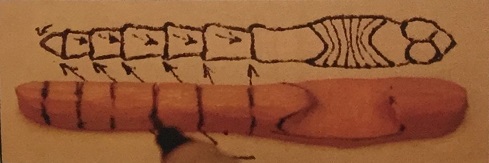
Now make very shallow slicing cuts from the back end of these sections to the bottom of the stop cuts.
Do not make them perfectly smooth, but leave them with facets from the knife cuts.
Transfer the location of the head details as you did earlier with the other details. Make very shallow (l/2mm -1 warned you) stop cuts with your knife just behind the eyes, then in front of the eyes, between L the eyes, and finally on the sides of the eyes to create a square. Make tiny V cuts down to the stop cuts on both sides of all of these cuts with your knife, i Now the eyes are separated and square. Use the tip of your knife to lop toff the corners. Close enough. We will finish rounding them with wood I burning.
If you are still feeling brave, then remove some of the extra wood from in front of and underneath the eyes, helping them to stand out even more.
Assembly
Squeeze a drop of wood glue on the saddle and on I the center of the bottom of the wings where they meet the body. Put them together a little of the glue ishould squish out the sides. If there is a drip you can mop it up, but a little squeeze out lets you know that you have used enough glue. Clamp lightly for at least an hour, or until the glue is set.
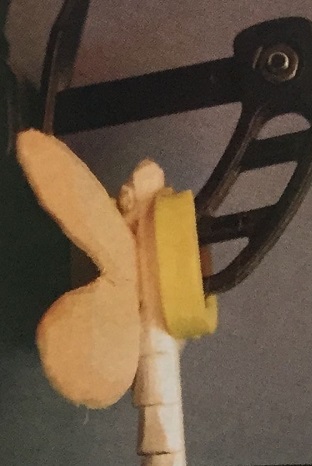
Check after clamping to make sure that the two pieces are at right r angles to one another. It is easy for them to slip out of place as the clamp is tightened. If you don't have a clamp, a clothespin would work, or lay something heavy on the top of the glue-up.
Wood burning
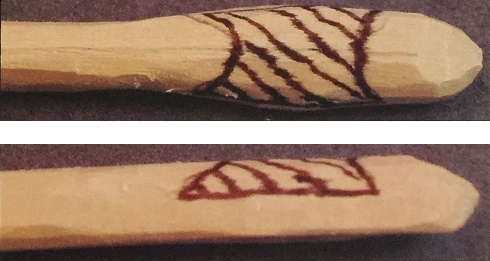
The wood burning is straightforward and does not need much explanation - but getting the pattern on is another story. At first it may seem impossible to get all those lines on correctly, so I’ve devised a step-by-step approach to help us out.
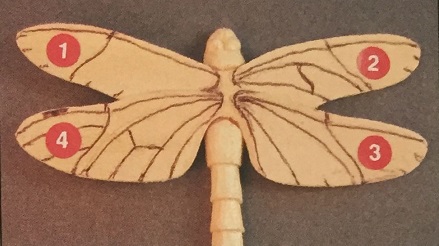
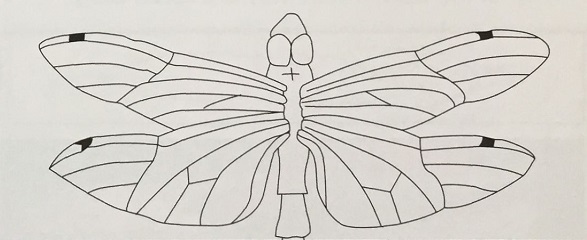
You have already made some marks where the lines end on the trailing edges of the wings. Start by drawing the lines as shown in the upper left wing - (1) in the above photo. Draw these same lines on all four wings. Proceed then to the wing numbered (2) and add the new lines to all the wings. By the time you are finished with the (3) and (4), you will have them all drawn out. Use a light touch at first in case you make a mistake and need to erase. Pressing too hard will make a depression in the wood that may show up in the painting.
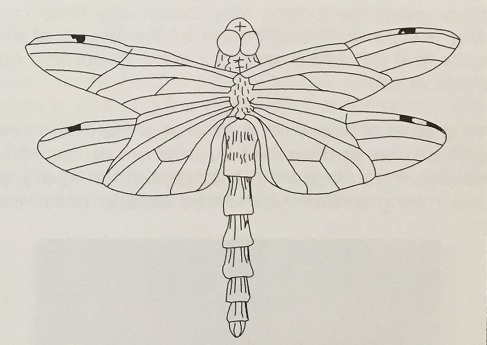
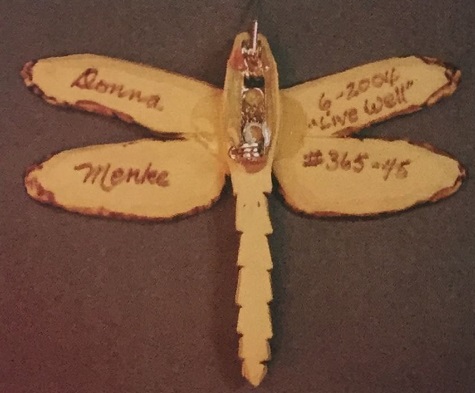
Use a fairly hot skew tip to burn the wing details. We want the black marks to show up as the structure of the wings. Use the side of the same tip to seal the edges of the wings and the edges of the stop cuts on the abdomen. Burn the eyes to make them rounder and darker. Add in some mouth parts and details on the abdomen as you see in the above illustration. When you are done with this task, change to the writing tip and sign and date your work on the bottom of the wings.
Attachment and reinforcement
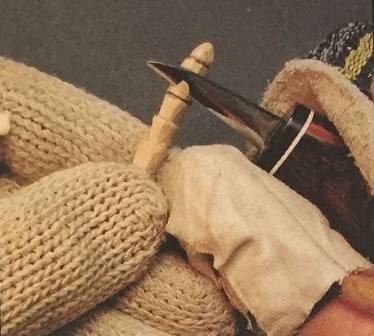
Mix up a few drops of 5-Minute Epoxy, fill the hole on the back of the carving, then add another drop. Place the pin back over/into the hole so that the excess epoxy comes up through the holes in the pin back. Use a toothpick to spread the epoxy around on the pin, but be careful to keep it away from the pin’s locking mechanism and hinge or they will be frozen and useless.
Hint: If you should have the misfortune to get epoxy into the pin mechanism, all is not lost. You will not be able to salvage the pin back, but you can save your hard work on the pin. Using a pair of needle-nosed pliers, grasp the locking mechanism very firmly and twist the pin in the direction of the length of the body. You should be able to curl the metal right out of the wood.
Put a drop of epoxy on each side of the body/wing joint on the bottom and let it all set up for 10-15 minutes. If you leave the toothpick in the epoxy on your mixing surface you will be able to determine when it is safe to touch the piece.
Now we are going to reinforce the delicate edges of the wings. This is the secret to how something so delicate can also be strong. You have the pin back to hold on to, so you should be able to keep your fingers from getting stuck together - if you are lucky.
Drizzle as little cyanoacrylate glue as possible all around the edges of fhe bottom side of the wings.

It will penetrate into the wood fibers and make them much sturdier. If you should get your fingers stuck to the carving, or to each other, a little fingernail polish remover or acetone will set you free.
Painting
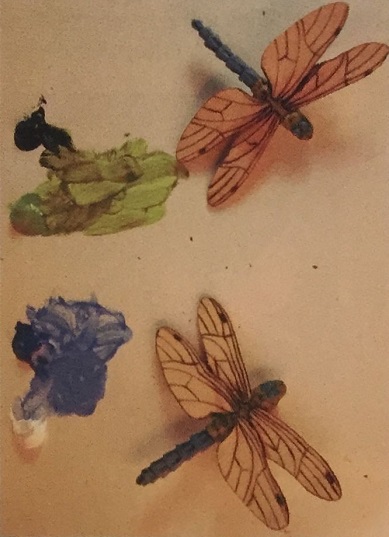
When painting such small items, you do not need much paint. Notice in the photo below how I’ve dragged out a bit of each color of paint and then mixed them together. I added a little water to thin the paint and I was in business. Do not mix up a big glob of paint because you may not get the mixture correct and it often takes a lot of the other color to correct an imbalance. Mixing up a little at a time is better.
Create a 4:1 ratio of Cobalt Blue to White. Mix it with the tip of your brush and determine if it needs more of the blue or white. When you think you’ve got it right, put a couple of drops of water onto your palette, add some of the color mixture to it, and mix. You should have a medium consistency that will not cover up the grain of the wood, but will give a nice blue color. Paint the eyes and the abdomen blue. Use the same mixing technique with the green-gold and black. The black will tone down the bright green. Paint the (head and thorax (the area behind the head) with the smallest Lour green paint. Be careful around the eyes, but area, remember that when the paint is dry you can repaint as necessary.
People are always amazed at how the wings of this dragonfly seem to shimmer with iridescence. The trick is to use a thin basecoat of black paint before painting with the iridescent paint. The effect is similar to that of a mirror’s silver coating on the back of the glass. So create a very thin mixture of black paint and water. You should be able to paint a piece of newsprint and easily read through the paint. Wash the whole carving with this mixture, wiping off with your finger or a paper towel on the high spots of the body and on the top of the wings. Some of the paint will stay in the grooves and add dimension to the piece.
Let it dry. It doesn’t look too pretty now, but wait a minute and the dragonfly will come to life.
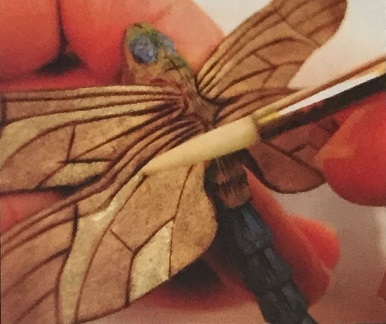
Some students think that we should use very small brushes to paint in the cells of fhe wings. The areas are very small, but you would be surprised at how well a #5 round brush will do, and it will hold more paint than a smaller brush. A good quality brush will have and maintain a stiff point during use, and that point is all we will use. Notice in the next photo how I'm using the tip of the brush to drag the paint into the smallest area.
Mix water with a small amount of green iridescent paint- about a 1:1 ratio - and spot paint it on the thorax and head. By spot painting, I mean to dot the color onto the high spots. Then use the same paint to solidly fill in some of the cells on the wings. Alternate the four different iridescent paint colors on the wings in no particular order. It doesn't matter as long as the same colors appear in the same relative places on each of the four wings.
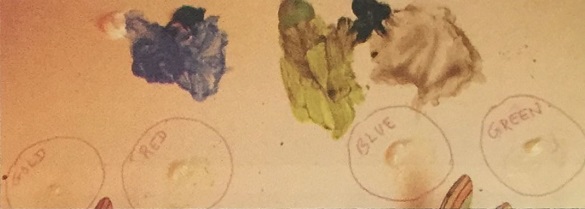
Hint: Notice in the above photo how I’ve drawn a circle for each of the iridescent colors and written the names along with the paint. This is because the iridescent paints all look white until they are painted on the wood and it is easy to pick up the wrong color.
Mix blue iridescent paint with water and spot onto the high areas of the abdomen and the eyes. Then paint some of the cells with the same mixture. Repeat, painting the cells with the remaining gold and red iridescent paint until they are all filled in. Now, isn’t that gorgeous! Finish with a coat of clear acrylic paint and your pin is ready to show off. Just beware of bug-a-phobics with flyswatters!
