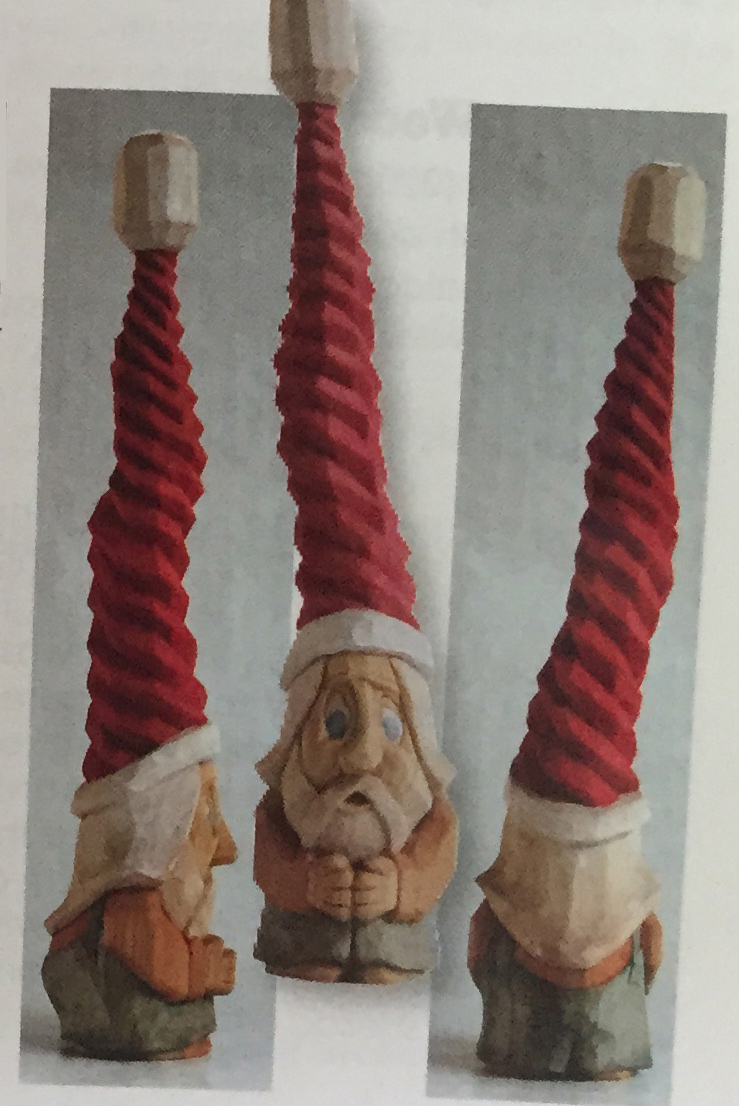
When I have displayed gnome home bark carvings, I have been frequently asked, "What do the gnomes look like?” Well, way back in the annals of time, I had whittled out a few "tomten" (actually a lot of them), which became my gnomes. They had tall hats which were sometimes crooked and sometimes decorative, and I gave them away to collect dust on someone else's shelf. My tomten/gnomes had big loopy cartoon eyes, crooked noses and, in fact, crooked, uneven everything.
I never cared for whittling out perfect proportional human features nor faces full of wrinkles any more than I cared to do whimsical houses or woodspirits that look humanized. I just don't think fantasy beings should look like little humans. As you progress with these little fellas, please remember that there are no mistakes, and if you do make what you consider a mistake, just change the story. They’re supposed to look goofy.
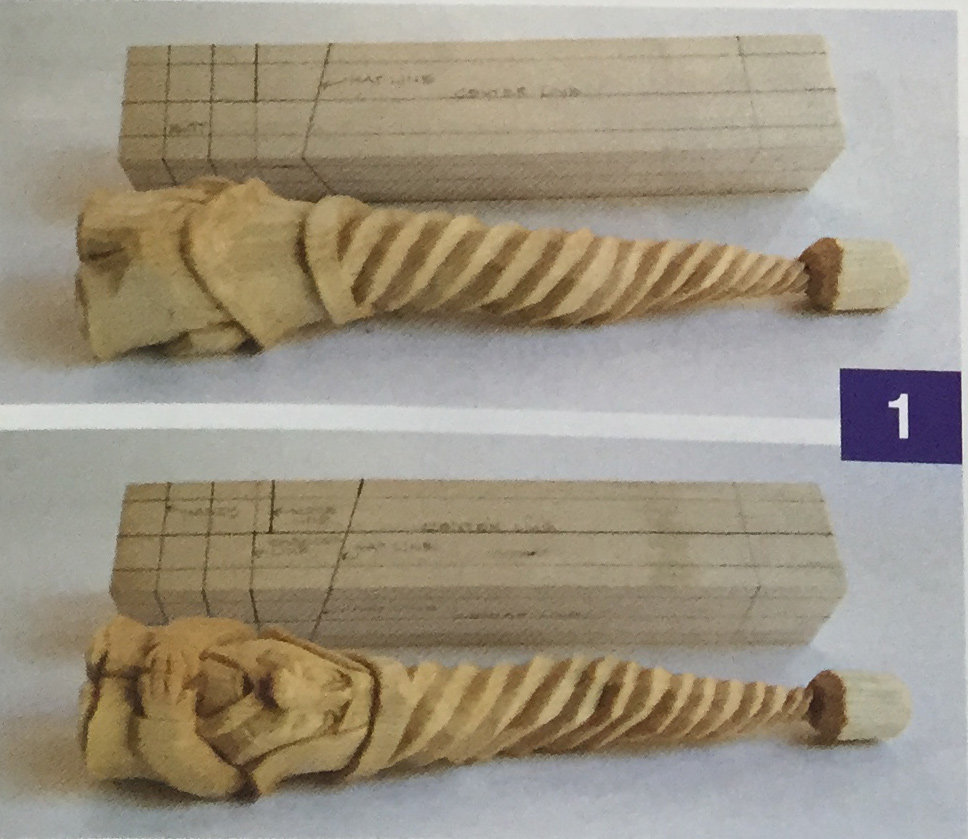
1. Starting with a 2" x 2" x 12” stick of basswood, locate and draw centerlines completely around the piece. Label the top and bottom. Designate one corner to be the front ond label it so. Measure 4" up from the bottom and draw a line all around. The remaining 8” becomes the hat.; Measure down 8 1/2" on the left and right sides and 9" down on the back. Connect the dots, and this will set the hat askew. Measure down approximately 1” to 1 1 /2” from the top and draw a line all around. This becomes the topper.
Looking down at the top, draw a 1 ” diameter circle in one corner depicting the size and location of the topper. Measure up 3/4” from the bottom. This locates the hands in the front and his butt in the back. Measure 2 1 /2" up from the bottom to locate the approximate bottom of the nose. Measure up 2 1/4” from the bottom to locate the top of the shoulders and approximate mouth mound.
Big Hint: A good layout makes the work easier.
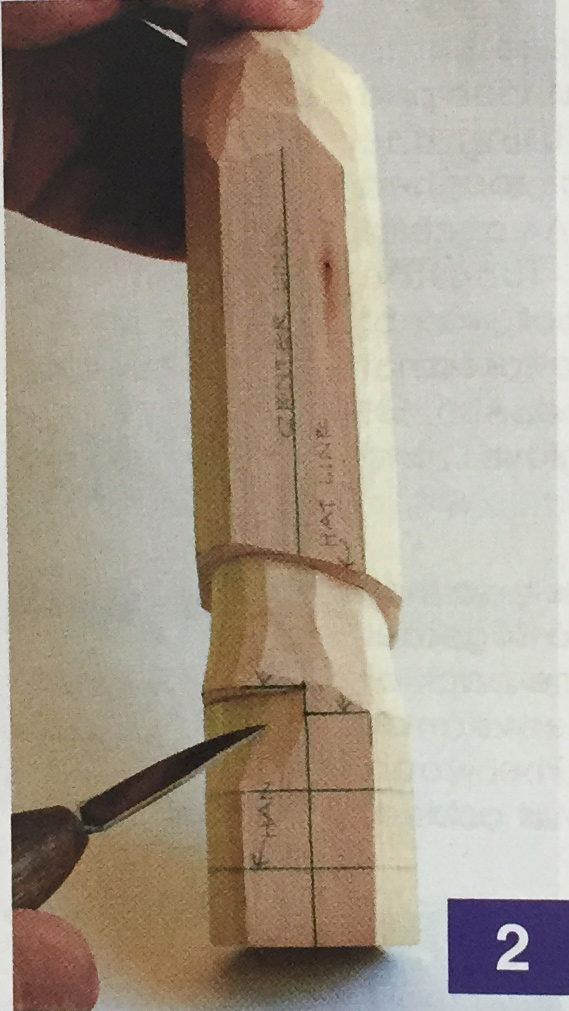
2. Draw vertical lines 3/8” in from the corners and then remove the corners. Then reconnect the hat line. You can just whittle the corners off. I’ll use my “portable bandsaw" for this. Some of you might want to use a real one.
Big Hint: My “portable bandsaw" is a Japanese pull saw (sometimes known as a Bear Saw)
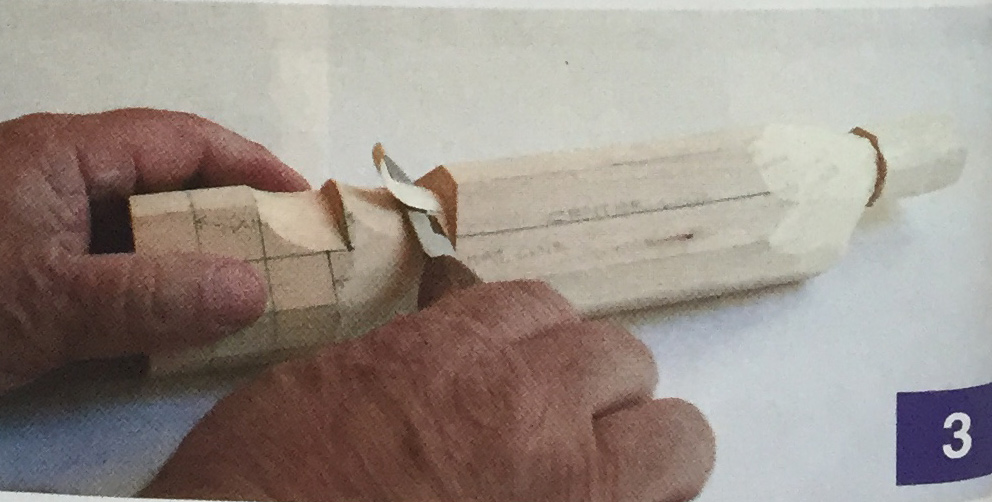
3. Using my portable bandsaw again, I cut in around the topper line and then down until I have a 1" x 1" square, 1 to 1 1/2” long, on top.
Stop-cut in at a slight downward angle all around the ho* line. About a 1 /2" below that, take chips out up to the stop cut.
4. Make a stop cut in at the bottom of the nose. Take out chips from the hands to the stop cut. Repeat until the nose stands out.
Starting from the tip of the nose, make a curved sloping cut up to the hat and remove the chips.
Draw in the angle of the arm as shown in the photo.
5. Stop-cut in approximately 1/4" all along the arm lines. Remove the wood above and below the arm. Work up from the bottom and down from the mouth lines, ending at the stop cuts.
6. Draw in a broken or twisted nose, and stop-cut all around it.
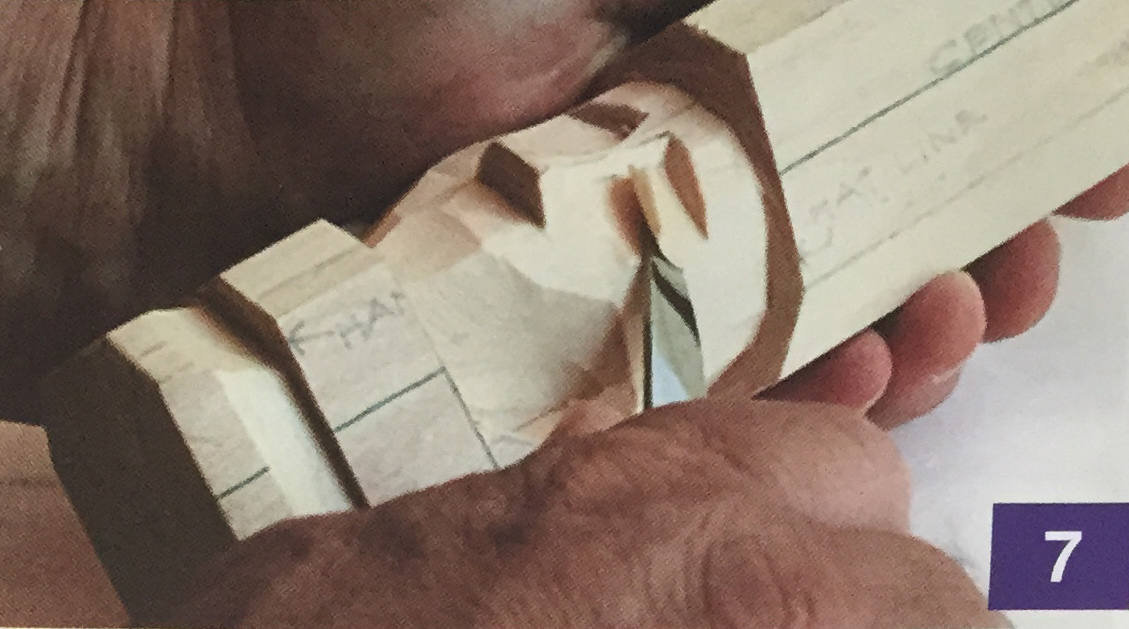
7. Make a stop cut at a downward angle, away from the nose, to form the eyebrow.
Two-thirds down from the eyebrow, cut at an upward angle to the eyebrow and then at a downward angle to the bottom of the nose, forming the high point of the cheeks.
Big Hint: Do not intentionally try to make one side match the other.
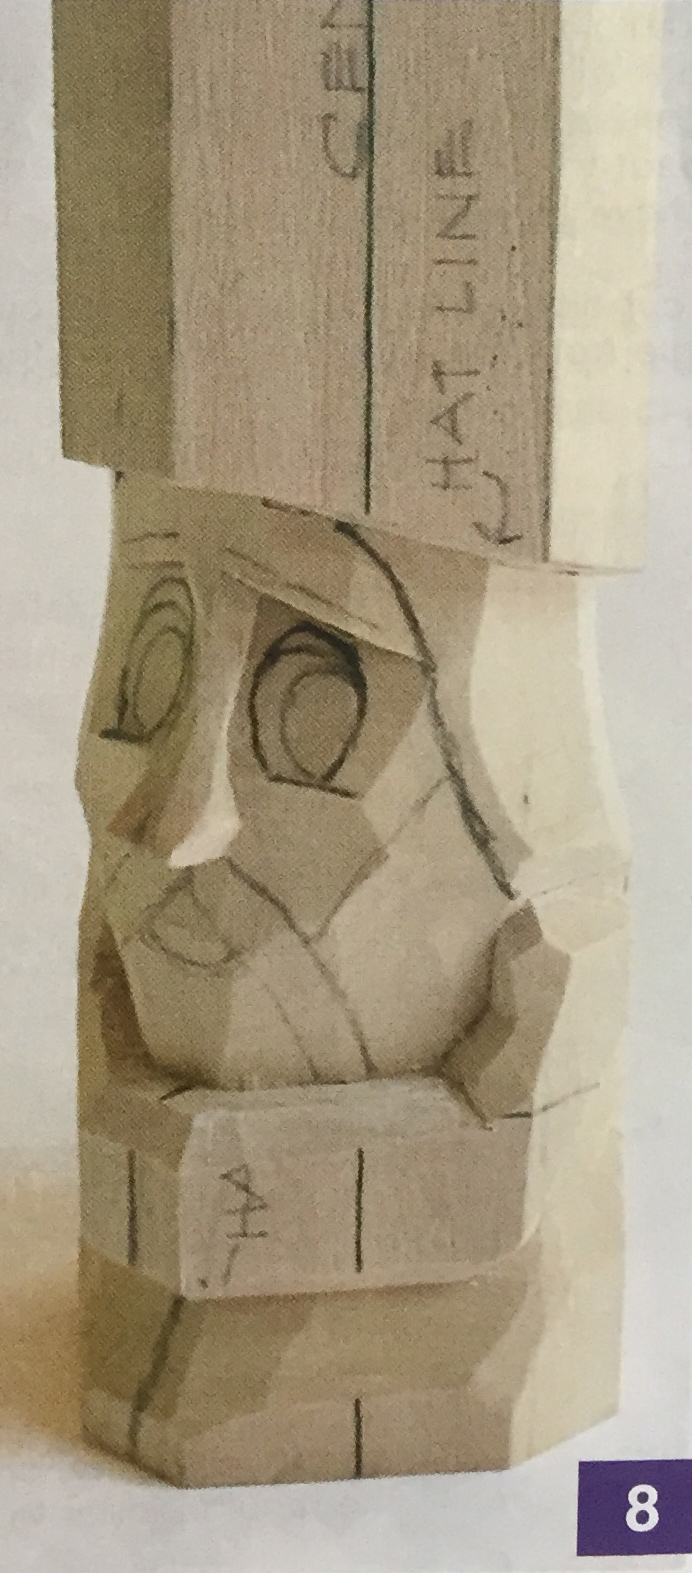
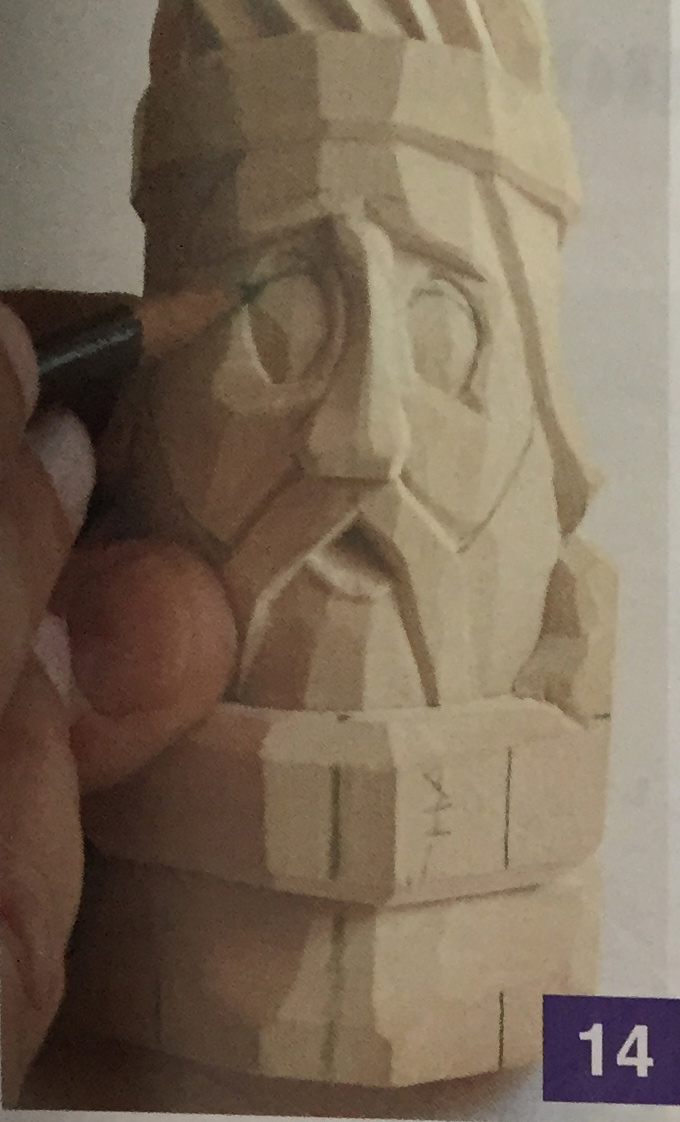
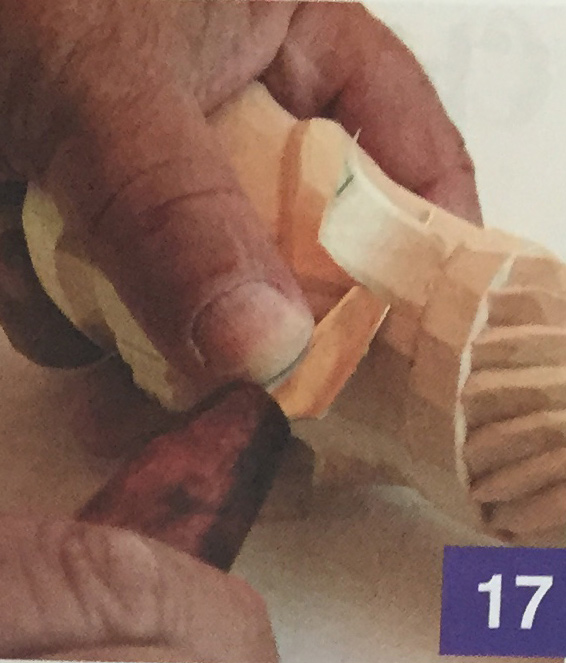
8. Now shape the nose to the brow. Bend it and put a bump on it. Draw in the hands, the loopy eyes, the eyebrows, the hairline, the beard line, the mouth, and the mustache.
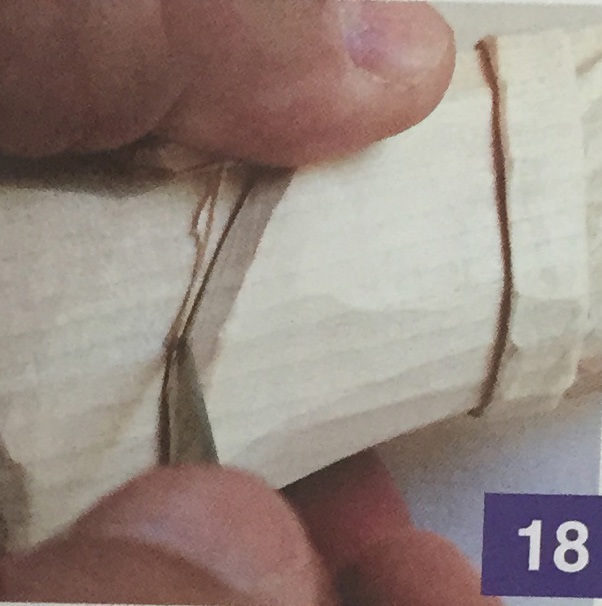
9. It's time to form the hat. I like to bend it, curve it, twist it—make it go in as many directions as I can.
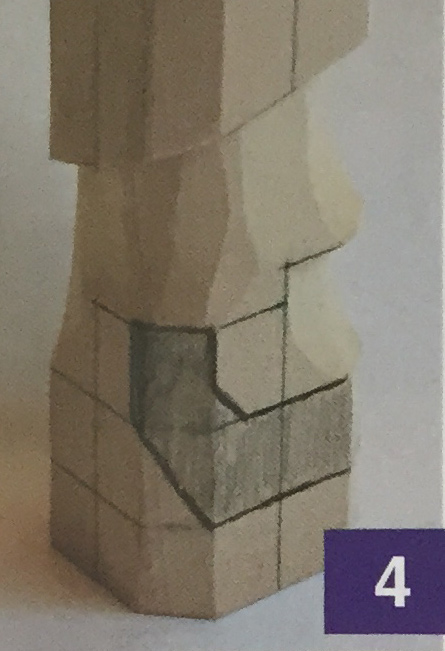
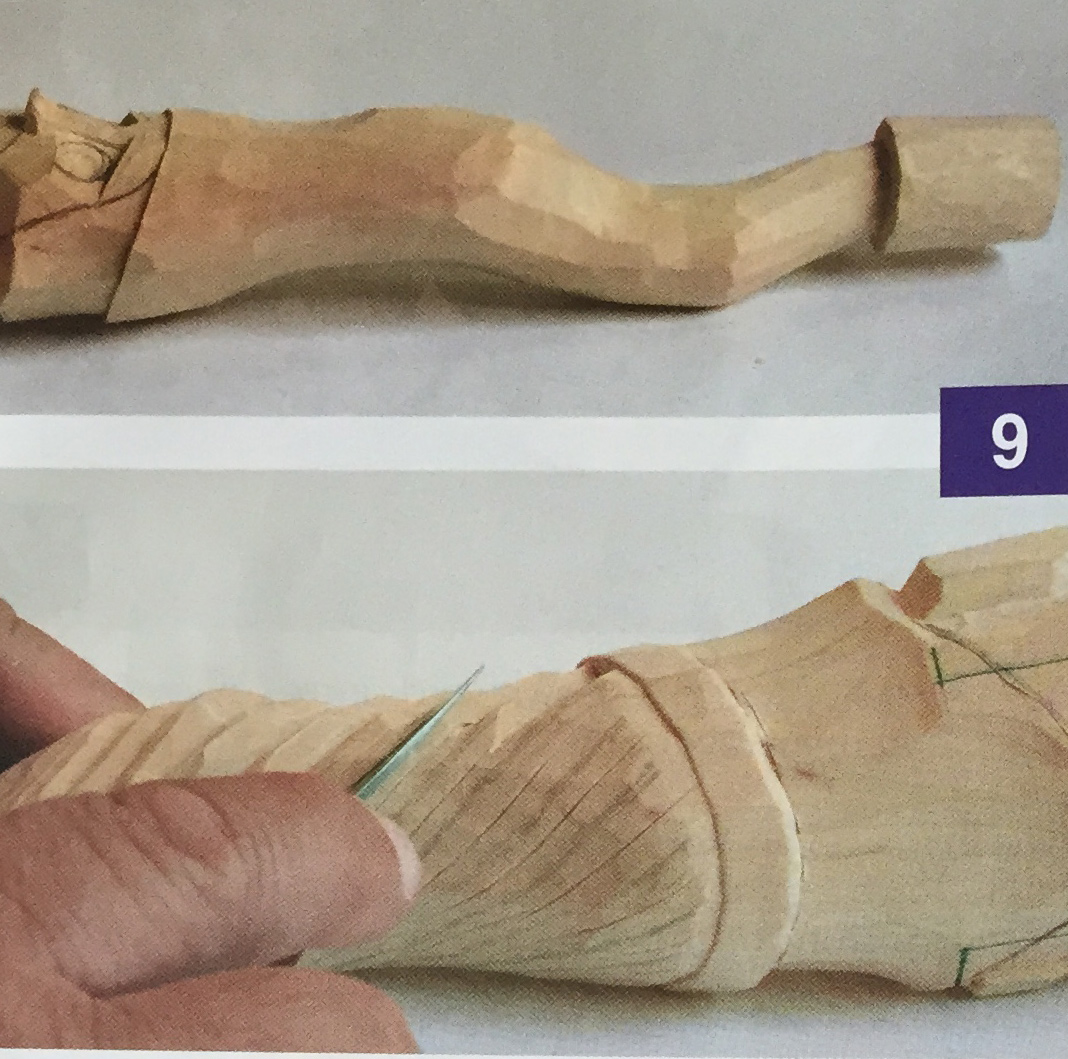
Now that "оГ tomte" is blocked out, it’s time for details. Carve in a 1/4" band around the bottom of the hat. Then, starting at the front of the hat, draw a line at an approximate 30-degree angle around the hat all the way to the topper. Repeat these lines about 1/4” (or less) apart, being sure to have an even amount of lines.
Now make a stop cut along every other line. Take out wedges at an angle from the solid line down to the stop cut.
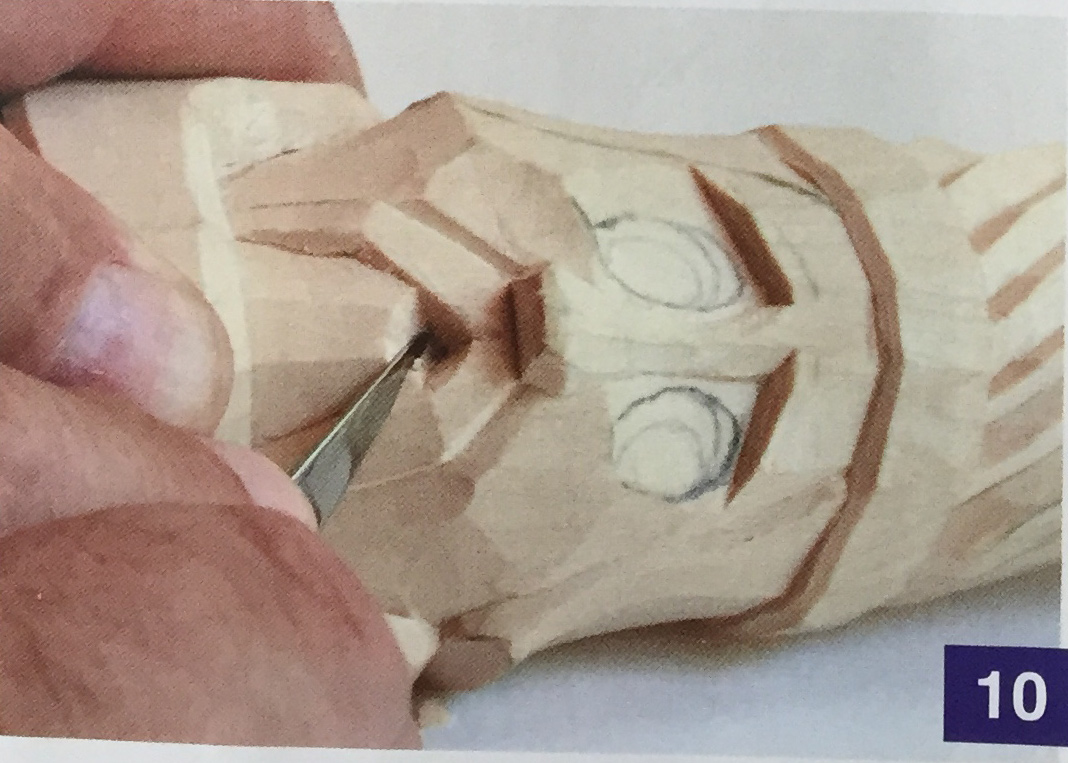
10. Make stop cuts sloping away from the mustache and remove the wedges.
Cut in the mouth straight back from the mustache, and make a curved cut upward into the mouth, similar to a three-point chip cut.
11. Make a shallow stop cut along the lower lip line at Q downward angle. Cut upward into the stop cut and take out the chip.
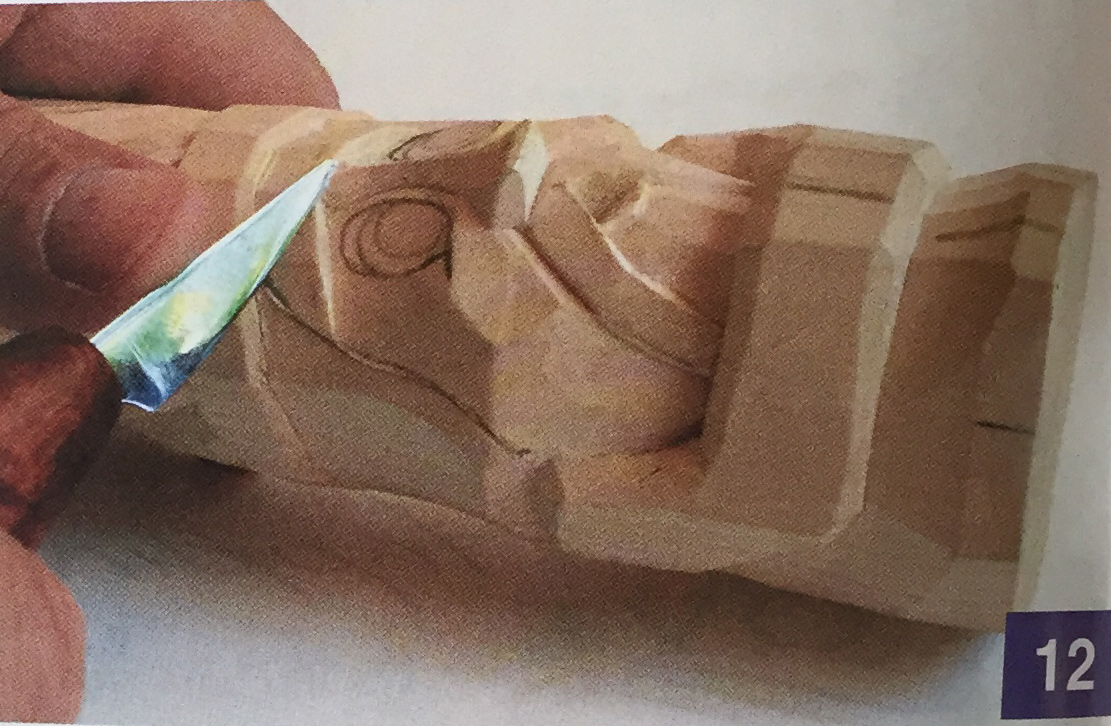
12. Make cuts at an angle from the center of the nose to the face.
A small notch at the top of the nose at the brow line finishes the nose.
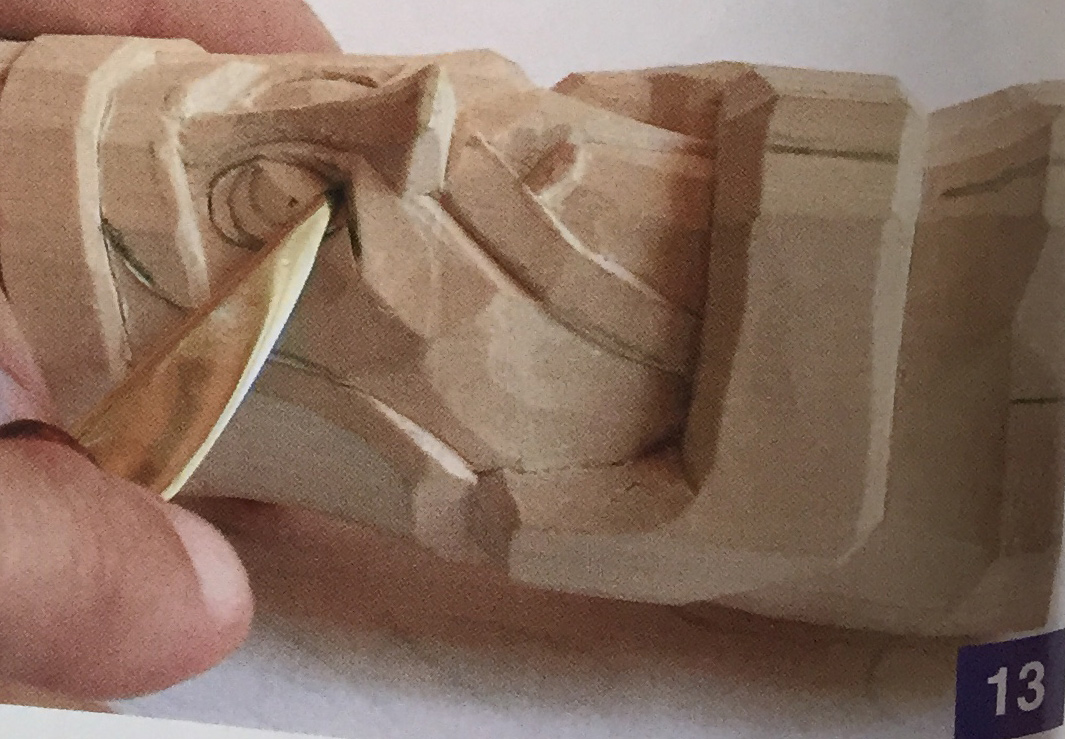
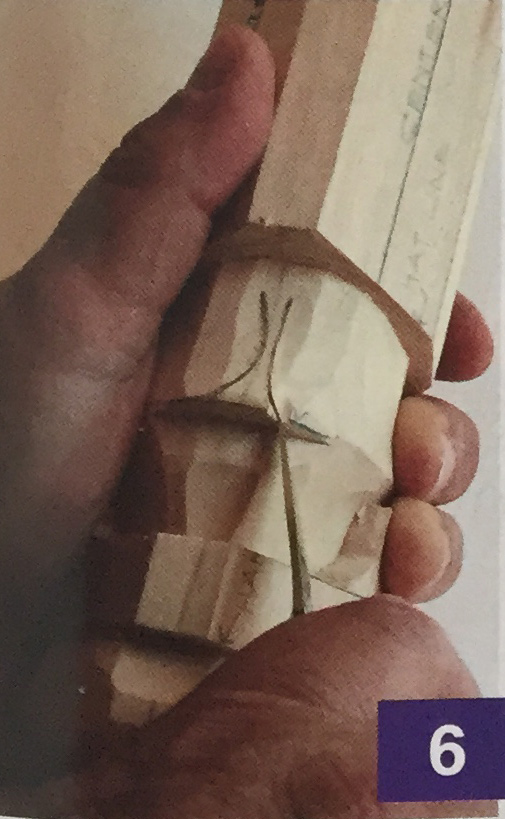
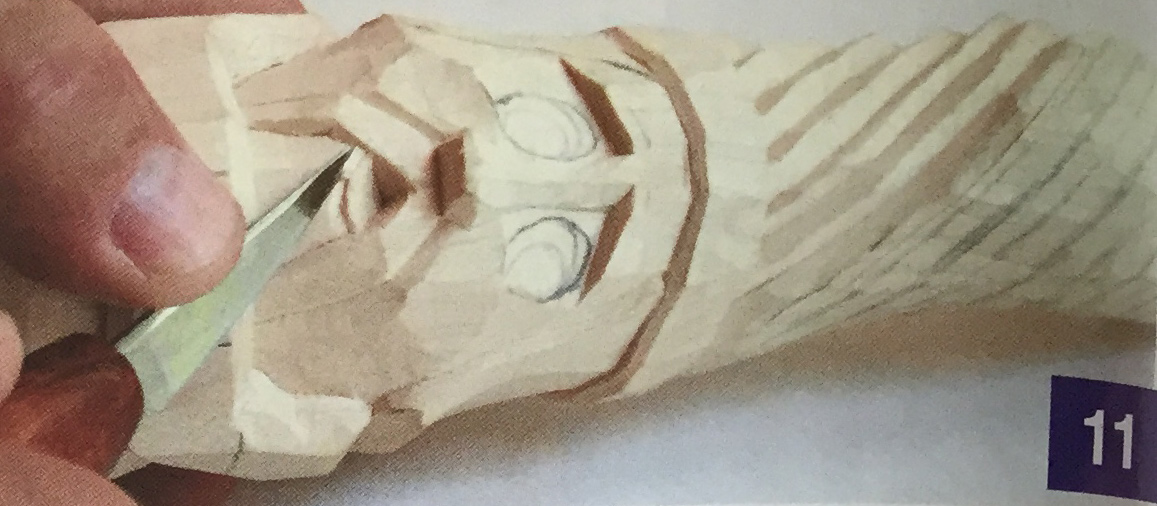
13. Make a mark at the high point of the eye oval. Start at the top mark and stop-cut down to the right mark, then the top mark down to the left mark, the left corner up to the left mark, and then the right corner up to the right mark. The last stop cut is up from the lower right corner to the lower left corner. Reverse the procedure for the left eye.
14. Make a dot at the center of the eye and carve from the dot to the edges.
Draw in an eyelid; stop-cut and remove the chips.
Big Hint: Leaving the center of the eye high makes a focal point and brings the viewer "into" the piece.

15. Check to be sure the face slopes away from the nose no more than forty-five degrees. Now make a shallow stop cut along the hairline and the beard line. Cut in at a slight angle and remove chips.
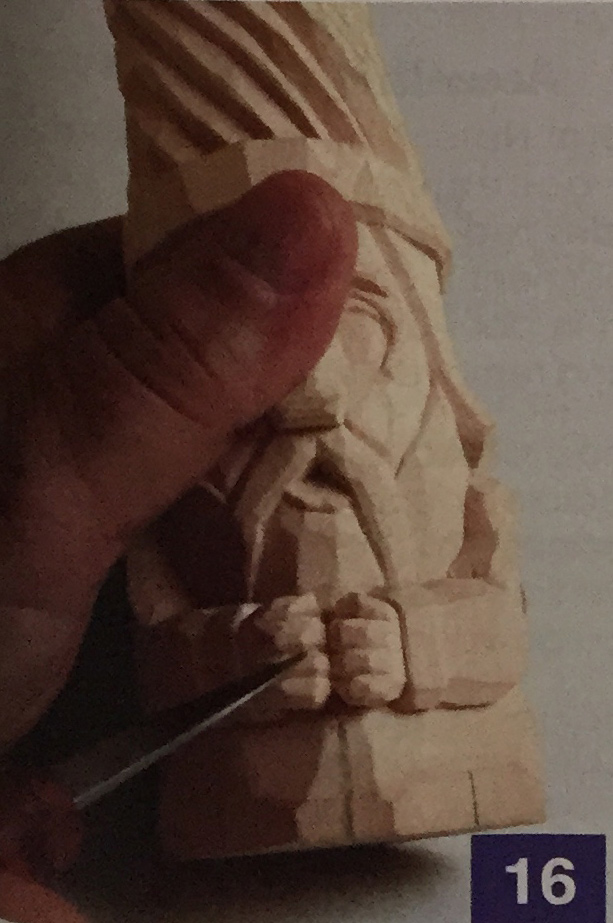
16. I prefer mittens because I think they are cartoony. Other than those, I use a thumb and three-finger glove. I also like a cuff on the sleeves.
17. Shape the back side by carving up and into the hair, and down into the bottom. Make sweeping cuts around the robe to give shape. I do not care for folds and creases simply because I believe detail can be overdone and it’s a cartoony-type character—not a reality piece. An optional detail is to do shoes and coveralls in lieu of a robe. See finished photos and note the button-down arm straps in the back.
18. Make several sweeping flat cuts upward to the hat. Again, because I believe that detail can be overdone.
I do not carve in a great deal of lines to depict hair. At the most, I will do a few large areas for a layered look.
Make a shadow cut around the the hat line, the hairline, and the arms and hands. This will give the piece a little shadow and dimension. For example, hold the knife flat against the hair and insert the tip under the hat and cut all around. Then, holding the knife at a slight angle, take out a sliver of wood all around.
Finish. First, wash your carving. I use warm water, blue Dawn dishwashing detergent, and a soft brush. After rinsing, pat dry with paper towels.
Mix a 32 oz. can of boiled linseed oil and a small tube of oil-based yellow sienna. Paint all white areas first, and then coat with the mixture. This makes a great skin tone and brings out the grain. Pat dry with paper towels, and let the carving dry completely.
About the Author
Tony Erickson carves commissioned pieces and instructs at various carving roundups and carving clubs throughout the USA. Tony Erickson carves commissioned pieces and instructs at various carving roundups and carving clubs throughout the USA and sells rough outs and tools at www.woodakoodashooda.com.
