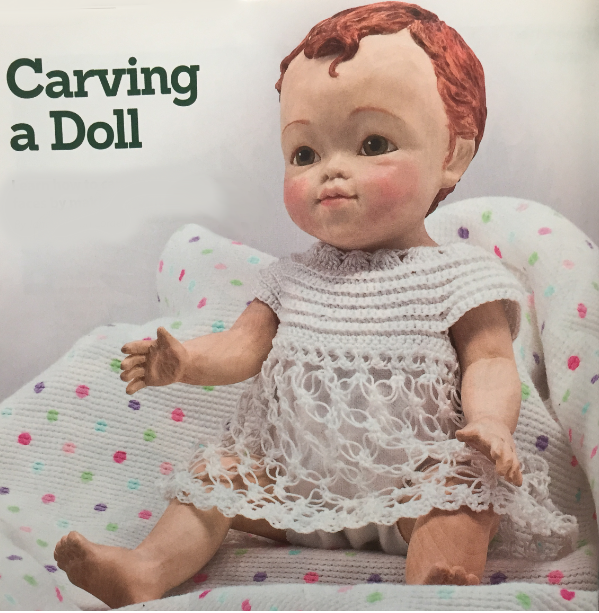
Learn how to carve children's faces by making a jointed doll
When I was a child, I didn’t play with dolls much. However, as an adult and a professional woodcarver, I began to notice that no one made carved dolls and that a well-made doll could be a work of art. One of my friends calls my dolls poseable sculptures.
I developed this rough out, which I call Nellie, for my students. She’s about 9" tall and has jointed arms and legs. 1 hope you enjoy carving her as much as 1 do.
Cutting the Blanks
Cut all pieces of the doll from the same piece of wood. This will keep the “skin tone” even. Lay out the pieces on the blank so the tops of the pieces (arms, legs, body, and head) all point toward the same end of the board. A part that is reversed tends to have a different cobr because the cell structure reflects light differently. Drill all of the joint holes before cutting the blank. This helps assure that arms and legs will be even. I cut the perimeter of the pieces with a band saw.
DOLL: CARVING THE HEAD AND BODY
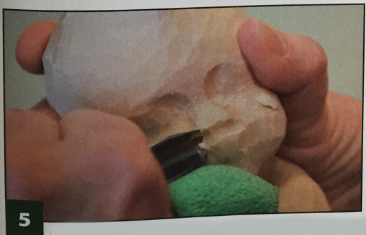
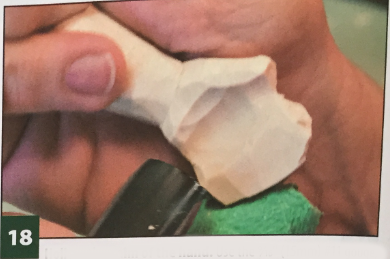
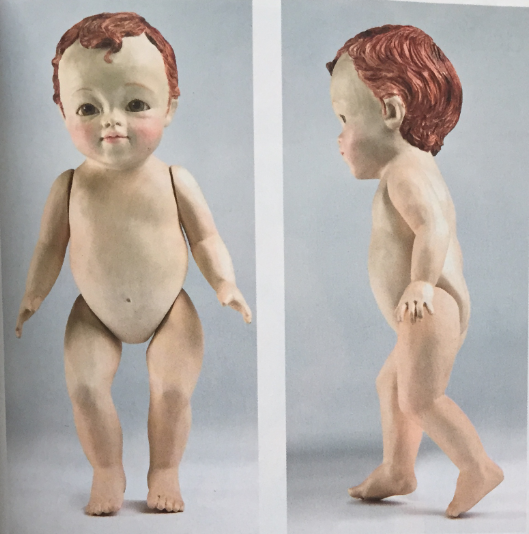
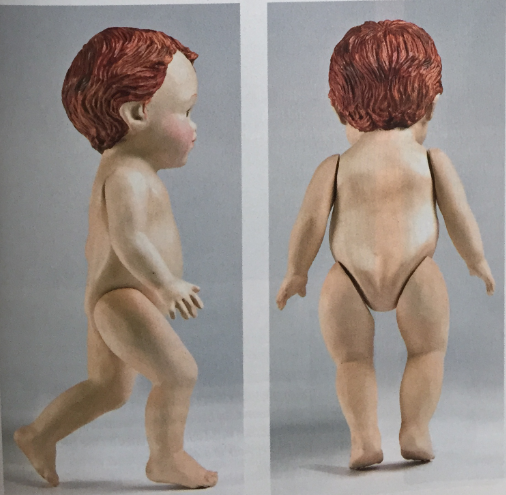
1. Rough out the head and body. Use a knife to remove the saw marks and sharp corners. Smooth and round the body and flatten the areas where the limbs join the body. Carve slight curves for the bottom, belly, waist, and shoulders; add a belly button if desired.
Thin the neck, but remember that baby necks are short; the head sits down almost on the shoulders. Smooth the sides of the face and the forehead. Check the front view to be sure the face is symmetrical.

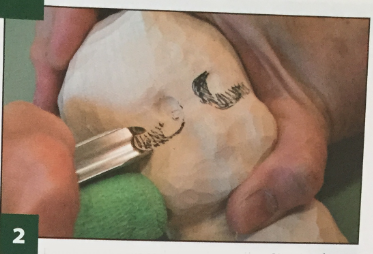
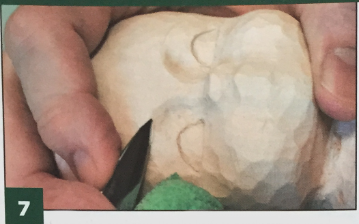
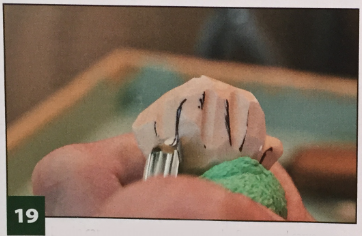
2. Rough out the eye sockets and nose. Use a 3/8" (10mm) #11 gouge to cut across the bridge of the nose. Use a knife to curve the forehead and the top of the nose into this cut. Mark the eye sockets below the brow line, which is halfway between the crown of head and the chin. Use the #11 gouge to cut beside the nose bridge, under the eye mound, and out to the temple. Note: Do not cut across the top of the eye mound or under the brow line.
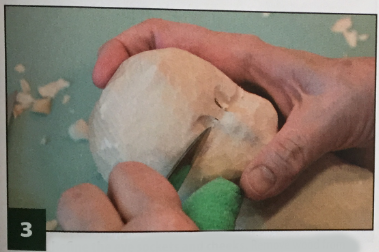
3. Refine the eye sockets and cheeks.Remove wood from beside the nose and curve the cheeks up into the bottom of the eye sockets using the knife or the #11 gouge. The fullest part of a baby’s cheek is at the corner of the mouth if the face is relaxed. Use the knife to smooth the front of the eye socket down to the top of the cheek. Do not remove the curve of the eye mound. Keep the eye socket deepest at the bridge of the nose.
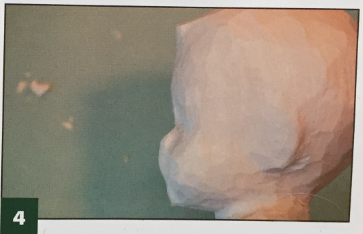
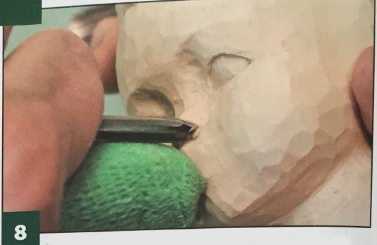
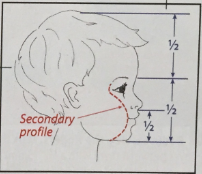
4. Check your work. Match the profile of your carving with the photo above. You should be able to see half the eye, half the nose, half the mouth, and all of the eyebrow. You should not see the inside corner of the eye. Keep the mouth even with or beyond the nose.
5. Rough out the nose. Cut between the bottom of the nose and the upper lip with the 3/8" (10mm) #11 gouge. Curve the cut around the upper lip. Use a 3/16" (5mm) #11 gouge to deepen the cut against the base of the nose. Use a knife to round the tip of the nose.
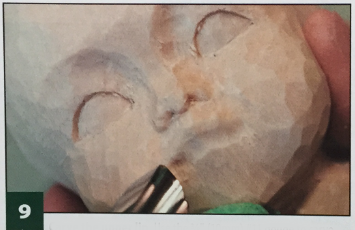
6. Carve the eyes. Round the bridge and sides of the nose. Draw the eyes. Make stop cuts along the lines and round the eyeballs to the cuts. Make sure the surfaces of the eyeballs are smooth and the depth of both eyes is even. Smoothness here makes painting easier.

DOLL: REFINING THE HEAD AND BODY
7. Shape the eyebrow. Use the knife to gently remove wood to create a subtle ridge on the upper curve of the eye socket. Babies don't need hairy, bushy eyebrows. Create a tiny ridge or line, where we will add a bit of hair color later. Smooth the forehead up into the hairline. Don't leave a hard line for the hair edge.
8. Refine the nose. Round and shape the nose with a knife. Stab in the nostrils with the W (5mm) #11 gouge, but be careful not to pry the wood with the gouge. Free the chip with the knife. The nostrils only need to be deep enough to make a good shadow when viewed from the front.
9. Carve the upper lip. Use the 3/8" (10mm) #11 gouge to carve above the curve of the upper lip. The side of the cut forms the top of the lip, so make sure the mouth is symmetrical. Avoid re-carving the mouth to keep the upper lip from moving down the face. Mark the corners of the lip an equal distance from the center of the face. Make a shallow cut from one corner to the other with slightly less curve than the first cut to form the Cupid's bow of the mouth.
10. Carve the bottom lip. Use the 3/8" (10mm) #11 gouge to carve over the chin under the bottom lip. The bottom edge of the lower lip is halfway from the base of the nose to the chin. Don't gouge under the bottom lip at the sides. Use the knife to cut the centerline of the mouth. Keep the lips rounded and full. Do not cut very deep.

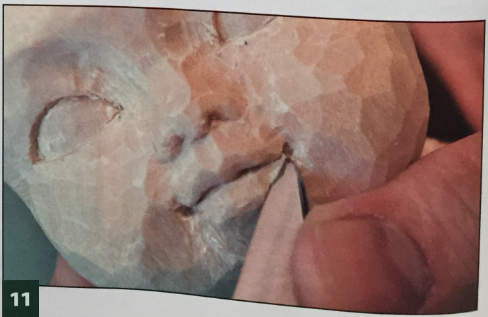
11. Finish carving the mouth. Use the 3/16" (5mm) #11 gouge to deepen the corners of the lower lip. Use the 3/8" (10mm) #11 gouge to make a shallow cut down from the corner of the lower lip to shape the chin and jaw line. Form the edges of the lower lip on the surface of the lip, not under it, and tuck it in under the upper lip. Use the 3/8 (10mm) #11 gouge to carve the philtrum (groove) from the center of the upper lip to the base of the nose to finish the upper lip. Use the 1/8" (3mm) #11 gouge to cut the corners of the mouth up and deeper to form a smile.
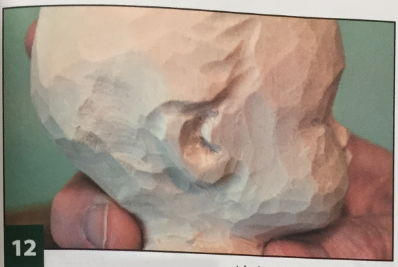
12. Carve the ears. Outline the ear with the 3/8" (10mm) #11 gouge and use the 3/16 (5mm) #11 gouge to carve the inner curve and behind the tragus. I usually don't add too much detail to young ears, because it ages them fast, especially if the tissue and cartilage gets thinned out.
13. Rough out the hair. Hair grows in a spiral from the crown of the head. Carve the rough locks of hair with the 3/8" (10mm) #11 gouge, following the direction of growth. Carve shallow S-shaped curves. Even straight hair follows the curve of the head to some extent. Use the 3/16" (5mm) #11 gouge and then а 1/8" (3mm) #11 gouge to add finer hair texture. You can choose how much hair texture to add.
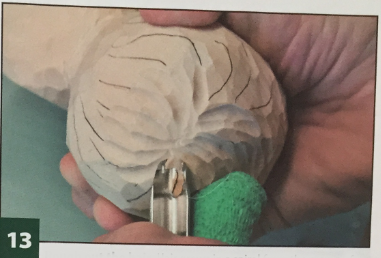
14. Finish carving the hair. Carve the S-curved forehead curls with the 3/16" (5mm) #11 gouge. Undercut the curl slightly with the gouge, and then use the knife to clean up the forehead around the
TIP: BABY FACE PROPORTIONS
Note that one half of the head height for a baby is at the brow line, not the center of the eye. The halfway point from the brow line to the chin is at the base of the nose.
DOLL: CARVING THE ARMS AND LEGS
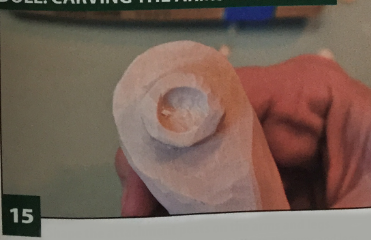
15. Shape the attachment posts on the arms and legs. Flatten the area around the attachment posts on the arms and legs. Use the 3/8" (10mm) #11 gouge to make a hollow area in the end of the post itself. The flat areas help the arms and legs hold their position better when posed.
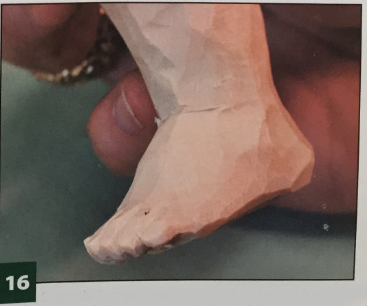
16. Shape the legs and feet. Use the knife to shape the legs and the feet. Keep the legs plump. Use a 9.16" (15mm) #11 gouge to carve the anklebone and Achilles tendon. Use the knife to separate and shape the toes.
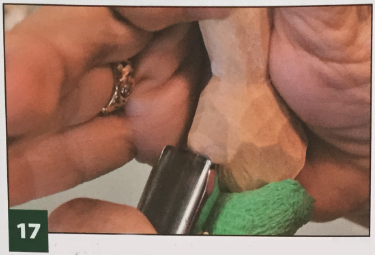
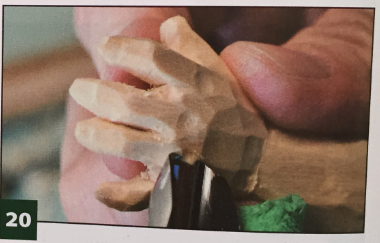
17. Shape the outline of the hand. Use the knife to make the wrist thinner than the heel of the hand on the palm side. Use a 9/16" (15mm) #11 gouge to shape the thumb and round the back of the hand. A hand is seldom flat; think of it as more of a bowl shape instead of a flat oval.
18. Hollow the palm of the hand. Use the 9/16" (15mm) #11 gouge, and be careful not to carve off the thumb. Continue hollowing and thinning the hand from the palm side. The hand is thinner on the outside edge, and the fingers are thinner than the palm.
19. Begin carving the fingers. Mark the fingers and carve grooves between them with a 3/W (5mm) #11 gouge. The gouge gives you the natural width and separation at the base of the fingers. The fingers are half the length of the hand (minus the wrist) when viewed from the back.
20. Finish carving the fingers. Use a knife to carefully remove wood from between the fingers and to round the fingers. Carve the grooves on the inside to represent the finger joints. Use the 3/16 (5mm) #11 gouge to carve the dimples that babies have in place of knuckles on the backs of the hands.
DOLL: PAINTING AND FINISHING THE PROJECT
21. Sand the doll. Use 220-grit sandpaper to remove the tool marks. Do not sand inside the joints because this makes the joints too floppy. Then, sand the skin with 320-grit sandpaper, and finish with very fine sandpaper, such as 600 grit. Seal the wood with a satin lacquer, such as Deft, before painting. Note: The wood forms the skin tone; do not paint the entire doll.
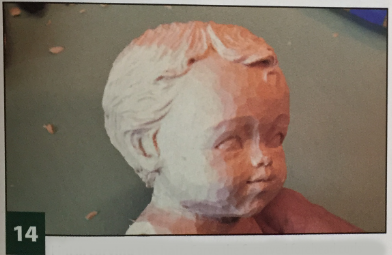
22. Paint the hair. Paint the eyes and hair whatever colors you wish. Create washes in different strengths by adding varying amounts of water and paint the hair in thin layers of color. Practice on a block before committing yourself to the doll's hair. Here is a short list of colors that I use:
- Brown hair: Golden burnt umber light, burnt umber, ora mix of several earth tones
- Blonde hair: Naples yellow hue, toned down and put on in thin washes
- Red hair: Burnt sienna
23. Paint the lips and cheeks. For the lips and cheeks, remember one word—subtle. Apply the lip and cheek color MUCH lighter than you think you want it. Alizarin crimson is a primary color that thins well and looks good when using the natural color of the wood for skin tone.
24. Paint the eyes. Practice painting eyes on a block of wood before putting paint on the doll.
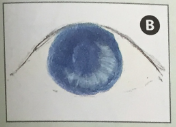
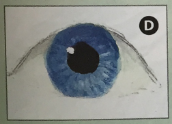
A. Basecoat the eyes. Color the white of the eye with warm white. Paint the circle of color for the iris, ensuring it touches the top and bottom lids. For blue eyes, I use oyster white and Prussian blue. For hazel eyes, like this doll, I use light washes of burnt umber light and chromium oxide green.

B. Add the secondary highlight. Mix bright white (such as titanium white) with the iris color, and paint a light semi-circle in the area opposite to where you will apply the highlight dot.
C. Add the black pupil dot.
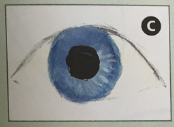
D. Add the white highlight dot. Position the dot opposite to the secondary highlight. You can add mixtures of blue and white (or burnt umber light and chromium oxide green) to the iris to add additional texture. Shade the top third of the eye with a very subtle mixture of grey.
DOLL: ASSEMBLING THE PROJECT
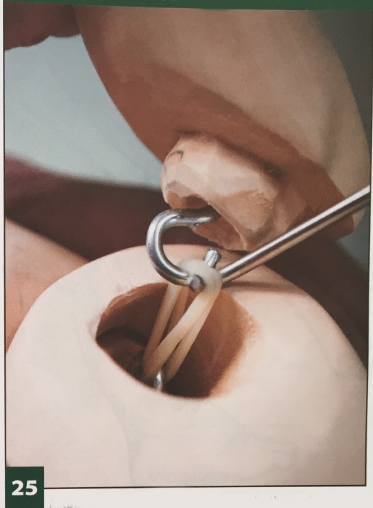
25. Attach the legs. Paint the doll and let it dry thoroughly before assembling it. Screw eye hooks into the indents in the attachment posts on the arms and legs. Using a doll-jointing rubberband with a 3/8" (10mm) outside diameter, double the band inside the hook in one leg. Use a strong hook, such as a large crochet hook, to reach through the body and grab both loops of the doubled rubberband. Pull the band through the leg hole and catch the ends in the hook in the other leg. You many need help holding the body as you stretch the band.
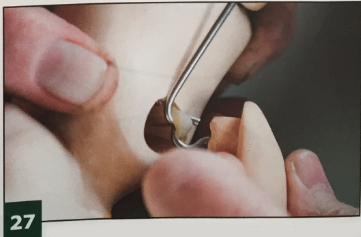
26. Adjust the legs. Reach between the body and leg with pliers and grasp the screw eye. Tighten it by holding the eye firmly and turning the leg on the screw. You may need to do this with both legs for them to hold tight against the body. Because the rubber band is doubled, the loops on each end of it are perpendicular to each other, and this will make one leg kick forward or backward. To correct this, make sure one screw eye has the opening of the eye at the top of the leg, and one has the opening facing the back or front of the leg.

Attach the arms. Hook a doll-jointing rubberband with a 7/8" (22mm) outside diameter over the screw eye in one arm. Reach the hook through the body, catch the band, and pull it through the body. Insert the band into the screw eye on the other arm. The arms are usually easy to install.
DOLL PATTERNS
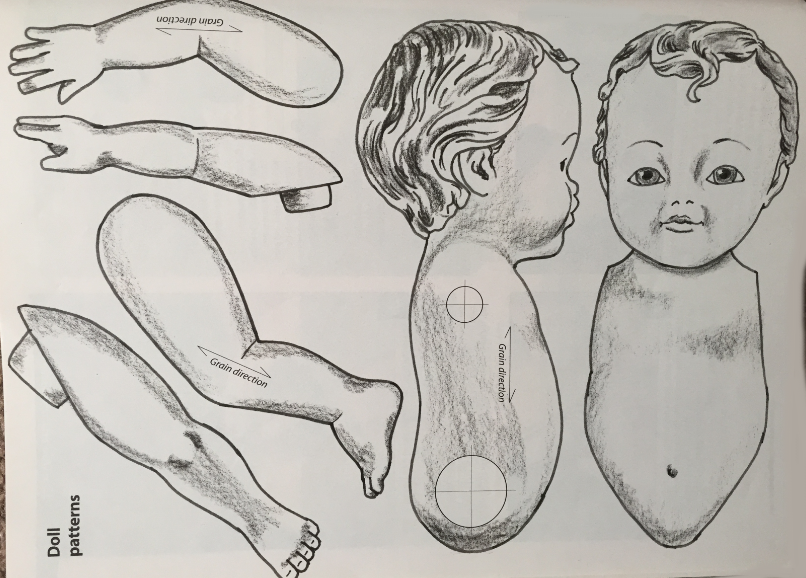
MATERIALS
- Basswood, 3" (76mm) thick: 3" x 15" (76mm x 381mm)
- Heavy-duty doll-jointing rubberbands: 7/8" (22mm) and 3/8 (10mm) outside diameters
- Screw hooks, 3/8" (10mm) diameter: 4 each
- Sealer, such as Deft satin lacquer
- Golden acrylic paint: burnt umber light, Prussian blue
- Acrylic paint: alizarin crimson, antique white, burnt umber, earth tones, Naples yellow hue, burnt sienna, chromium oxide green
- Sandpaper: assorted grits from 150 to 600
TOOLS
- Carving knife
- #11 gouges: 1/8 (3mm), 3/16" (5mm),3/8" (10mm), 9/16" (15mm)
- Paintbrushes
The author used these products for the project. Substitute your choice of brands, tools, and materials as desired.
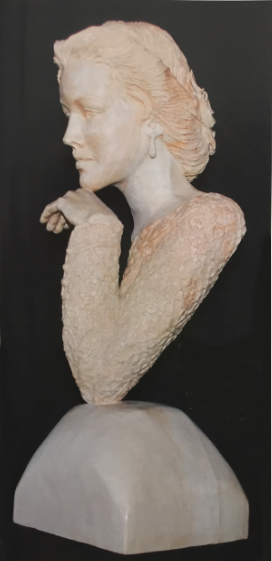
Janet Denton Cordell Gallery
Ellender's Window was carved from basswood and is 25" tall. The sculpture won a Judge's Choice Award at the 2008 International Woodcarvers Congress.
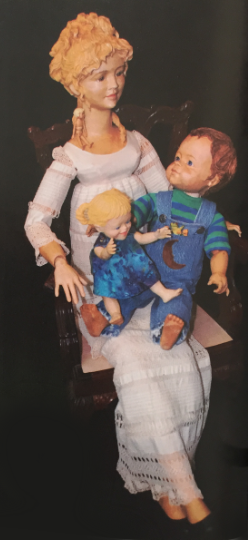
The Lena doll, 40" tall and fully jointed, holds Lovett, 20", and Nellie, 9"/ They were all carved from baswood.
By Janet Denton Cordell
Janet Denton Cordell comes from an Arkansas family with more than 200years of combined woodcarving experience, of which 46 years are her own. Her favorite subjects are Western art and animals, but she is known for her carvings of women and children-Janet is a current Arkansas Arts Council nominee for the Living Treasure Award for her work in dolls.
