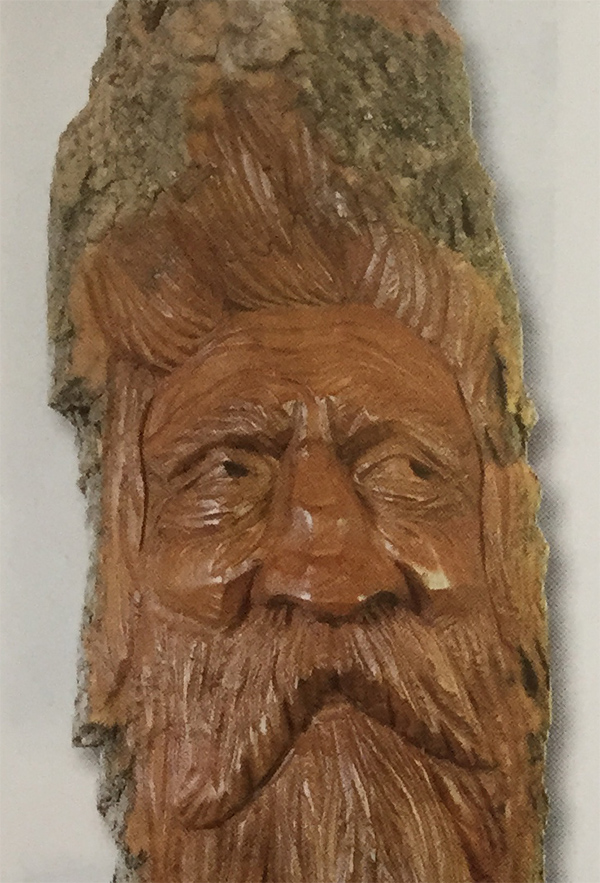
If you have not carved in cottonwood bark, I heartily suggest that you give it a try. I love to carve it. For faces, I like a piece that is at least 3 inches thick and a minimum of 3 inches wide. You need to have larger pieces because you will lose part of the depth during the cleanup process.
There are many kinds of cottonwood bark available. I have not carved all types but would recommend you try whatever you have on hand. If it doesn’t work you can always get another type. Rick Jensen and Jack Williams provide an excellent dissertation on the different types of cottonwood bark in their book Carving Tree Bark. This is a great book and one that I recommend for your woodcarving library.
Of the barks that I have carved, my favorites are Plains cottonwood and Black cottonwood. In the book Carving Tree Bark, Plains cottonwood grows in southern Alberta, central Saskatchewan, and southwest Manitoba, Canada, and south throughout the Great Plains into North Dakota, South Dakota, Nebraska, Wyoming, Colorado, Montana, Kansas, and eastern Oklahoma.
Black cottonwood grows from western Wyoming to Montana, Idaho, northern Utah, Nevada, northern California, Oregon, Washington, British Columbia, the Yukon, and the coast of Alaska. Black cottonwood grows in excess of 6 inches thick and is the very best for carving, in my opinion.
If you are lucky enough to find cottonwood bark in the thickness needed to carve, by all means harvest yourself some. The bark used for carvings needs to come from dead trees. It will take bark from two to three years to loosen on a dead tree. No special tools are required for harvesting bark from a dead tree. Removing cottonwood bark from a live tree will severely damage the tree and this bark is not good for carving. If you are going to carve bark, make sure you get your bark from a dead tree.
I do not live in an area with an abundance of good cottonwood bark. Therefore, I purchase my bark.
I buy it at woodcarving shows and from individual vendors. I buy my bark from Alex Bissof of Billings, Montana. I have never been disappointed with the bark that he sends me.
Carving Tools Needed:
- #5-50mm Gouge
- #3-35mm Gouge
- #11-12mm Gouge
- Pow R Arm vise
- Super Glue
- Zip Kicker
- #41-14mm V-tool
In addition, I have also heard good things about Art Olver—“The Bark Guy"— of Pacific, Washington. I also saw an advertisement in Carving Magazine for Chipping Away, and it showed great pieces of bark. You can also view the online catalog at www.chippingaway.com. If you have another distributor, then by all means get your bark there.
For bark carving, I like to use the largest tools I have. For instance, I use a #5-50mm gouge to clean the bark.
I find that this tool allows me to clean the bark in a hurry. I'm impatient, sol always want to get to the good stuff as soon as possible. If you do not have a 50mm, use the largest tool you have. I will be indicating the tools I used in the following steps. If you do not have these tools, use the ones that you have and are comfortable with. Also, I might not mention the size of the tool in some steps because that will depend on the size of your bark. Again, my suggestion is to use the largest tools you have for each of the following steps.
The piece of bark that I selected for this project was 5” wide, 2 1/2" inches deep, and 14” long. I always suggest that a larger bark carving be done using a holding device. In this case, I am using a Pow R Arm vise. However, you can use anything.
I have screwed bark to a 2 x 4 that was placed in a standard vise. Another good way to hold bark is on an adjustable carving arm with a carving screw in the back.
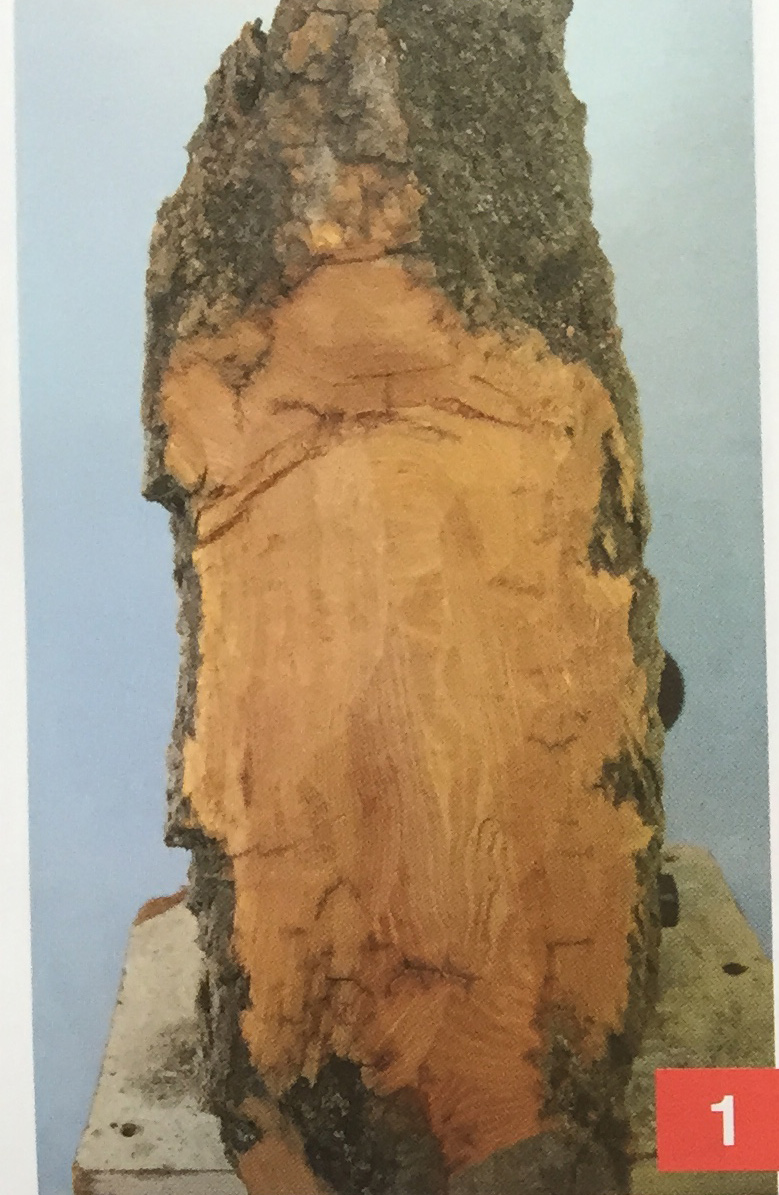
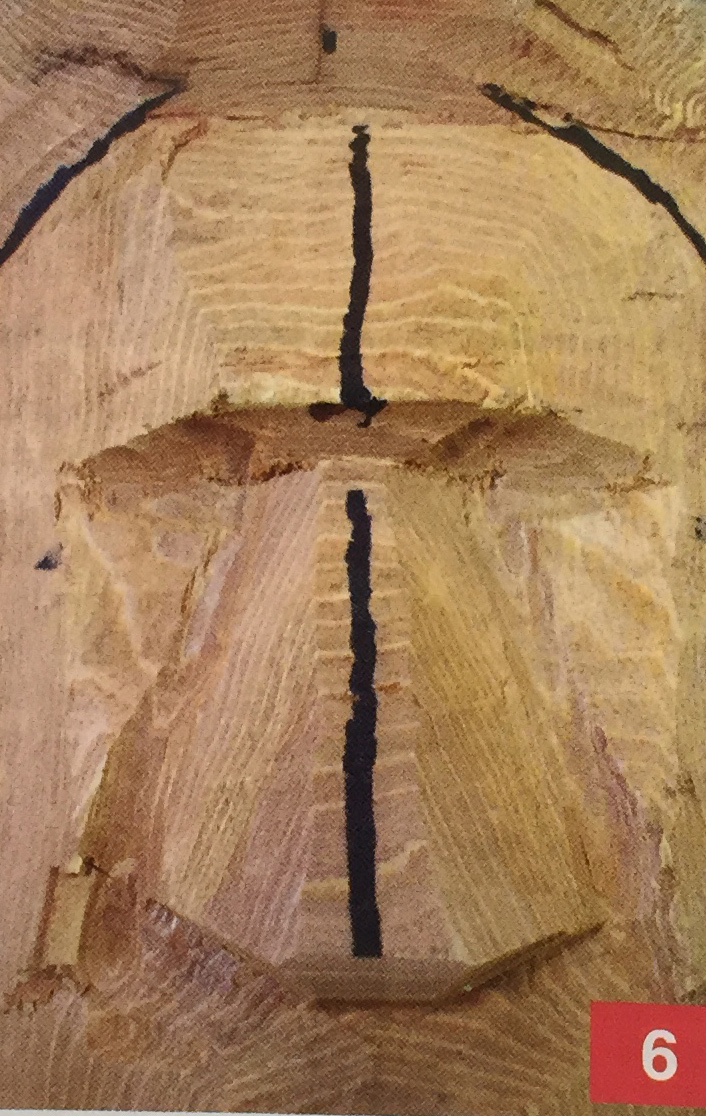
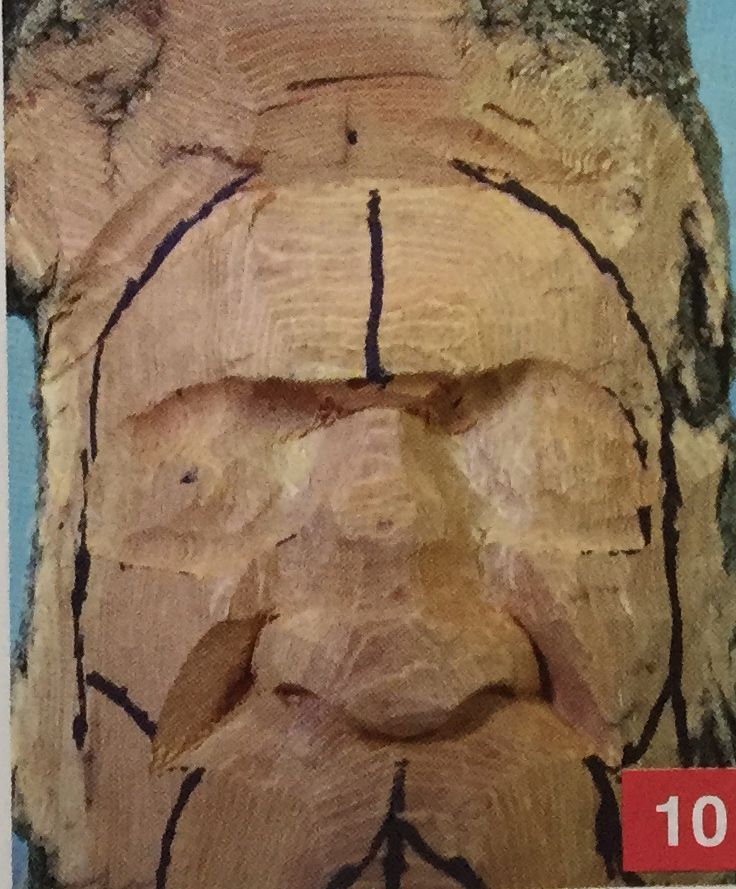
1. I used a #5-50mm gouge to clean the bark up to this point. Notice, I have cleaned the bark from side to side. I want to utilize most of the depth of the bark for my carving.
I hate to see a nice large piece of bark with a small carving setting out on the front edge. My suggestion is to utilize as much of the bark as possible. Notice that I have cleaned the sides in the same manner that I would carve a face into the corner of a block of wood. I have left a small flat ridge across the high area to utilize in my face carving.
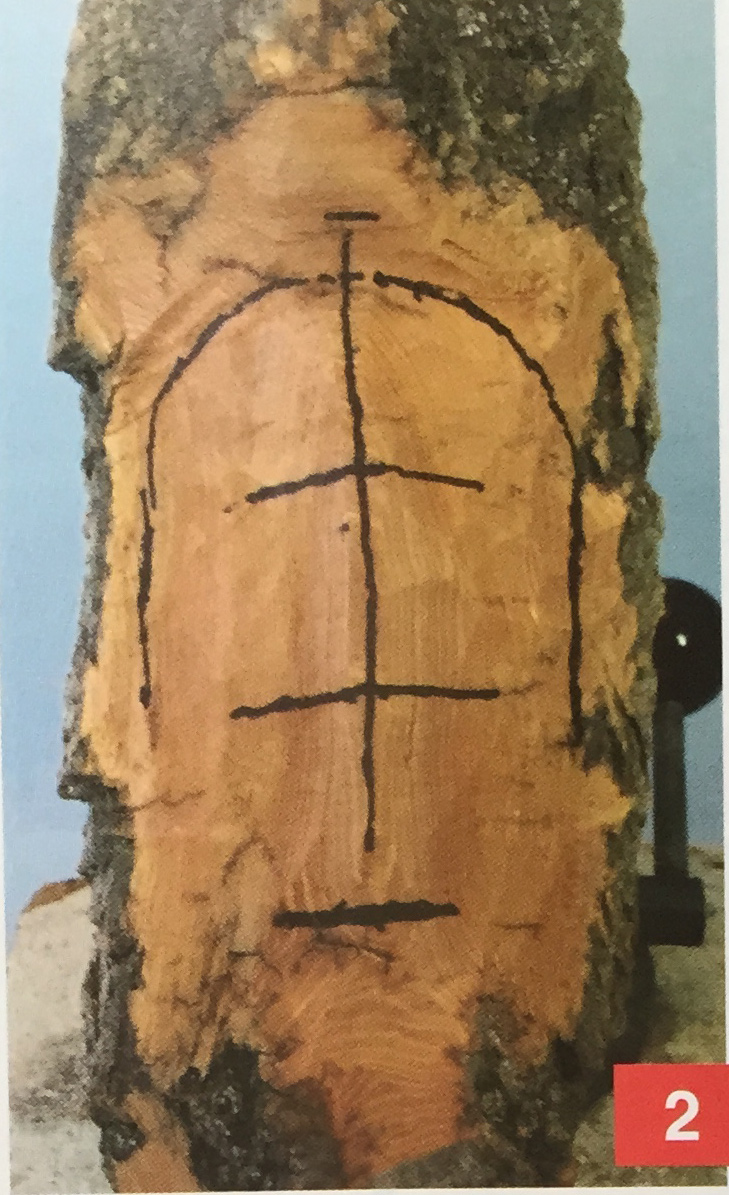
2. Next, we need to establish the centerline and additional lines to lay out the face. I have measured my bark and established a width of the face af 3 1 /2" wide. Anatomy books tell us that the length of the head is 1.6 times the width of the head. I’m lazy, so I generally calculate the length at 1 1/2 times the width. Therefore, our head is 5 1 /4" from top to bottom. By looking at the lines on my carving, you will see that my hairline is lower than the top of my head. Check your hairline in a mirror and you will see that this is the case.
I have provided 1/2 inch for the difference. The facial features are generally split into thirds from the hairline to the bottom of the chin. If you have a full head of hair, check this out on your own face. With these lines drawn in place, we are now ready to start carving.

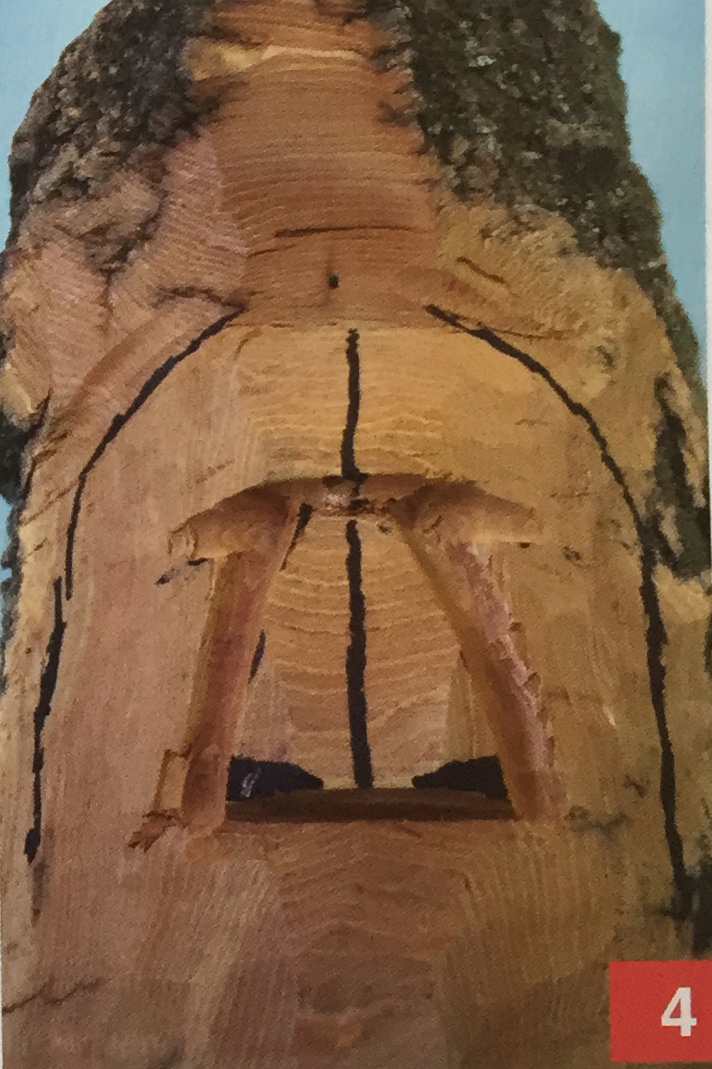
3 & 4. Next, I will take a #11-12mm gouge and cut across the line that I drew for the eyes and across the line that I drew for the bottom of the nose. Make sure that the line for the bottom of the nose is near the top edge of the gouge so you don't take too much length off the nose. Also, my woodpirit is going to have a bushy mustache. Therefore, I did not go very deep under the nose. I went in just over 1/4". Whoops, when I was making this cut, my nose separated from the rest of the bark. This happens often when carving bark. It is easy to repair because bark is so porous. I keep thin consistency Super Glue and Zip Kicker handy when I'm carving bark for such instances. I simply lifted the separated nose, soaked it with Super Glue, pressed it in place, and sprayed it with Zip Kicker. Trust me, this will happen to you... don’t stress, just fix it.
Now that I have the top and bottom lines in place for the nose, I take a #3-35mm gouge and slope the nose back from the bottom line into the channel we previously carved for the eye line. This cut establishes the slope of the nose. At this point in the ball game, I can always take the line back farther if I decide it needs to be back. Also, I used the same gouge to slope the forehead back. If you will notice, the head generally slopes back from the tip of the nose to the top of the head. If we don't take the forehead back, as well as the nose, we lose this slope. I took a side-view photograph to show how I've sloped these areas back.

5. After I finished sloping the nose and forehead, I drew lines for the sides of my spirit’s nose. I’m going to take the same 11mm gouge used previously and set each side of the nose. Start at the bottom and take the cut to the bottom of the eye channel. I have intentionally left the nose wide. Also, leave some width at the top. The nose does not make an inverted hard V at the top. Remember, it will narrow every time you cut on it. If you don’t start wide, your nose will become very narrow and skinny looking. As you will see, I like my woodspirit noses to be large and have lots of character. Notice that I have darkened in the area of my next cut. As John Burke says, “The nose should look something like an inverted coffin” when all the cuts are made.
6. Here the nostril area is angled. Be careful not to make this area too sloped. He can get awful “character looking” in a split second by taking this area up too high or leaving it too flat. Study the picture carefully.
Here you see the shape of the nose as described above. Hopefully, your carving looks similar to the photo at this time. If not, take a few minutes to work it over and try to get the nose area as similar as you can. After you are satisfied with the shape of your nose, we can now start rounding things up a bit. First, I nib off the end of the nose so there is no hard line on the ball of the nose. Next, I take my bench knife, or a #3 gouge, and round the nose over. Make sure you leave the curve of the #11 gouge at the bottom of the nose, as there is no hard line in this area. If you develop a hard line when you are rounding the nose, simply remove it with the same #11 gouge you previously used.
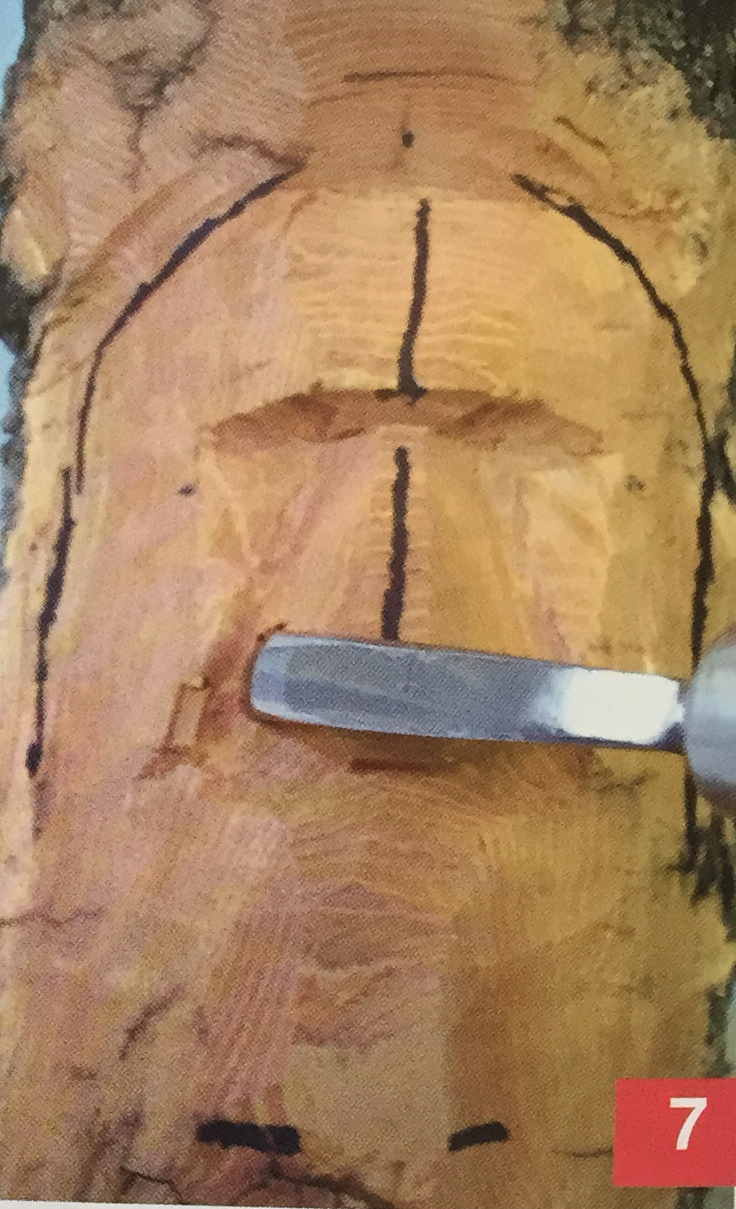
7. Many carvers stop here and wonder why they have a flat face. Check your face in the mirror, and you will see that the nose is twice as deep as the septum area of the face. In our man’s case, he has a heavy mustache, so a lot of wood needs to come off by the side of the nostril. To keep from having a flat face, you must round the face from the nose to the sideburn area. In addition, you need to make a three-corner chip cut on each side of the nose. Since we started out with a rounded structure, all we need to do is make the chip cut. First, I'm going to take a #5 gouge, place it on the side of the nose and push it in at the angle we established for the nose. Study the photo to see how this first cut is made. Notice how I have pulled the handle of my gouge over so that the tool is resting on the angle that we previously made on the nose. Now push it in deep. Do the same cut on both sides of the nose.
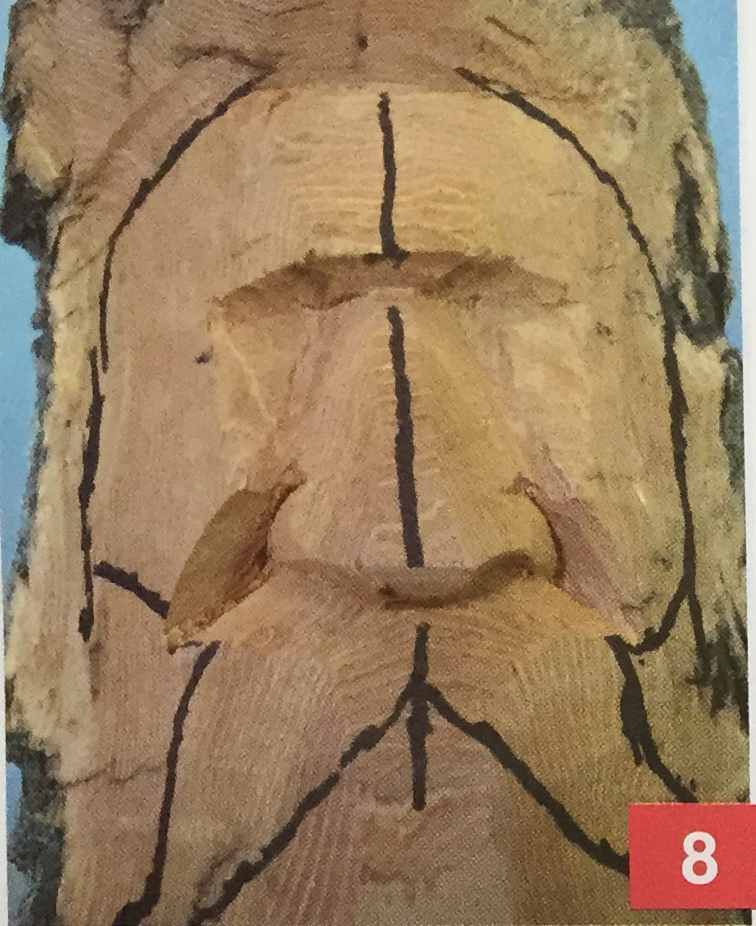
8. Notice here that I drew in the approximate shape of the mustache before I made the rest of the cuts.
I don’t like my mustache, beard, or hair to be too smooth or straight, so I generally swing things around a bit. Check out the photo. After pushing in the gouge, I used my bench knife to cut along the top of the mustache and then cut down to meet this cut. Now I ask, “Who said we aren’t chip carvers?” Check out the depth of these two cuts. In no way does the nose sit flat on the face in this carving. Also, note that I have rounded over the top of the mustache in the area that the chip cut was made. Finally, use the same gouge that you used for the side of the nose and cut in both nostrils.
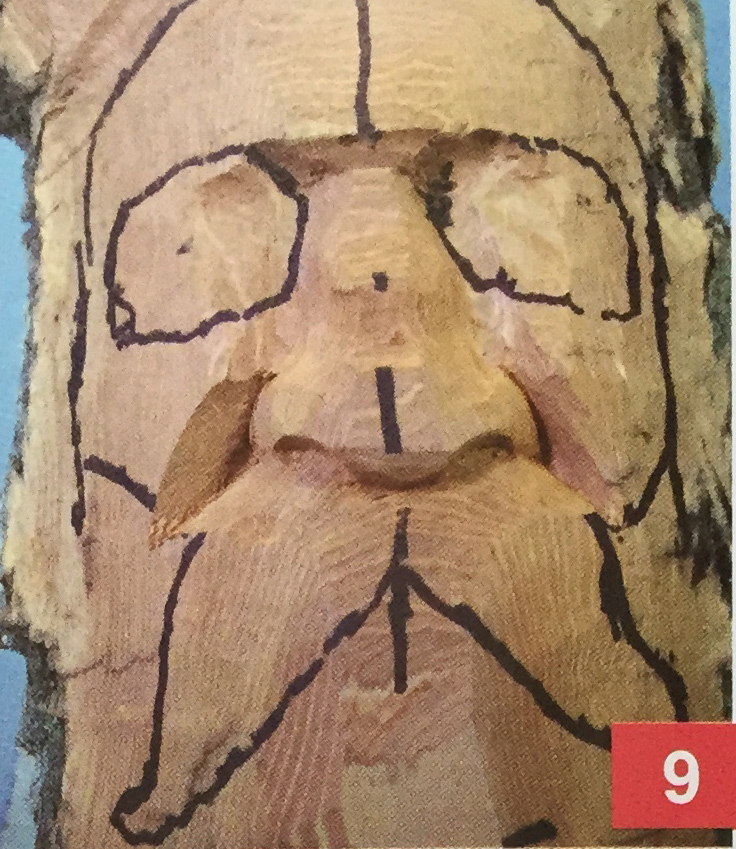
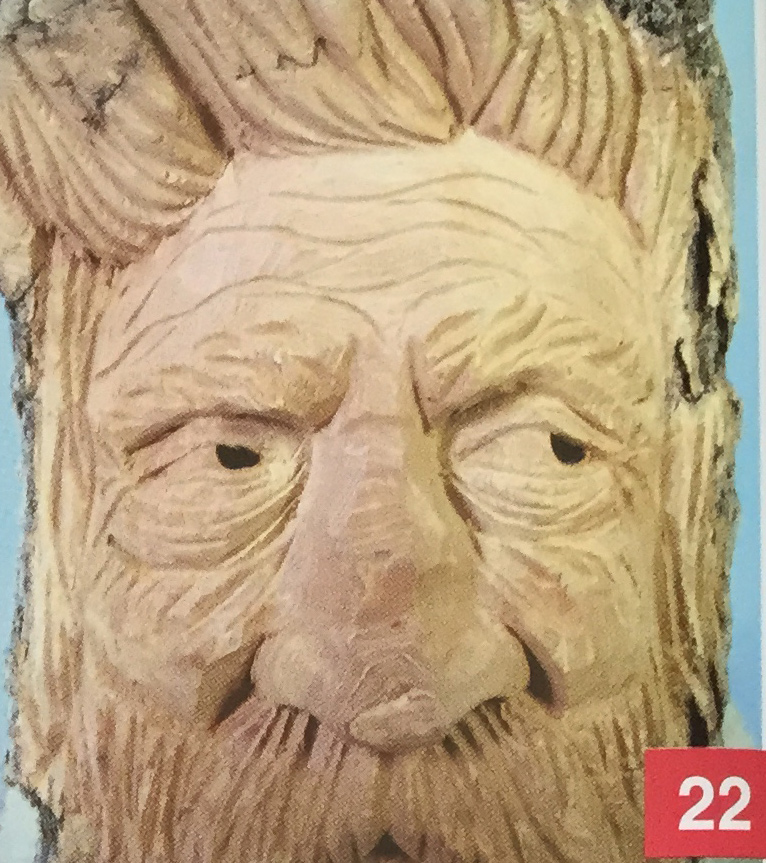
9. I will now set the inside depth of my eyes and finish out my nose structure. You can carve yours to suit you. Personally, I like a rougher nose on my woodspirits. I will exaggerate some of the cartilage bumps in the nose and generally shape it to suit my taste. After I finish shaping the nose, I draw in the eye sockets. Notice how large they are. Generally speaking, the bottom of the eye socket goes down the nose about halfway. Don’t skimp here or you won't have enough area to give your spirit a proper eye structure. Also, note that the sockets I drew resemble the shape of a pair of aviator sunglasses.
10. I’m now going to use my #11-12mm gouge to carve this area and create a good foundation for the eyes. Keep in mind that the inside of the eye is the deepest part. Go deep here so you can round the eye mound. Okay, are you satisfied with your eye orbital? Oh yes, did you notice when you were shaping the nose and the eye orbital how much more wood came off the nose. Now you can see why I stressed leaving the nose wide at the beginning of this article.
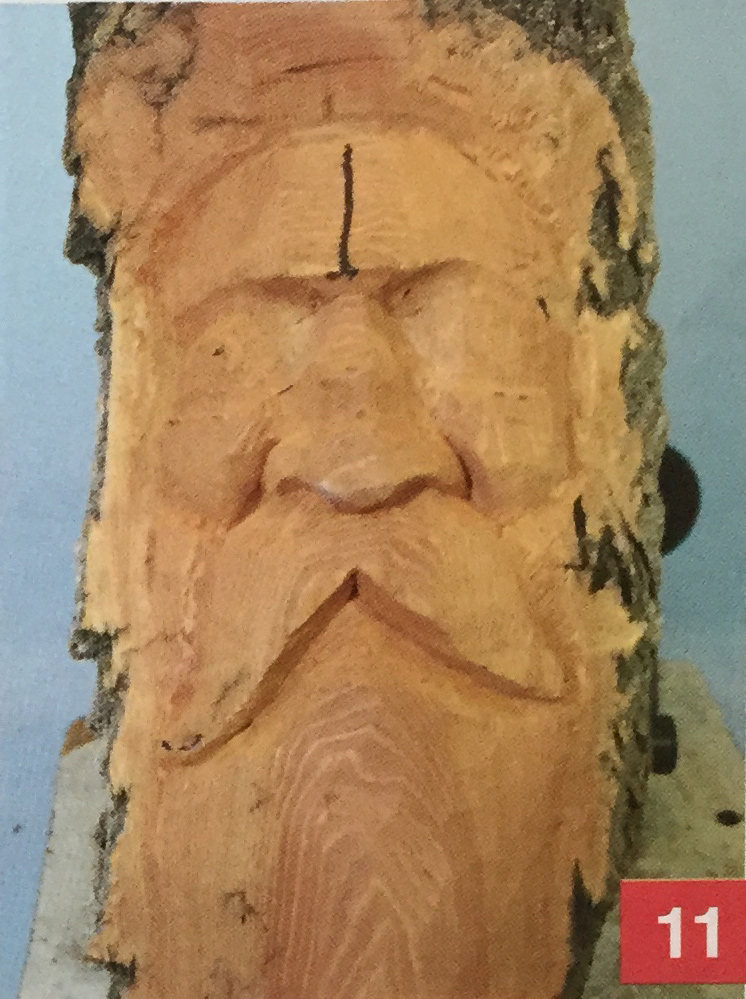
11. Next, we are going to shape the mustache and cheek area. Our first step will be to take our #11-12mm gouge and outline the top of the mustache that we drew previously. Remember, give your mustache some movement. I like to use a round gouge on top of the mustache, as it generally lays down on the face, unlike the bottom of a bushy mustache. After we get the top of the mustache carved, we will take a V-tool and cut in the bottom of the mustache. In my case. I’m using a #41-14mm V-tool. Use a large tool in this area to get a good positive cut. You will most likely notice that I have taken away more bark and smoothed up the face a little to make room for a good beard. I keep going over my carving as I go along to make sure that nothing gets left behind. I would encourage you to do the same. Just don't put in the detail until you are ready for it.
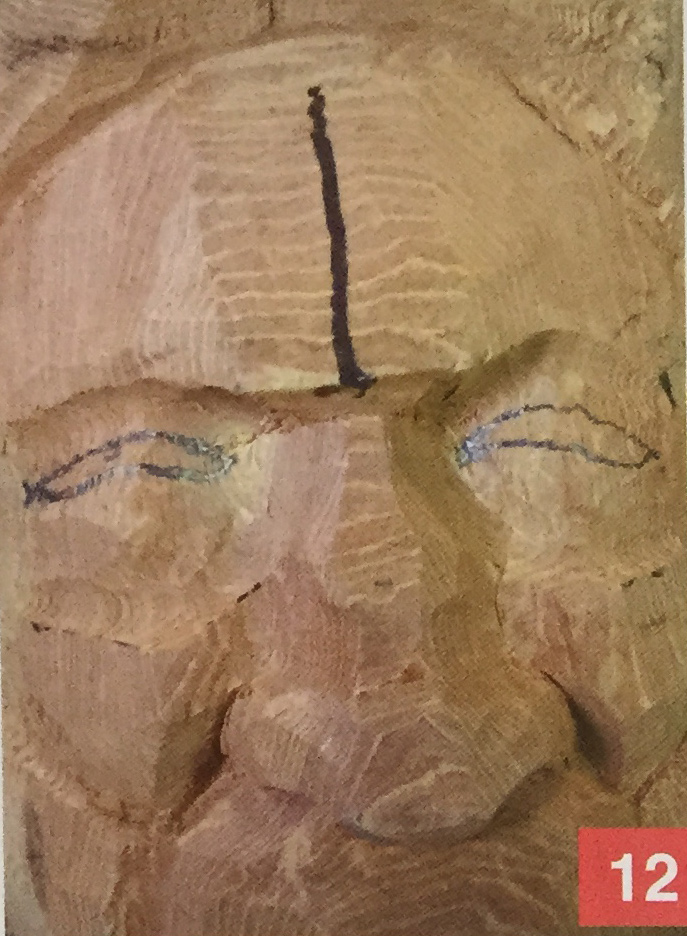
12. Now, this old boy is adamant in that he wants to see what has been taking place! Let's go ahead and cut in some eyes. An artist will tell you the head is five eyes wide. Realizing that this is not fine art and not meant to be judged, I will most generally fudge just slightly. My eyes will probably equate to about 4 1 /2 eyes wide. I do recommend using a pair of calipers to measure the eyes. They need to be the same width (or nearly so). Measure twice and cut once. Also, we don't want our woodspirit to look bug-eyed. To keep this from happening, I don’t lay out the eyeball like a foot ball. I will put a nice arch in his upper eyelid, as shown in the photo above. To keep the eye from getting too wide, I will pull up the bottom lid slightly. Study the drawing on my carving to see what I’m talking about here. Also, notice how the arch on the right side is slightly higher than the arch on the left and how the right eye is slightly higher. Check out the mustache—it swings up and to the right more than the left, suggesting the right side of the face is arched slightly higher than the left. At this time, this is the look I'm after. If things don't work out for me, I can always adjust things a bit if needed.
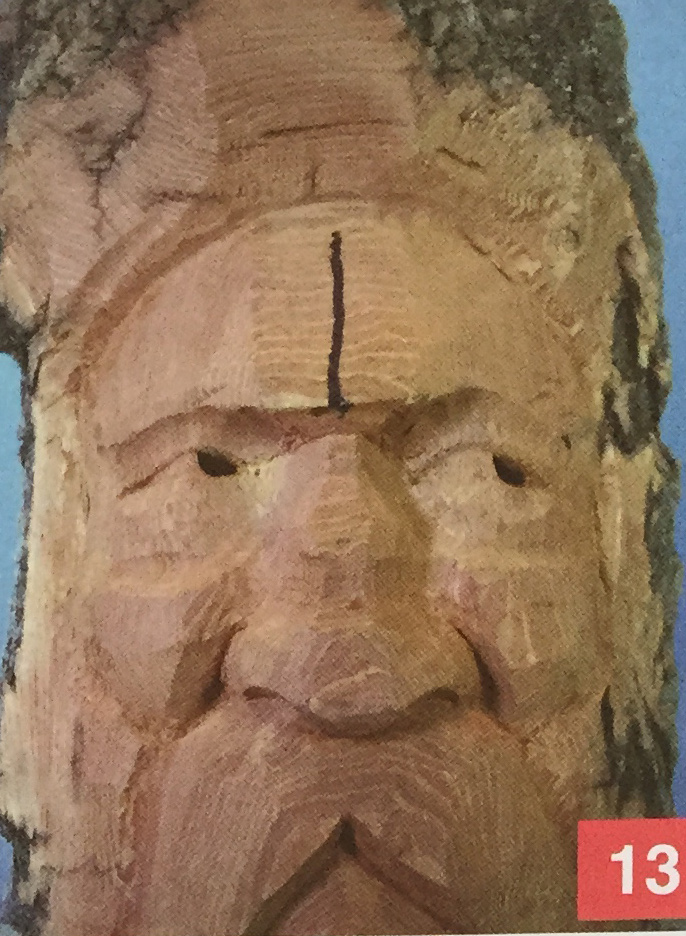
13. Here I'm going to cut the eyes in. Remember, the eyeball is round, so don't carve it flat. First, I’m going to stab my knife in fairly deep and back toward the center of the eye just a bit on the top and bottom of the inside of the eye. Next, I am going to lay the knife on the eyeball, at the same angle we previously carved the eye, and take a three-corner chip out of the corner of the eye. Here we go, chip carving again! I’ll do the same step to the outside of the eye, and then simply connect the center of each line to the outside and inside cuts. Relieve the center of the eyeball slightly. Now smooth the eyeball. Don't take the eyeball in too deep and spend extra time here. The smoother the eyeball, the better the carving will look. I use a sharp-pointed detail knife to carve the eye. Notice that there are no holes in either side of the eye. Also, I went ahead and put the pupil in. Typically, I wait awhile but I thought the eye carving would show up better if I finished this part. I used a #4 gouge to put the inverted pupil in. The size of the gouge will depend on the width of your eye. Study mine and try to match it if you like what you see. I then woodburn the pupil to give it some life.
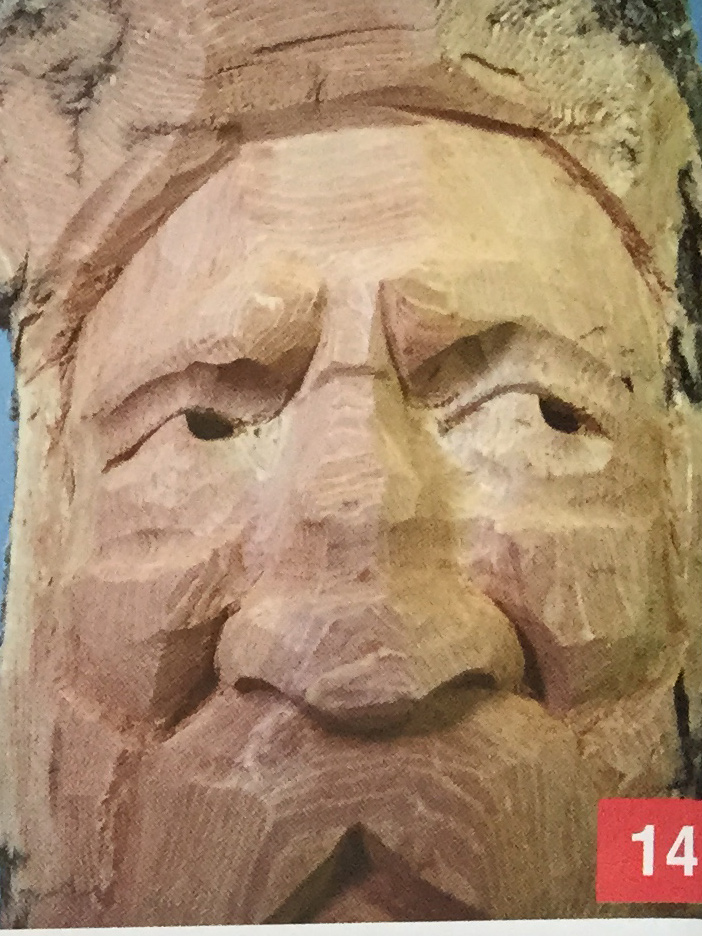
14. Now I think we will work around the eye, putting in some eyebrows, eyelids, and some heavy bags under the eye. I started with the eyebrow area. I took a #7 gouge and cut between, up, and over the eyebrows to separate them. I then used my bench knife and a #3-20mm gouge 1 to smooth out the forehead area, * Remember to maintain the three 1 levels of the forehead: flat in the 1 middle and slanted on the left and j right sides. I then took a #41-6mm I V-tool and made a cut along each* side of the eyebrow from the top to j the side of the nose. After this was j done, I took a large #3-20mm gouge I and smoothed everything off. This I photo shows the eyebrow area ready I for detail.
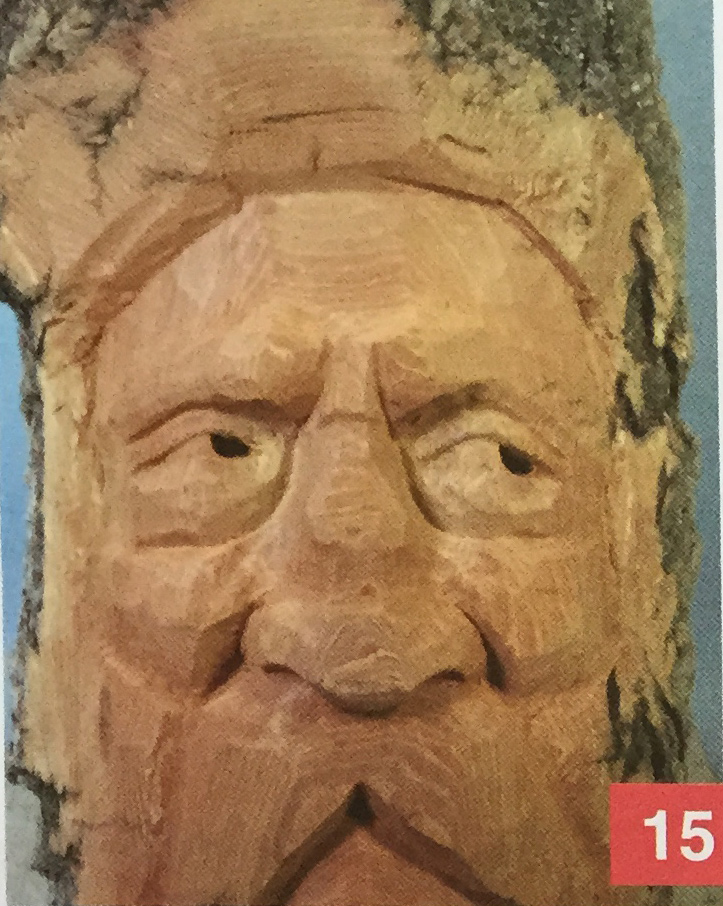
15. Next, I cut in the upper eyelid and outlined the bottom of the eye mound to make a place for some heavy bags under my old gentleman's eyes. This old boy has lived in the woods for a long time. We don't want him to be too smooth. Notice, I have set the area up but have not done any detail yet.
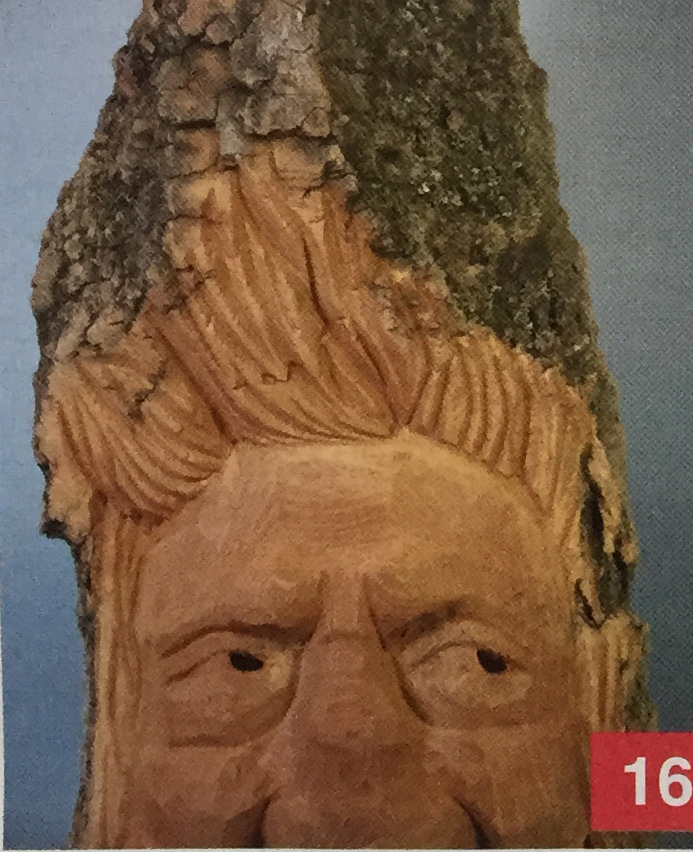
16. Let’s base in the hair. Again, we don't want any straight lines and we want him to have a layered hairdo. Therefore, we are going to start with a #41-14mm V-tool, go down to a 8mm V-tool, and end up using our 4mm V-tool. For the hair, you can use either deep gouges or V-tools. I like a V-tool for a woodspirit. I like gouges if I’m carving realistic. Above all, be sure to layer the hair—no straight lines.
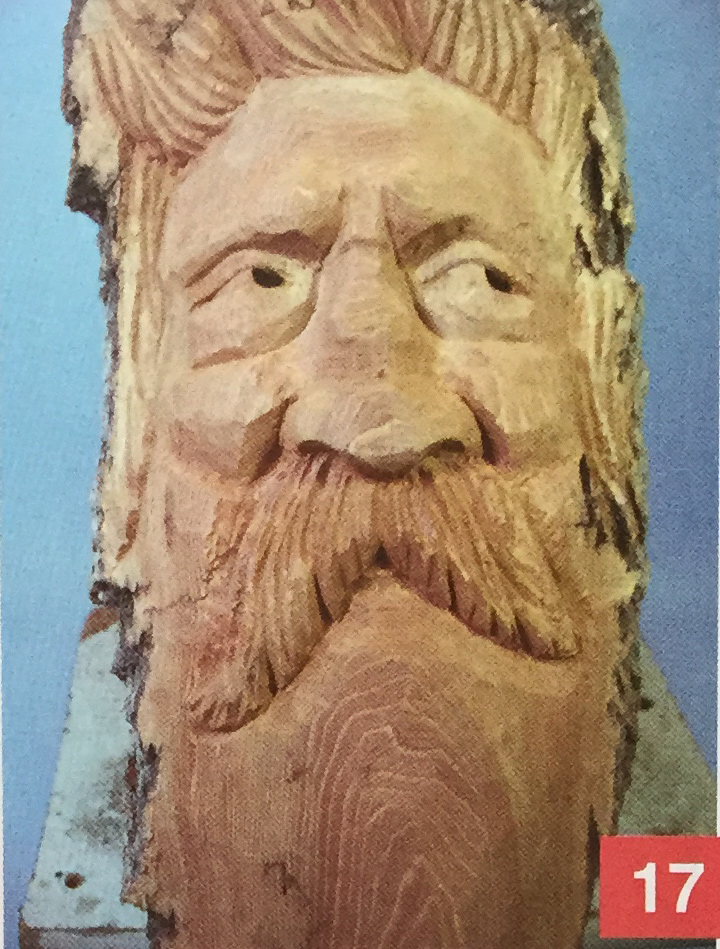
17. Next, I think we will work on the mustache a bit. Again, for wood-spirits, I like the V-tool, and I’m going to layer this hair using different-sized V-tools. However, first, I'm going to put in a hint of the bottom lip. With this old boy's big mustache, not much of the lip will show. He’ll have to comb the mustache out of the way with a yard rake before he can eat.
I cut the lip in with a #1 l-8mm gouge and then tucked it back in under the mustache with my bench knife. I use an 8mm V-tool, 6mm V-tool, and a 4mm V-tool for the mustache. I then cut in a couple of splits on the bottom edge with my bench knife.
Mustache a bit. Again, for wood-spirits, I like the V-tool, and I’m going to layer this hair using different-sized V-tools. However, first, I'm going to put in a hint of the bottom lip. With this old boy's big mustache, not much of the lip will show. He’ll have to comb the mustache out of the way with a yard rake before he can eat.
I cut the lip in with a #1 l-8mm gouge and then tucked it back in under the mustache with my bench knife. I use an 8mm V-tool, 6mm V-tool, and a 4mm V-tool for the mustache. I then cut in a couple of splits on the bottom edge with my bench knife.
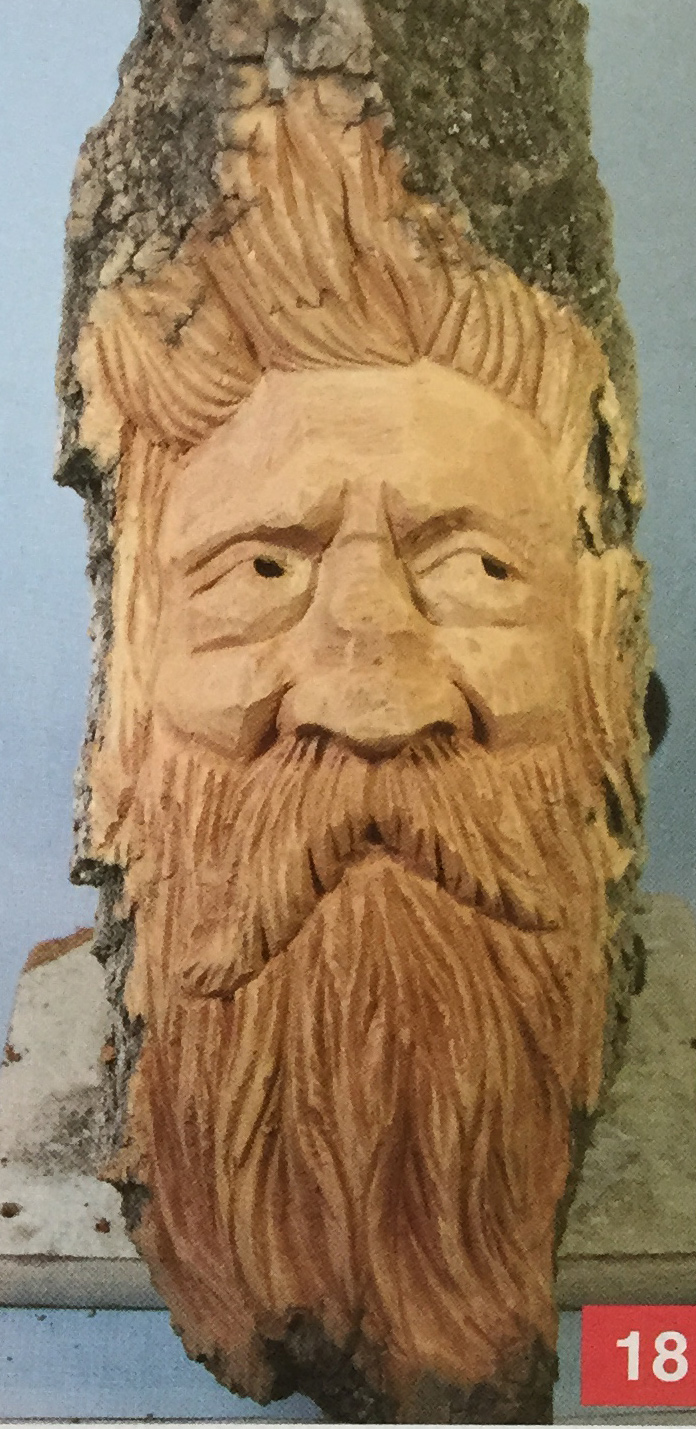
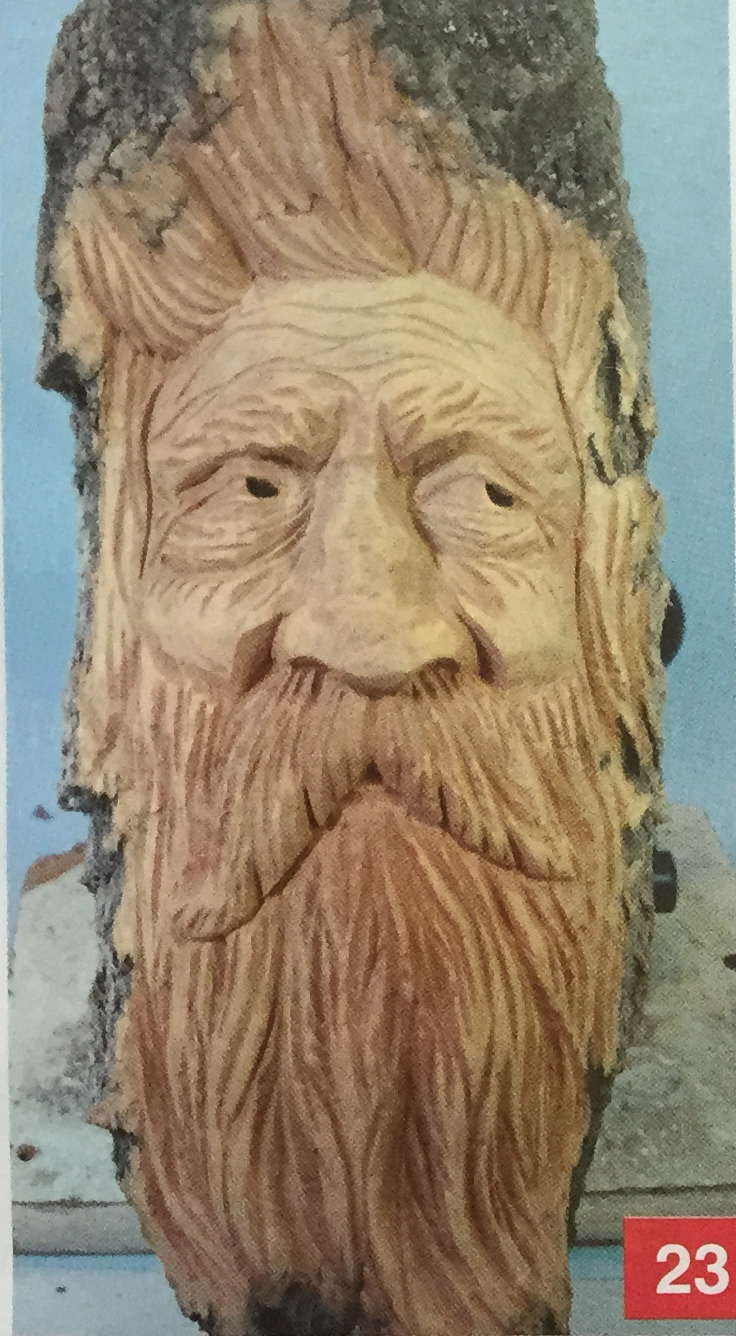
18. Here we carve in the beard. That way, the other woodspirits will stop making fun of him. Again, I’m going to layer the beard and use different-sized V-tools to cut in the hair. Remember, no straight lines, not even in the beard. I used the larger 14mm V-tool to separate the beard into different layers. I then used the 8mm, 6mm, and 4mm V-tools to carve in the hair.
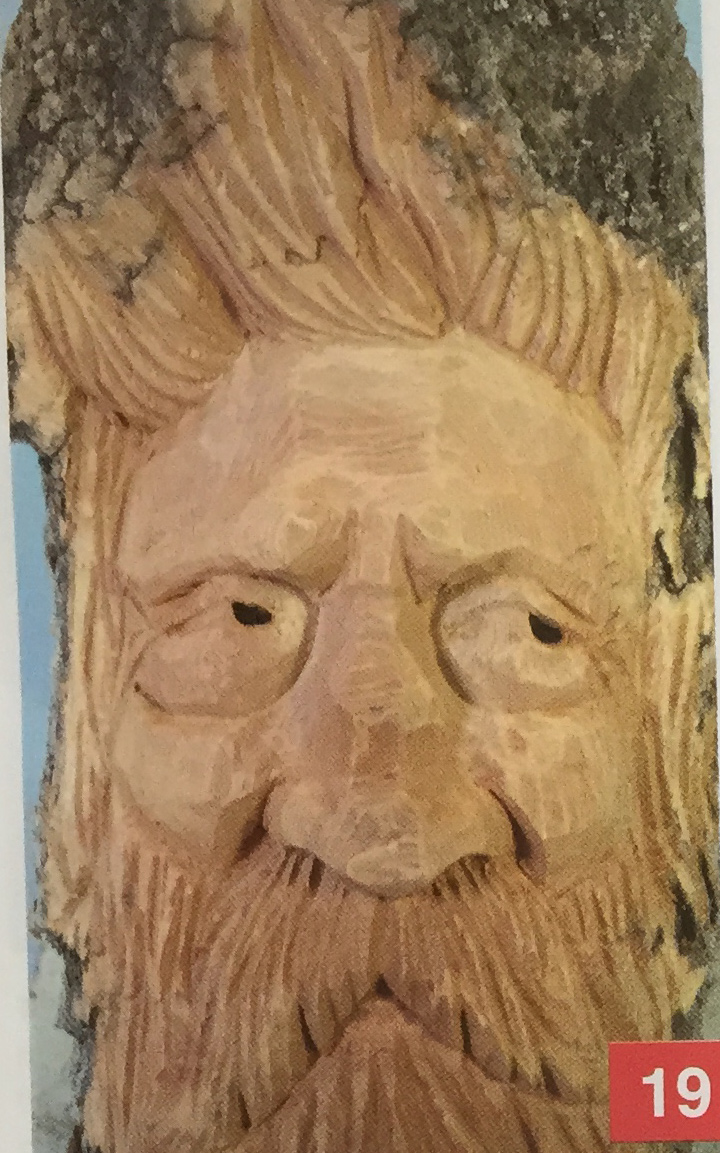
19. I think my old boy is starting to look somewhat respectful now. However, we still have to detail the eye area and wrinkle him up a little. Use your bench knife and take a fairly deep sliver out of each side of the eyelid and each side of the bag under the eye. This will help to add age to your woodspirit.
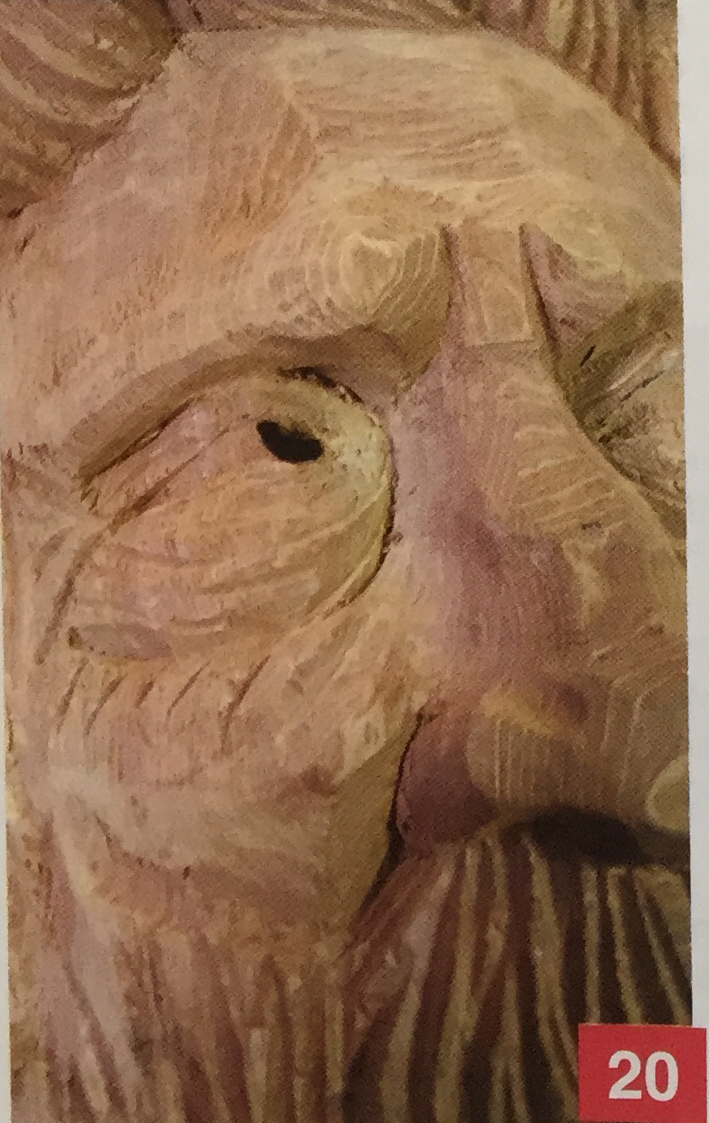
20 & 21. Now that we have a good bag going under our woodspirit's eye, let's go ahead and add some wrinkles. Remember, the skin generally sags with age. Wrinkles generally follow the flow of the skin. Therefore, it makes sense that if the skin is sagging down, the wrinkles should sag down as well. First, I took a #4 gouge and made a slight cut out of the corner of the eye and down the cheek about halfway between the mustache and the bag of the eye. This is a shallow cut, so don’t go overboard here.
Next, I used a 2mm V-tool to add my wrinkles, keeping in mind that they will sag in a downward motion in the middle. Notice that I break the wrinkles up some under the eye to give them more life. After all, we want this old boy to win a beauty contest, don't we? These photos show the left eye and then both eyes completed.
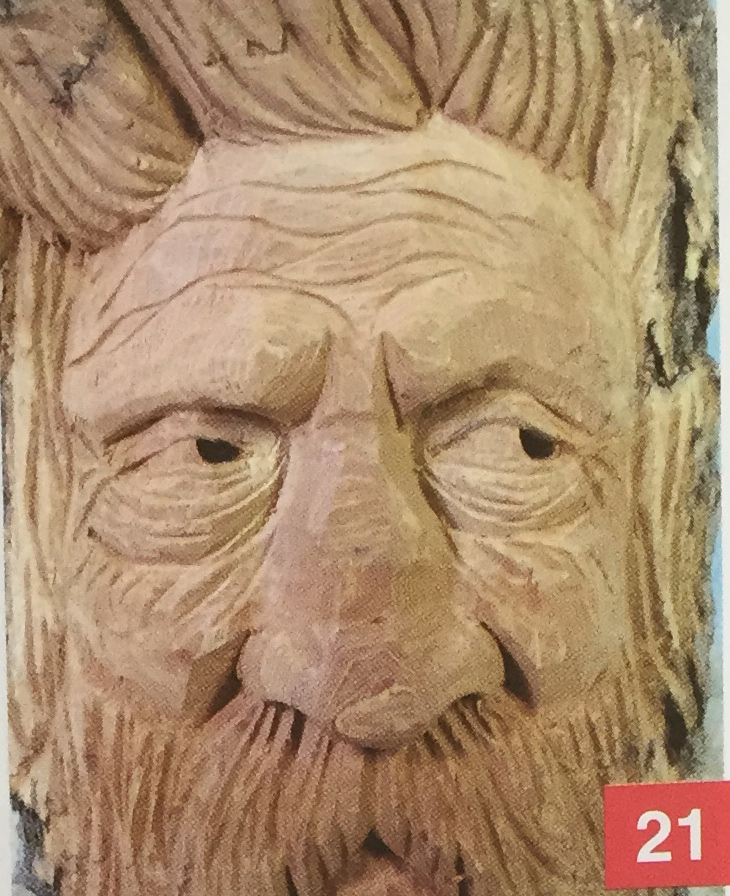
22. Okay, since we are adding wrinkles, let’s work on the forehead a bit. Remember that these wrinkles have a tendency to sag in the, middle and on each side. Again, I’m | going to use my 2mm V-tool. This is a j weathered old man, so give himj plenty of wrinkles but don't get too carried away. Study the photo! showing the wrinkles and thenl “wrinkle him” to your taste.
Since we are working in the forehead area, let's go ahead and finish the eyebrows. Remember, eyebrows: generally grow to the side. They do not stick straight up like blades ofj grass. We want his eyebrows to look bushy, so let's use a couple of different-sized V-tools. I will start with a 4mm and cut in some nice grooves. I will go back with my 2mm V-tool and deepen the very ends of i the cuts I made with the first V-tool. In addition, I will add a few more hairs with the 2mm V-tool where they are needed. Again, don’t get too carried away and put too much hair in the eyebrows. Study the photo showing the eyebrows and see if you like them. If not, finish them to your taste.
23. We have just about finished our woodspirit. I try to carve as clean as possible so I don't have a lot of re-carving to do. I did take my bench knife and make a running stop cut between the hair and the side of fhe face to create a shadow there. In addition, I did a running stop cut under the mustache to create another shadow line there. I like to remove the sharp edges that V-tool cuts can leave on a bark carving. Therefore, I take a piece of worn-out 220-grit sandpaper and knock the sharp edges off a bit. I don’t sand long, just enough to soften the area a bit. He is now ready for finish.
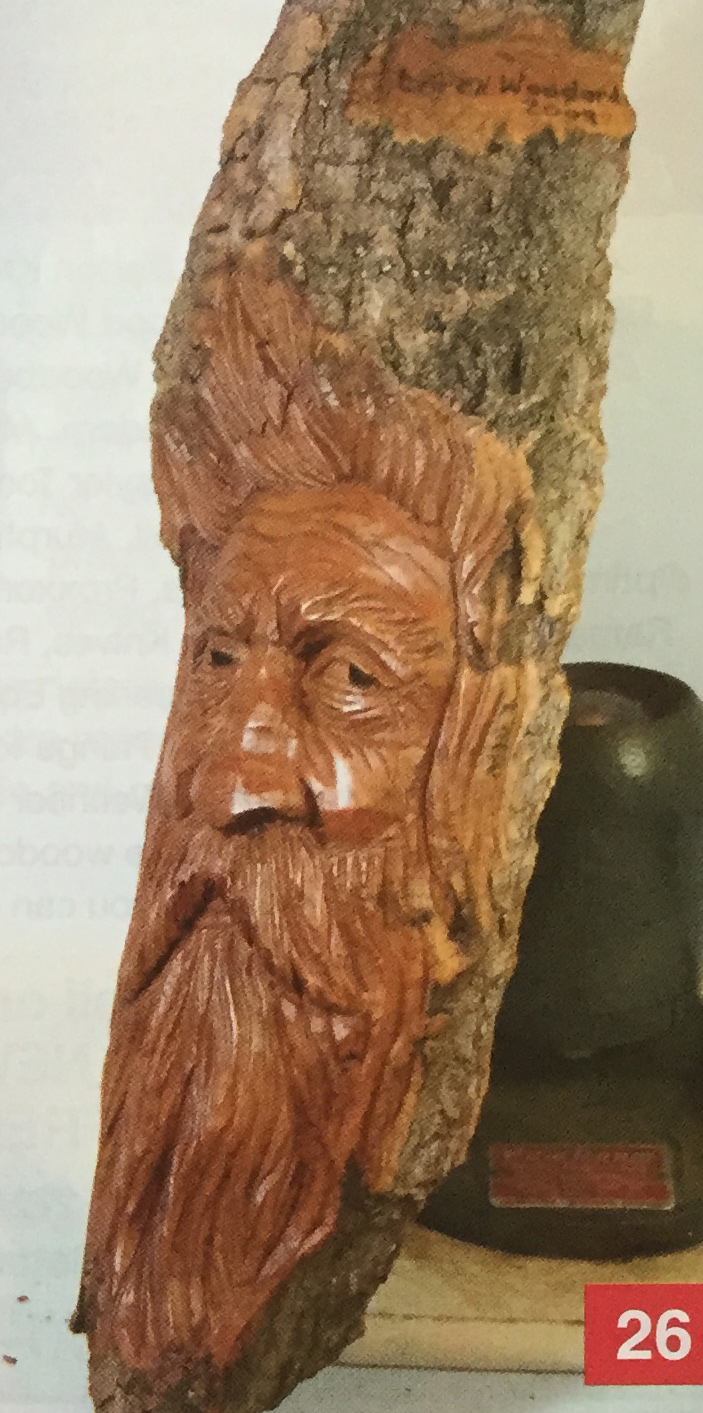
He looks good enough to join the other woodspirits in all their wood-spirit games. Now, that should be fun. But like a good parent, I need to make sure he is fully dressed. Just in case he gets to messing around in the woods and forgets where he lives, put your name on him. I cleaned a small area off at the top right-hand side of my carving, and signed and dated it there. Always sign your work and be proud of it.
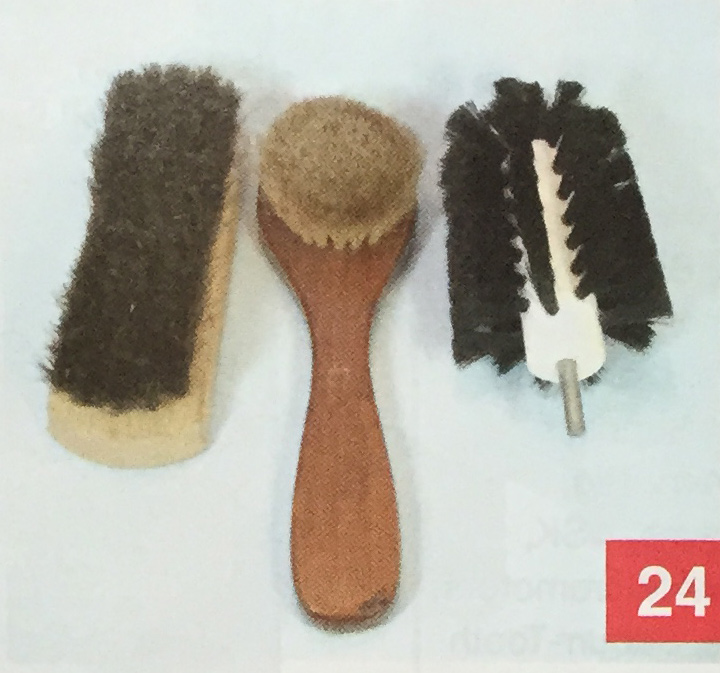
24-26. My finishing technique for bark is very simple. I use either Light Brown or Rustic Pine Briwax. For the color of this bark, I'm going to use Rustic Pine. It has just a slight hint of a reddish color to it and looks great on bark. I do about as many in Light Brown as I do in Rustic Pine, so both colors work well.
Let the wax sit a bit and then use a shoe brush to remove as much wax as you can. Personally, I'm lazy. I bought a circular horsehair brush from Woodcraft Supply in Bettendorf, Iowa, and use that. I chuck it up in my drill and let the drill do the work.
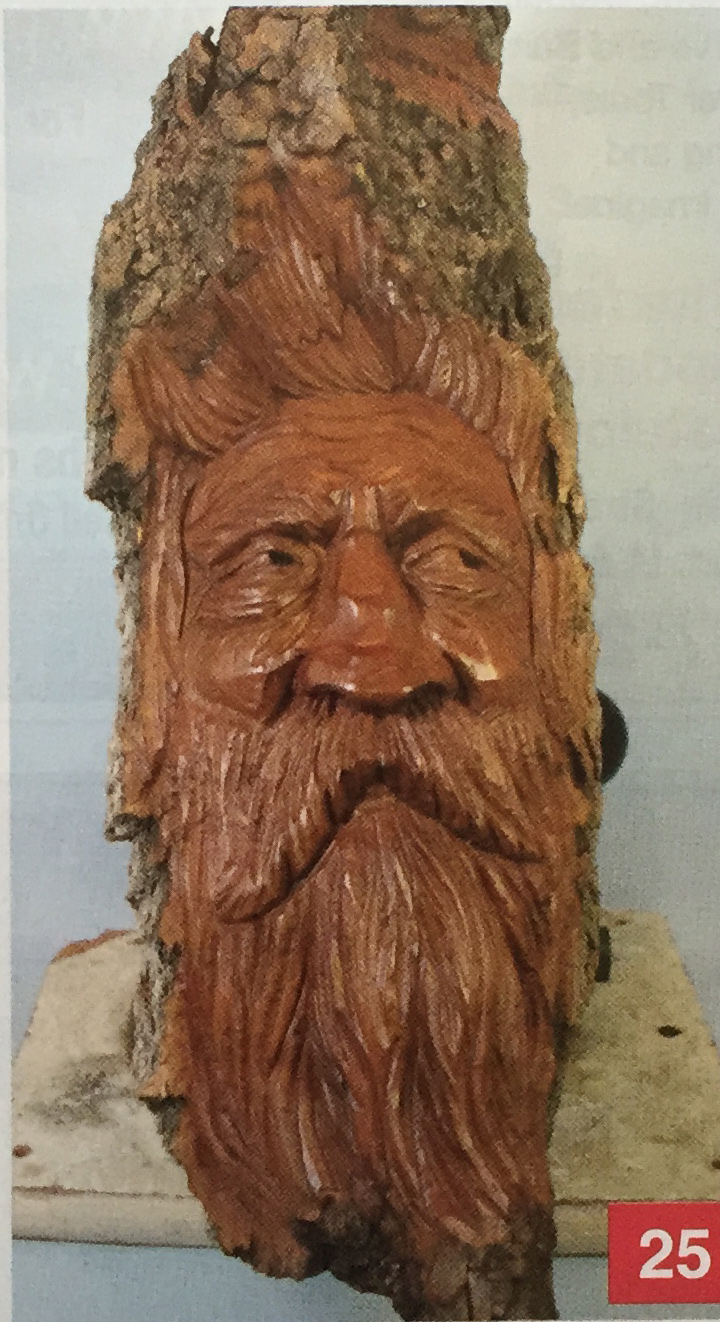
I don't like my bark to shine too much, so I generally stop with one coat. After waxing my piece, I put a hanger on the back and I'm done.
We are done with our carving. Be proud of yours. Put a hanger on the back and hang it where everyone can see him. People love to look at these guys. I hope you had as much fun carving your woodspirit as I did. I would appreciate it if you would e-mail me a picture of your finished product.
About the Author
Loren Woodard lives at the Lake of the Ozarks and enjoys a variety of carving styles. He carves many different styles, but realistic Native American and caricature are two of his favorites.
In addition to his carving, Loren teaches carving seminars at Silver Dollar City, Carv-Fest, various clubs in the Midwest, and beginning carving for the Camdenton school district. Loren teaches classes in bark carving, caricature carving, and beginning carving. He especially enjoys teaching bark carving.
