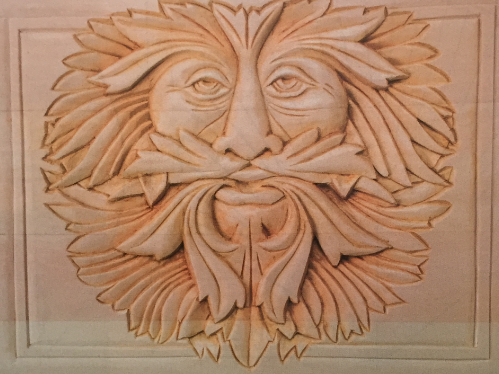
"Reverse relief" design is an easy introduction to relief carving
>For this project the background wood—the wood outside the pattern—is left at the original level of the wood surface. Only the actual design area is carved, creating the appearance in the final carving that the face is sunken into the wood. This low relief carving does not include any undercutting.
Throughout this tutorial, I’ll be referring to the tools in a semi-generic way. The actual sweep and size of the tools is less important than the overall action of the cut. I’ve cited suggested gouge sweeps and sizes in the Materials list, but any tool you have that is close to those sizes and sweeps will work.
I use a thick terrycloth towel or nonslip mat to hold the blank in place while I carve.
GREENMAN: ROUGHING OUT THE CARVING
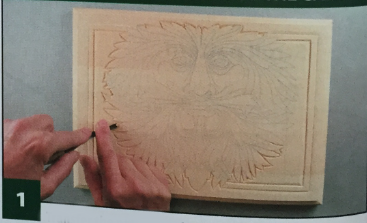
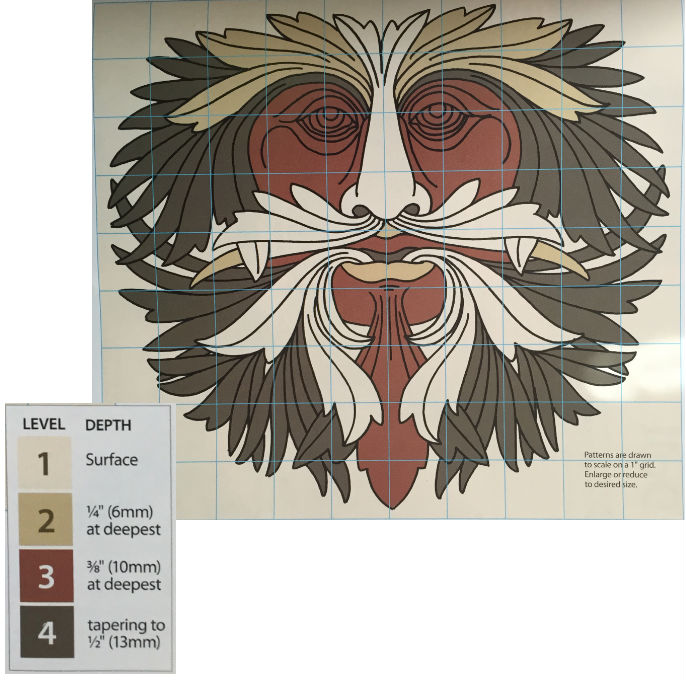
Transfer the pattern and cut the outlines. Prepare the board by lightly sanding it with 220-grit sandpaper. Remove the sanding dust with a dry, dean doth. Use graphite paper to trace the pattern onto the blank. Using a pencil and ruler, measure and mark a border W (13mm) from the edges on all four sides of the blank. Measure and mark a second border W (19mm) from the edges on all four sides. With a V-gouge, carve along the outer pattern lines of the face and along both border lines. With a straight chisel, bevel the sides of the border line cuts.
Cut and shape the background leaves. Use a bench knife to make stop cuts along the pattern lines of the lowest leaf clusters ground the mouth and mustache (Level 1]. With a large and/or. * small round gouge, rough cut the background leaves (Level |apering them from their highest point at the outer edge of the pattern^ their lowest point where they intersect with the face and upper l&f clusters.
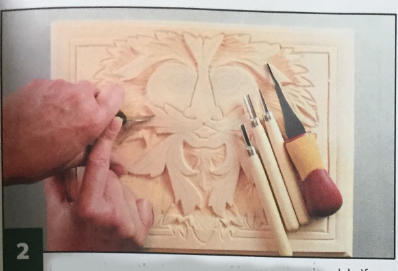
Refine the leaves. Smooth the background leaves, and shape the mouth leaves. Use a wide-sweep gouge or large round gouge to remove the tool marks left from carving the background leaves. With the bench knife, make stop cuts along the leaves extending from the mouth and then round the edges. With a V-gouge, carve a groove in the center of each leaf to simulate a vein. Round the lips with a straight chisel.
Shape the eyeballs. Use a V-gouge to make cuts around the i upper and lower eyelids. Use a straight chisel or wide-sweep round gouge to round the eyeballs. Shape the upper eyebrow area with a straight chisel or a wide sweep gouge.
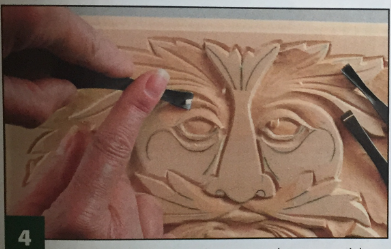
Shape the face. Cut with the V-gouge from the corner of each eye to the side of the face. Round the edges of the face with a straight chisel. Round and shape the area above and below the eyelids (Level 3) with a straight chisel.
GREENMAN: ADDING THE DETAILS
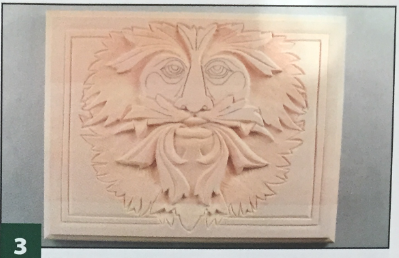
Carve the pupils. Upend a large round gouge and cut the outline bf a three-quarter circle at the top of each eye. Free the ^circular chips with a bench knife. The indented circles represent the pupils of the eyes.
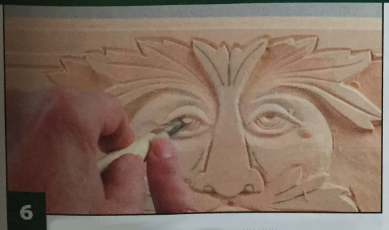
Shape the cheeks and nostrils. Cut along the sides of the nose with a V-gouge. Shape the sides of the face next to the nose (Level 3) with a straight chisel ora wide sweep gouge. Upend a small round gouge and cut the outline of a three-quarter circle for each nostril. Remove the nostril chips with a bench knife.
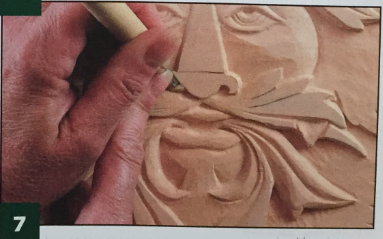
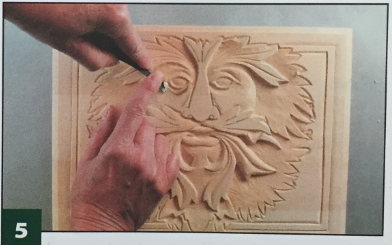
Add the facial details. Taper the nose to its lowest point at the bridge with a straight chisel. With a V-gouge, cut wrinkle lines at the corner of the eyes, under the eyes, and from the corner of the nostrils into the lower cheek area. Finish shaping the mustache leaves, eyebrow leaves, and the leaves at the top of the nose.
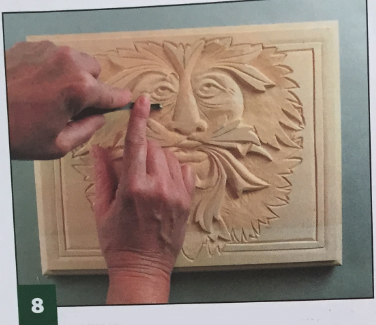
Carve the background details. Use a pencil to mark the detail leaf lines into the lower section of the facial leaves. Make stop cuts along the pencil lines using a V-gouge. With a straight chisel, bevel one side of each leaf to tuck it under the leaf above it.

Finishing the Carving
Smooth the carving by shaving the carved areas with a wide-sweep gouge, bull-nose chisel, or straight chisel. Lightly sand the carving using 220-grit sandpaper, and remove the dust with a dry, clean cloth. Spray two coats of sanding sealer over the entire carving, following the manufacturer’s instructions. Sand after each coat. Sign and date the back of the carving with a fine-point permanent marker.
Following the manufacturer’s instructions, apply one coat of pecan oil stain to the carving. Apply the stain to an area about 3" (76mm) square, and then wipe the carving with a dry, clean cloth. Allow the stain to dry completely. Seal the work with two light coats of polyurethane spray sealer.
The author used these products for the project. Substitute your choice of brands, tools, and materials as desired.
Greenman pattern
MATERIALS
- Basswood, 3/4" (19mm) thick: 9" x 12" (229mm x 305mm)
- Graphite paper
- Sandpaper: 220 grit
- Sanding sealer
- Polyurethane spray sealer
- Pecan oil stain
- Fine-point permanent marker
TOOLS
- Bench knife
- Large and small round gouges, such as a 3/8" (10mm) #8 and 1/8 (3mm) #8
- Straight chisel:3/8" (10mm) wide
- Wide sweep round gouge, such as a 1/2" (13mm) #3 gouge
- V-gouge or V-tool: 1/4" (6mm) 90°
- Bull-nose chisel: 3/8" (10mm) wide
- Pencil
- Ruler
- Thick terrydoth towel or nonslip mat
- Soft, clean cloth
By Lora S. Irish
Lora S. Irish is a prolific designer and author. Lora is the author of several how-to woodcarving books, induding Relief Carving Wood Spirits.